Landscape photography laws. How to photograph a landscape correctly and what you need to know to get masterpieces? Tilt-shift in landscape photography
Landscape photography is an incredibly fun type of photography that requires the photographer to know the basics of not only photography, but also painting. Landscape photography has always been and remains a popular and interesting genre. Photos of architecture and nature are in great demand in the photography market.
Filtered landscape photography
Horizon level in landscape photography
 When shooting a landscape, it is important to keep the horizon level in mind, and to keep the horizon line flat and not cluttered. This is especially important when photographing seascape. There is a grid in the camera's viewfinder and monitor during Live View shooting to help you create the correct horizon.
Clear photos in a landscape
 Author: Xin Hua
 Depth of field is an important factor when shooting landscapes. In landscape photography, photographs are encouraged where most of the frame is clear and sharp. To increase the depth of field, you need to photograph with a narrow aperture.
Telephoto lens

To achieve the widest angle of view it is worth using an appropriate lens, or focal length, but a telephoto lens will also be useful for landscape photography. A telephoto lens allows you to squeeze the elements of the scene, bringing the foreground and background closer together. Thus, the mountain range and foreground background will appear closer to each other, the picture will be richer. Telephoto lenses also help focus attention on a particular subject.
HDR landscape shooting

Exposure in landscape photography

Long exposure in landscape photography will allow you to take beautiful pictures of moving elements. Waterfalls, waves and trees in the wind, and much more will look livelier and more interesting when shooting with a shutter speed of a few seconds. It is known that the use of a long exposure during the day can lead to overexposure of the frame. You want to set your aperture to f16 or less. For best results, you may need to use a ND filter. Powerful filters such as the Lee Filters Big Stopper allow extremely long exposure times, even on the clearest day.
Tilt-shift in landscape photography
 Photo Credit: Arnar Birgisson
 Tilt-shift allows you to combine photos with high and shallow depth of field. The effect is achieved using lens shift and tilt. Thanks to Tilt-shift, the elements of the frame will resemble miniature models. This effect will look great in landscape photography. If you do not have such a lens, the Tilt-shift effect can be achieved with a graphics editor, in addition, this effect is provided in some cameras.
Black and white landscapes
 If you have never photographed black and white landscapes before, but really want to try yourself in such shooting, then it is better to start by photographing in color format. Once you've got your shot, convert it to black and white using Lightroom or Photoshop. This gives you full control over how your photo is edited, and you can fine-tune it to create a truly beautiful black and white photo.
Panorama

To create a panoramic photo, do not shoot at the wide-angle position of the lens; this will distort the frame. Take pictures at a distance of 30-50 mm. Yes, you will have to take more shots than with wide-angle coverage, but the panorama will turn out to be beautiful and natural. Many camera tripods have a tripod head for panning, but in practice this is not always necessary, especially if you plan to use software later. The latest version of Photomerge for Photoshop will be especially effective in the panorama creation process. Panoramic photography experts recommend using manual settings - manual exposure, focus, and white balance - to ensure maximum photo quality, and uniformity of all photographs taken.
Infrared photography
 There are several ways to create infrared photos in Photoshop, but nothing beats creating them yourself. Infrared landscapes in black or white allow you to look at the world around you in a different way. To create such images, you need a special filter.
We continue to acquaint our readers with the best contemporary photographers. Today we'll talk about the landscape genre. So read our review, share it with your friends and get inspired by admiring the works of the masters of the landscape genre!
Dmitry Arkhipov
Website
A native Muscovite Dmitry Arkhipov has been fond of photography since childhood. A physicist by education, Dmitry served in the army, worked at the Space Research Institute under the Buran program, created his own well-known IT company, while continuing to improve in the field of landscape photography.
The results of his travels to 108 countries of the world were five personal exhibitions, at which more than a million people saw Dmitry's works. Now Dmitry Arkhipov is an award-winning photographer, a member of the Union of Photo Artists of Russia, winner and laureate of national and international photo contests.
Blog

Denis Budkov is a native of Kamchatka, since 1995 he has been traveling and photographing his native land. Love for nature and the desire to show all its beauty became an incentive for learning the basics of photography and improving skills in practice. Denis's main passion is volcanoes, which are so rich in the nature of Kamchatka. The volcanic eruptions and peaceful Kamchatka landscapes captured by him have already received awards from the prestigious photo contests Best of Russia 2009, 2013, Wildlife of Russia 2011, 2013, Golden Turtle, Wildlife Photographer of the Year - 2011. Denis says that photography is a way of life for him, which is completely satisfied. The main thing is to wait for the right moment to take that very shot.
Vkontakte
Website

Mikhail Vershinin became interested in photography as a child; he had to give up visiting a photo studio in favor of another hobby - rock climbing and mountaineering, but even on sports routes he brought a camera with him. The craving for travel to wild places and a passion for filming eventually led Mikhail Vershinin to landscape photography. He explains his choice of this particular genre not only with a craving for nature, but also with a special mood, the ability to convey feelings and emotions with the help of a captured moment. Mikhail Vershinin's works have repeatedly become finalists and winners of Russian and international competitions, including National Geographic Russia - 2004 and FIAP Trierenberg Super Circuit - 2011 in the Night Image category.
Website

Oleg Gaponyuk, an MIPT graduate, lives and works in Moscow and has an unusual hobby - panoramic photography. For the sake of a good picture, he can easily go to the other end of the earth, along the way doing downhill skiing, windsurfing and diving. Despite the fact that his sports hobbies are associated with mountains, seas and oceans, in the field of photography, Oleg was carried away by the creation of spherical panoramas in the air. He actively participates in the AirPano.ru project, within the framework of which more than 1,500 bird's-eye panoramas have already been made in the most interesting cities and corners of the world. In terms of the geography of filming, the number of aerial panoramas and the artistic value of the material, this project is one of the world leaders in this type of panoramic photography.
Blog

MIPT graduate Daniil Korzhonov prefers to call himself an amateur photographer, because he just does what he likes. Photography allowed him to combine his passion for painting and love of travel. As a landscape photographer, he visits the most beautiful places in the world and “draws” what he sees on film. Combining photography with travel allows Daniel to lead an active life and express his thoughts and feelings through beautiful and original shots, captured both in the wilderness and on the streets of cities. He advises all novice photographers to shoot as much and as often as possible in order to better understand the surrounding beauty of the world.
Website

Vladimir Medvedev is the founder of the Wildlife Photographers Club, tireless traveler, professional photographer, winner of international competitions, including the 2012 BBC Wildlife Photography Competition for the Eric Hosking Portfolio Award. Cooperation with wildlife sanctuaries around the world allows Vladimir to make unique shots of the virgin world and its inhabitants. Photography, according to Vladimir Medvedev, is both art, and a means of understanding the world, and a means of influencing the world. Getting started is easy - you just need to buy a camera and learn from the best.
Yuri Pustovoy
Website

Yuri Pustovoy is a graduate of VGIK, a cinematographer of the Odessa Film Studio with ten years of experience and an honored travel photographer. His works were recognized by the jury and visitors of international exhibitions and photo contests, in the treasury of Yuri's awards Gold medal of the International Federation of Photography FIAP Global Arctic Awards 2012. Yuri Pustovoy is not only a traveler and photographer, but also an organizer of photo tours for real amateur photographers and beginners. The sights of the cameras of Yuri and his team capture landscapes from all over the world. During the tour, Yuri shares his photographic experience, helps during filming with advice and deeds, teaches the methods of processing photographs in graphic editors.
Sergey Semyonov
Facebook (over 800 subscribers)
Website

Sergei Semyonov became interested in photography in 2003, when a digital camera fell into his hands for the first time in his life. Since then, he not only devoted all his free time to this hobby, but also turned shooting into a profession, exchanging his career as an economist for the fate of a travel photographer. In pursuit of the most beautiful views of the land, Sergey visits the national parks of North America, the mountains of Patagonia, the icy lagoons of Iceland, the Brazilian jungle and hot deserts. He shoots his favorite landscapes from a bird's eye view and is an active participant in the AirPano.ru project. In his first panorama, Sergei showed the Kremlin the way birds see it.
Facebook (more than 700 subscribers)
Website

The Belarusian photographer is known as a master of the landscape genre. Like many of his colleagues, he believes that beauty is everywhere, and the skill of the photographer is to show it to the viewer. He is characterized by exactingness towards himself and the quality of his work. You will be surprised, but sometimes Vlad comes to the same place several times to achieve the right lighting and take a great shot. And also, Vlad has been reading our magazine for a long time and regularly shares his photos with our entire audience.
Alexey Suloev
Website

Alexey Suloev got his first camera at the age of seven and quickly got used to taking pictures of everything around him, especially since his hobby for tourism allowed him to find himself in the most unusual, unexplored places of the Caucasus, Pamir and Tien Shan. Gradually, tourist trips turned into real photo travel. In pursuit of unusual shots, Alexey has already visited more than a hundred countries, the geography of his trips includes the most inaccessible and untouched places on our planet from the North to the South Pole. Alexey takes pictures because he cannot describe in words the beauty and diversity of the earth. He generously shares everything he sees with his viewers, so that everyone can find creative inspiration in the inexhaustibility of nature.
A lot has been written about landscape photography. I do not want to repeat myself, because here I will describe the main points and focus on the problems that I directly face when shooting.
A very short guide to landscape photography:
- Keep track of the aperture, often, you need to close it tightly to F / 5.6-F / 16.0
- Keep track of the horizon, the horizon should harmoniously “cut” the frame. Carefully and thoughtfully compose lines and proportions in the frame
- Watch out for light sources (sun)
- Enjoy the result

As you can see, there is nothing difficult in landscape photography. But here's the problem: getting a good shot takes some work:
- The landscape implies that you have to find it. Finding a pretty landscape is not always easy. Very often, when you find a good landscape, you don't have a camera with you.
- It is best to shoot in the morning and evening, when there is no “hard” (strong) sun. Shooting in strong, hot sunlight is very difficult.
- Since it is best to shoot in the morning and in the evening, and even with closed apertures, you need a tripod. A tripod means extra expenses and extra weight during transportation.
- To capture good shots, you need an inner sense of harmony, which can either be innate or developed over a long time of photographing.

The masters of landscape photography have in their arsenal a very large stock of skills and developments, it is useless to describe them, since every little trick in the trick will be useful only in one case out of a hundred, and the person himself must choose exactly how he needs to shoot in a given situation.

Setting up the camera for landscape photography
- Almost always, the landscape is shot at a closed aperture: F5.6-F36.0. The easiest way to do this is in aperture priority mode.
- The ISO value should be set to the minimum: ISO 50, 100, 200,
- Color Saturation Adjustment - Maximum
- Focusing is best - manual, focusing preferably at infinity (on the farthest object)

Theory is great, but with practical shooting, all the simplicity vanishes. First, when shooting landscapes, a very serious problem is the effect of overexposure or under-lighting of areas in the photo... The most common example is a photo of black earth and white sky. In this case: either the sky will be with details, and the earth will be completely black (dark, without details), or the earth will be normally exposed, but the sky will be strongly lightened (overexposed). This is due to the dynamic range of the camera. A gradient filter helps to solve this problem, which compensates for the difference in the "glow" of the earth and the sky. Very often, it is enough to make a correction in order to “save” the frame a little. It can be very useful for a landscape.

Secondly: landscapes are shot with closed (covered) apertures... On digital-SLR cameras, with closed apertures, every speck of dust on the matrix will be visible. This is very unnerving, frustrating and ruining the photo. For example, already on F11, “blots” appear on the matrix (they can be seen in the examples for this article). On the F14, fine dust is already quite visible. You can deal with such an ailment with the help, or, by lowering the f-number. It's funny, but conventional digital cameras (soap dishes) and film cameras are less susceptible to this ailment. On the other hand, soap dishes suffer from diffraction at closed diaphragms.

Thirdly: often, by eye, very difficult to compose a shot, so that the lines fit perfectly into the frame. The horizon line tends to bend. When I shoot hand-held, thoughtfully and attentively, and then look at the footage on the computer, the horizon often “falls down” by a couple of degrees. For some plots, even 5 degrees is already an unacceptable error. To overcome the blocked horizon, I turn on the "grid" in the viewfinder. The grid draws lines, dividing the frame into 9 or 12 segments, which allows you to immediately see the symmetry in the frame, as well as position the horizon evenly. Almost all Nikon CZKs support the grid. Some cameras have a virtual horizon (for example) that allows you to control the lines. Well, if at all there are problems with lines, then you can crop the image with a rotation of the area in Adobe Photoshop or other editors.

Fourth: for landscapes, most often, needs a very wide viewing angle, for this use wide-angle and. All “super-widths” have distortion (geometry curvature). Distortion can spoil the picture very much, or it can make it unusual (like, for example, the fish-eye effect). However, the less distortion, the better. Unfortunately, all ultra wide-angle lenses have this drawback. Distortion can be overcome with the help of graphic editors; some cameras have built-in distortion correction for a number of lenses (for example). Or, you can shoot with a longer lens without distortion. The photographs of the sky were taken at fifty dollars, this lens has no distortion.

Personal experience:
If I shoot without a tripod, I use S (priority) mode. Usually I set it to a value from 1/80 to 1/200, while I know that the aperture will be (in good light) very closed when shooting, which is what is needed for a landscape. In low light, I still get a pretty sharp shot without blur when shooting handheld. When using a tripod, I work in A or M mode (aperture priority or manual). Long on closed apertures are not scary with a tripod. I rarely shoot landscapes, so this is where my experience ends.

I am often asked, and what is the best aperture for a landscape? There is no single answer. Sometimes, to shoot handheld in the evening, F2.8, ISO 800 is enough. And sometimes, to “freeze” the waterfall, you need F / 36.0 ISO 100. By the way, at closed apertures, almost all lenses (and whale lenses) give a very sharp image, so that, chasing a specialized landscape lens for home purposes - it makes no sense.

Shooting a landscape is very difficult if you want to shoot a person in front of nature. In this case, focusing at infinity will not always help. When photographing people in nature, I also recommend keeping track of the placement of objects in the frame, and in some cases, it is better to place a person not in the central area of the picture.

Conclusions:
Shooting a landscape is not difficult, it is difficult to find a good location. In a landscape, the most important thing is the harmony of combinations of lines, shapes, light and shadow. To correctly compose (select) a picture, you just need to go and experiment. In practice, experience comes very quickly.
Don't forget to push the buttons ↓ ↓↓ social networks ↓ ↓↓ – for site. Thanks for attention. Arkady Shapoval.
Scenery- this is a detailed picture of nature. It would seem that it could be easier than photographing the view you like. However, there are a few handy landscaping rules that will come in handy to create high-quality photographs.

Fig. 2
The basis for constructing a spectacular landscape is the unbreakable rules of composition. And this is where the "law of thirds" comes in handy. Divide the frame mentally with imaginary horizontal lines. Always position the horizon line so that it intersects the landscape at a height of one third of the total height of the frame. (fig. 1,2)
There can be exceptions if, for example, you want to emphasize the symmetry of the composition as in Fig. 3 (sea and sky).

Fig. 3
In the landscape, the "protagonist" is of great importance. It can be a tree, an interesting building or group of buildings, an unusual cloud shape, a yacht, or something else. The main character should be placed at the intersection of 3 vertical and 3 horizontal lines according to the rule of thirds.

Fig. four
Versatility is one of the main characteristics of a good shot. It is difficult to achieve the effect of spatial depth in the frame, but this is aerobatics. This is where your knowledge of the principle of perspective comes in handy (Figure 5).

Fig. five
Use a wide angle lens to help you create a third dimensional effect. But remember to fill in the foreground. In landscape photography, the center of the composition is almost always the horizon line. Unfilled foreground areas turn into compositional "holes". A flower, a tree branch, a gate, and similar at first glance elements of the composition can compensate for the emptiness of the foreground.

Fig. 6

Fig. 7
Practice: the lowest point is often best for landscape photography. The dull grassy lawn in the foreground can be enlivened by an unexpected flower. A pile of picturesque boulders will become a suitable impetus for the movement of the viewer's gaze along a winding path deep into the frame to a picturesque hill ("the main character") as in Fig. 6.7.
Remember that the person is not staring at your image with a frozen gaze. The gaze moves along obvious or invisible lines that connect the individual elements of the composition. If these lines are diagonals, your landscape will acquire dynamism and become much more interesting. The natural appearance of diagonals in the frame can be achieved by a good choice of the shooting point. Moreover, the left diagonal is always more expressive than the right one. A single diagonal is most effective when positioned at 45 degrees to the horizon (or to the bottom of the frame).

Fig. eight
Converging diagonal lines, as you know, are the basis of the principle of perspective (Fig. 9).

Fig. nine
Practice: when there are two equal-sized objects in the frame, choose a shooting point from which one of them will appear smaller than the other. This will create the illusion of a multidimensional image.

Fig. 10
An unusual angle for a landscape is as possible as for any other genre of photography. The top view will save you from falling into the frame of the sky or the horizon line. On the other hand, you probably won't have any problems with choosing the right shutter speed when the sun is too bright (Fig. 11).

Fig. 11
The advantage of a low focal point is that the subject in the foreground is optically enlarged in the frame. This is especially important when you want to do a still life with a landscape in the background. Use a wide-angle lens that creates a deep perspective in the frame, but even distant objects remain in focus.
Photography is light. When shooting panoramic landscapes, the photographer always has to wait for a natural spotlight to appear in the gaps between the clouds, which will brightly illuminate the desired area of space in the frame. The most important thing here is to have patience, although the skill to catch the slightest changes in the weather will also not hurt. It is hardly worth shooting a landscape in rainy or cloudy weather. But as soon as it starts to clear up, the sun shines through in the glades between the clouds. Try to catch enough sunlight to illuminate the landscape.

Fig. 12
It is in such conditions that the contrast between the bright sun and gloomy clouds can be especially expressive. Even the last rain, which cleared the air of dusty suspension, dispersed the atmospheric haze and significantly improved visibility, can become an important factor in a successful location shooting.

Fig. 13
Understanding the nature of light and its ability to transform even the most boring view into a stunning painting is a fundamental skill for the serious photographer. The most spectacular landscapes are obtained at sunrise and sunset.

Fig. fourteen
The sun provides side light, high contrast and deep shadows make the space more expressive.
If you are shooting on a clear, sunny day, beautiful white clouds can bring a picture of nature to life, as in Fig. 15-16

Fig. fifteen
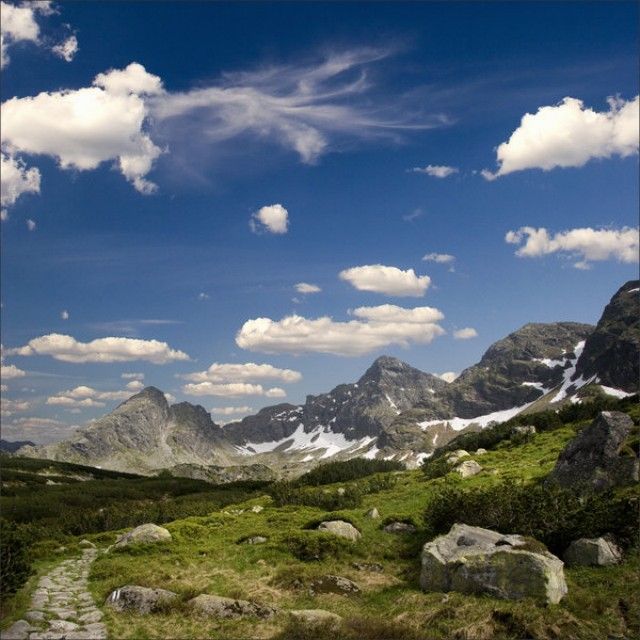
Fig. sixteen
If you decide to become a landscape photographer, get ready to travel. A tripod will be your faithful friend. And the heavier it is, the more successful the pictures will be.
Landscapes are different: mountainous and plain, rural and urban, sea or forest. Landscapes can be shot at any time of the year, at any time of the day and in virtually any weather.
The most beautiful landscapes turn out in which there is water. Whether it is a fast mountain river, a waterfall or the vast expanse of the ocean - such landscapes always attract the attention of the viewer with their beauty (Fig. 17-18).


Practice: Use a tripod and shoot at slow shutter speeds for spectacular water movement (Figure 19).
When you think of something as classic as landscape photography, chances are you are imagining high mountains or tranquil seascapes. But what do you do if these places are not available ... or maybe you just want to photograph something else?
1. Capture local landscapes
There are many very good reasons to start photographing local landscapes, rather than waste time traveling and try your luck and get the practical experience in the end that was right under your nose.
We all need to take a break from photographic “norms,” and there is nothing wrong with that. But will it reward you with the great images you've dreamed of?
Photo trips away from home are a great way to recharge your “creative batteries” and you can gain invaluable experience, but in the field of photography, this means that you are playing a very gamble.
Without local knowledge and depending on unfavorable weather conditions, you can return home empty-handed.
Whereas by concentrating on your home place, you are much more likely to be in the right place at the right time, and therefore, by speculating on better conditions.
The main advice
Many of the photographs show what kind of deep knowledge of the landscape you want to show.
It will be much easier to do this in your home area than away from home. You will have a better idea of when the flowers and trees are in bloom, what angle of the sun is throughout the year, and what is the best time of day to visit a particular place.
2. Do your photographs tell a story?

Good landscape photography is a bit like a good story. She needs a beginning, a middle, and an end.
The landscape should consist of three components - foreground, golden mean and background. This rule can help you make your images more effective.
Of course, not all images fall into this simplistic kind of composition, but in most cases, you won't lose if you follow this rule. It's also a very good way to frame your photos from front to back.
Once you have constructed your images using this method, you will instinctively begin to “compose” your photographs. The end result is a photograph in which the foreground subject is closely related to the background.
One way to do this is to give a strong foreground accent and then compose the shot. Thus, the eye moves to something interesting in the middle of the photo and its background.
On the other hand, the background may be the most important object of the picture, in which case the foreground should cause some interest, but should not distract attention from itself.
The main advice
This approach to composition tends to work best when using a wide-angle lens. This is done in order to reflect the foreground of the photo as well as its background well enough.
Just be careful not to photograph too wide an angle. By changing the perspective, you greatly reduce the significance of the background objects.
3. Use side lighting to add depth to images

Using side lighting will add a sense of depth to your landscape images. This method is one of the best for creating shadows and revealing the shape of objects.
We often tell newbies to photography to photograph with the sun over their shoulder. But when it comes to landscape photography, this is not the best solution.
The problem is that front lighting makes the landscape very flat and two-dimensional. In this case, shadows appear behind the subject and are therefore hidden from the camera.
If you just rearrange the camera so that the sunlight falls from the side, then create all the conditions for the appearance of a three-dimensional landscape.
Shadows now fall across the frame to help bring out the shape of objects within the landscape and help create the illusion of depth in the final photo.
The main advice
The lower the position of the sun in the sky, the more shadows there will be. Therefore, it will turn out to reveal more features of your landscape.
Generally, the best time to shoot landscapes is when your own shadow is longer than your height, i.e. try to avoid the midday sun and take pictures in the early morning or late afternoon.
You can read about this time, which is called, in more detail on our website.
4. Give the weather a chance

Blue and clear skies are good for sunbathing. But if you want to give your landscape some kind of drama, then we advise you not to be lazy and go to shoot in the rain.
Weather is often a decisive factor when it comes to landscape photography, and as long as blue skies are pleasant and peaceful, they won't thrill the world.
No drama, that's what you need. Large, brooding skies full of intent or piercing rays of sunlight shining through rain clouds.
To capture such breathtaking moments, you must be prepared for multiple setbacks, as well as be prepared for a great opportunity to get a good wet.
The sun can only rise for a few moments, so you need to be fully armed, with the correct camera settings and ready to shoot.
It often takes a long wait and you can only be rewarded in isolated cases.
But these moments will never happen again, and only you will have this magical picture.
Windy or rainy days are also very good for transient light, during which time the clouds move constantly, allowing sunlight to seep through narrow gaps.
5. Eliminate the sky

A good sky can play a big role in landscape photography, but if the sky is of no interest then feel free to crop it out.
Small, cloudless, blue skies are more or less acceptable, but if they are uniform, pale gray in color, it is usually best to eliminate them altogether.
You just need to re-evaluate your capabilities. Woodland interiors, waterfalls, and coastal scenes all look really good on cloudy weather. In most cases, much better results are obtained when shooting in soft light than in bright sunlight.
This is due to the fact that when working in cloudy weather, the contrast level is much lower. It allows you to preserve in detail, both dark and light areas of the image.
The main advice
Take full advantage of cloudy weather. Set a slow shutter speed to capture moving water as creative blur.
You will get rich colors by installing a polarizing filter to remove surface reflections from water and foliage.
The polarizer will also reduce light reaching the sensor. This means you can shoot at longer exposure values.
All images by Mark Hamblin.
It might be helpful to read:
- Letter to Santa Claus - templates;
- What is healthier than barley or wheat?;
- What is healthier than barley or wheat?;
- Goal project Lego construction New Year's fairy tale;
- The largest and most powerful icebreaker in the world;
- Digital Camera LUMIX DMC-FZ1000EE;
- Canon PowerShot G16 digital camera review;
- Difference between hypermarket and supermarket;