How to make a beautiful background for a photo from a tree. How to make a high-quality do-it-yourself photophone
How to make your photos stylish? Many do not think, but it is the background of the picture that plays an important role in the overall composition of the frame. Which photo backdrop to choose? For you, we would have collected 12 best and budget ideas that can be implemented at home!
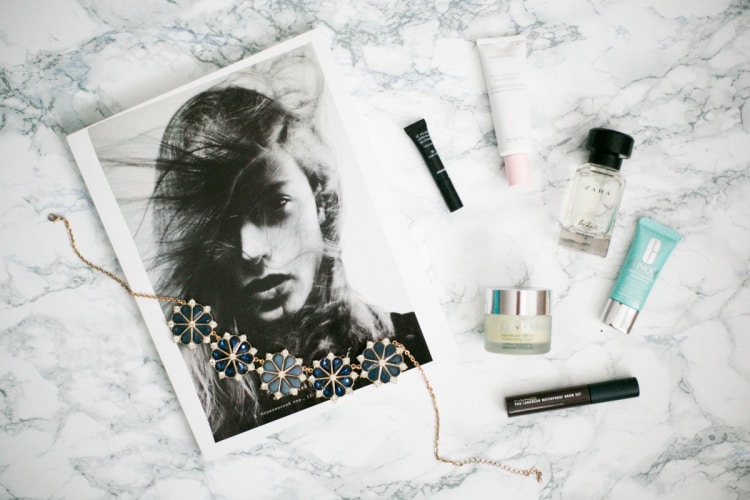
Crystal Clean
The perfect white background is a classic photon photo that will work well for 80% of shots. In addition, under the universal background, you can apply any texture in the photo and video editor that you want. From the materials you can choose one of the following:
- sheet;
- blanket;
- gauze;
- long pile woolen carpet;
- painted plywood;
- laminate;
- inexpensive countertops from IKEA.
If you want to buy a photophone for food photography, then plywood is not the best option. When drops of water fall on it, it absorbs everything well and tends to swell. And it does not look very aesthetically beautiful in the frame.
White laminate in different sizes can be purchased at any hardware store.


Plywood
Plywood is a very interesting and lightweight material for a photo background. It is a thin plank with a wooden uniform texture. You can buy it at a hardware store.
By itself, plywood is a great backdrop for pictures. But if your photographs lack zest, then you can stain the sheet to give it a different shade or paint it.
It is important to remember that such a photo backdrop for photos does not tolerate a lot of humidity. You should immediately abandon the shots using water or splashes.
Price per sheet starts from 200 rubles.


Panels
In the hardware store, in the wallpaper departments, you can find decorative panels for the ceiling made of wood or foam. They are both absolutely smooth and embossed with convex patterns. Their pleasant to the touch texture looks great in the frame. For the background you will need 4 or 9 squares.
Such a panel serves as an excellent reflector in product photography.
Price: from 50 rubles.


Adhesive tape
Self-adhesive film with various prints and textures, which are also sold in hardware stores, can set the mood for your photos. If you search well on Aliexpress, you can find self-adhesive paper with the effect of marble, wood, stone and other natural rocks. The film is best glued to thick MDF paper or hardboard.
Self-adhesive film can be found in Fix Price stores.
Price: from 100 rubles.


Concrete
A difficult photo background for a photo is, at first glance, quite difficult. And it is better to leave it in the hands of knowledgeable people. To create a concrete background, you will need cement (or cement-containing products: tile adhesive, grout) and water.
All this must be mixed with each other. Apply an interior primer to the fiberboard and allow it to dry. And then with strokes using a spatula, cover with a cement mixture (gypsum) fiberboard or plywood sheet. When it's all dry, you'll have the effect of real concrete. Looks pretty good!
White gypsum photon is suitable for cakes, cupcakes and other pastries.
Price: from 250 rubles.


Kraft paper
The next photon photo background is kraft paper. Pictures with such a background are very interesting. Universal background is suitable for absolutely any still life and other things. You can buy paper at any creative and hardware store or order it online. It is sold in rolls or comes in sheets. You can use it as a flat surface or slightly wrinkled.
Ideal photo backdrop for manicures, nails or jewelry display.
Price: from 100 rubles.


Cardboard
The unequivocal advantage of this material is that the cardboard has a huge color palette. It is with the help of it that you can create original and bright pictures. But among the shortcomings, it is necessary to highlight the fact that this material does not tolerate moisture at all, it absorbs everything well and forms various spots on its surface. It deteriorates quite quickly, and it is enough for a couple of photo shoots.
Price: from 100 rubles.
Fibreboard or fibreboard is the ideal material for a backdrop. It can be painted or paper glued on it. Fiberboard 60 * 120 cm costs about 80 rubles.


fabrics
Here fantasy has no limits. Fabrics can be chosen to your taste in various textures and textures, ranging from burlap to tablecloths or from chiffon to organza. You can combine them with completely different items to achieve the perfect composition.
In addition to fabrics, suitable:
- towels;
- curtains;
- tablecloths;
- scarves;
- large knit sweaters;
- silk pillowcases;
- covers for furniture.
Price: from 100 rubles per meter.
It looks insanely beautiful if the fabric is slightly wrinkled and the background is embossed.


Ceramics
Ceramic tile or porcelain stoneware is a very good backdrop for a photo. If you have a few plates left after the repair, then you can safely use this background for your shots.
If your bathroom has good lighting and beautiful ceramic tiles, why not? This is the perfect place to take pictures under the relaxing sound of the water! As a result, you can get unusual images with amazing effects!
Photos of clothes on such a photo background will look just amazing!


metal shield
How to make an imitation of a metal surface at home? There is an exit! A metal shield comes to the rescue. Finding it is much easier than you think. There is no need to look for it in the area or buy it from local men for a bottle. You can find an aluminum surface sheet at any hardware store.
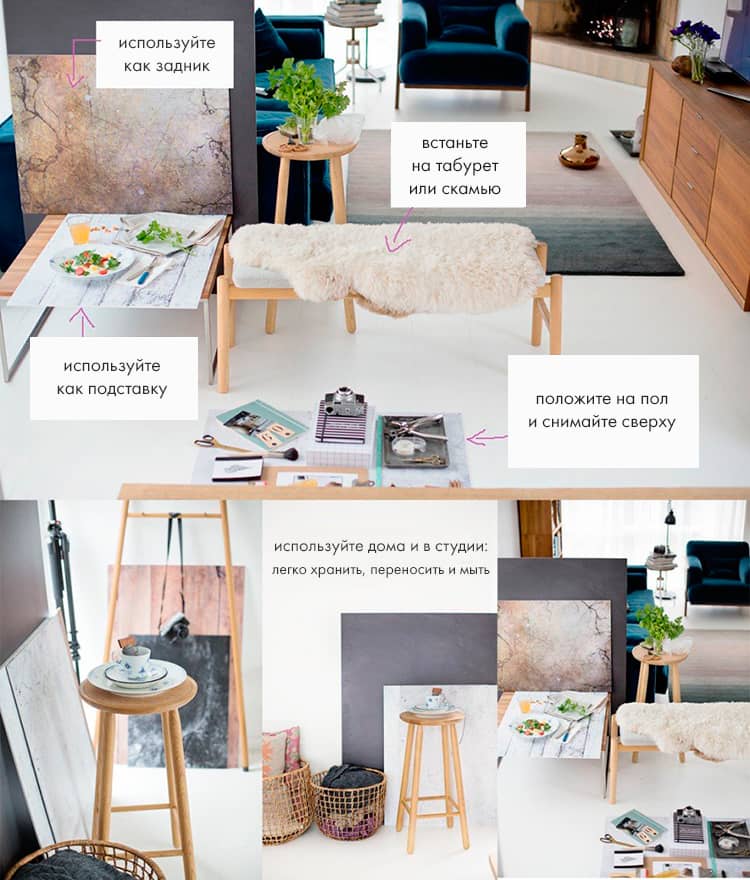
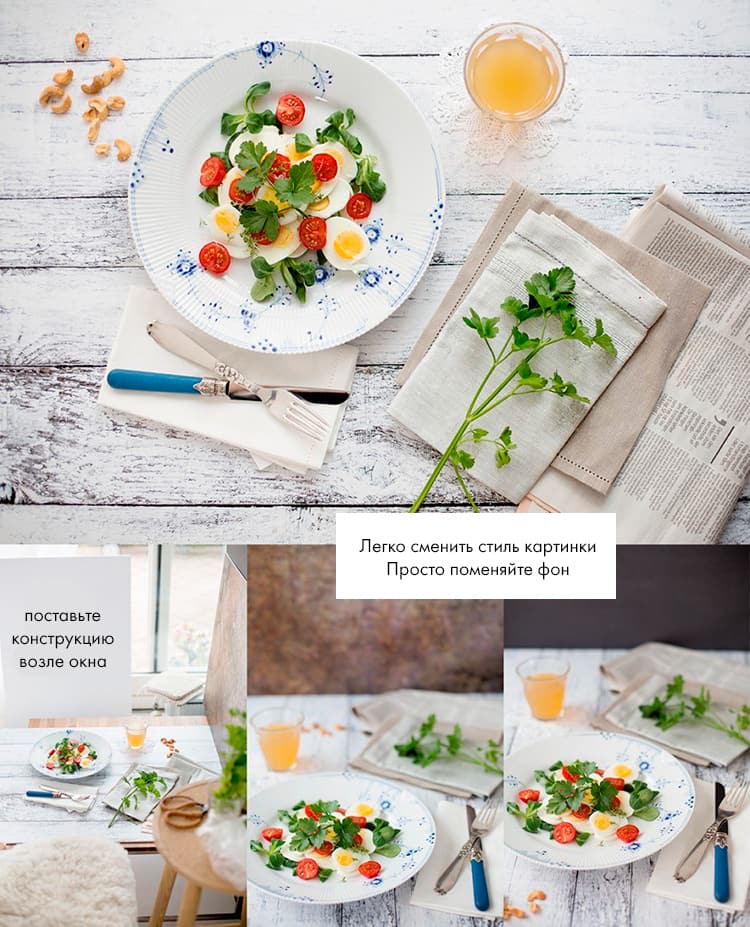
If you are fond of product or food photography, like to shoot still lifes, then you know that one of the components of a good shot is the right background. Repeating from shot to shot, the background can become part of the photographer's recognizable style.
For photography, both light and uniform surfaces and textured ones are used: vintage wooden tables, various fabrics, as well as surfaces made of real or artificial marble, brick and even asphalt are used.
How to find a good background? It’s good if your apartment or studio already has a “textured” table (although it’s still not very easy and pleasant to wipe off the consequences of a busy food shoot from it). Photographers often use real or specially made pieces of various materials, but all this wealth needs to be stored somewhere and is very inconvenient to transport.
Read the instructions on how to make a photophone with your own hands with minimal cash costs. Such backgrounds are almost weightless, easy to move and (not least) very easy to clean.
Method 1. Photo printing on foam board
Printing on foam board is widely used in photography. Such prints are often hung on the wall - they are inexpensive, while bright, light and durable. What if we use this technology for our task?
1. Find the source. There are no restrictions on what kind of image you can use for printing: a plastered wall, old wallpaper, painted old boards in a shabby chic style, a brick wall, marble ... You just need to take a photo of the surface you like or find it on one of the stock sites. Make sure the image resolution is at least 250-300 dpi.
2. Where to print. You can easily find a photo center, a photo lab or a printing house offering a foam board printing service - choose the one that suits the price.
3. Select options. The thickness of the foam board must be at least 5 mm. Choose a matte print (a glossy surface will give unnecessary highlights and reflections, which is not at all suitable for our purpose). Choose the right size according to your taste. From experience, the size of 50x70 cm is well suited as a surface for unfolding objects, and 100x120 cm can be used as a backdrop (wall).
4. Evaluate the result. Photophones made in this way most often turn out to be really successful. However, some prints may look unnatural. Do not be upset - just turn them over to the other side. Since the underside is white, they can be used very effectively as reflectors. Another option is to imitate the surface of the window sill. Perfect if yours isn't white enough, is still stone (hello USSR), or is just always stuffed with much-needed stuff.
So, it's worth a try. Be prepared for the fact that not all prints can turn out perfectly, but if you are lucky, you will get a photophone that is durable, light as a feather and pleasant to work with.
Method 2. Vinyl wallpapers / backgrounds
They are available in all possible colors and textures, from wood to granite - you just need to look well in the wallpaper section of the building supply supermarket. The print is made on a vinyl sheet that can be easily rolled up and placed in a corner/carried away. Of course, before using such wallpaper as a background for photography, the edges need to be pressed with something, or even better - glued so that the roll does not curl.
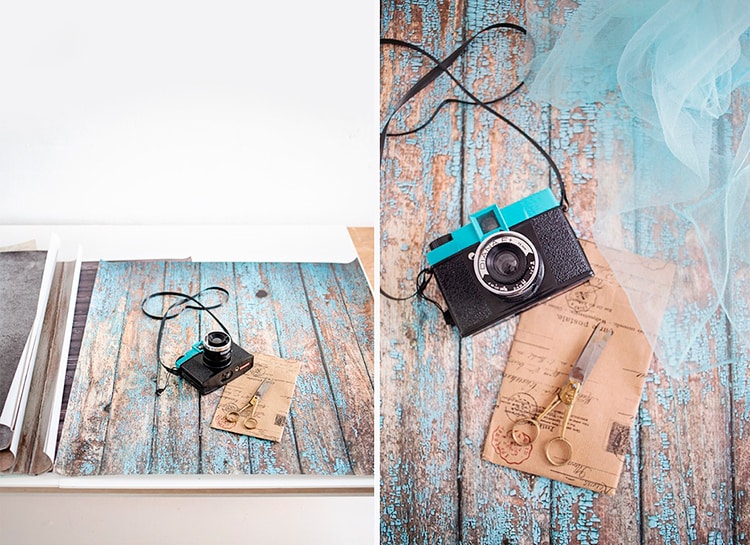
You can also buy special vinyl photophones. Companies like Swankyprints ship them all over the world. But be prepared for the fact that the quality can be different. On some, the seal is impeccable, on others not so much, and which one you got - you will find out only by unpacking your package. And the price for delivery bites, it is better to order several at once. In Russia, there are also online stores for vinyl photophones. It may be easier and cheaper to choose their products.
Method 3. Self-adhesive film
If you are not too lazy to work with your hands, then you can create a stylish background literally for a penny. You will need all the same foam board and self-adhesive film. The film is sold in building supermarkets (here is an example of a “marble” coating for 127 rubles), and foam board is sold in shops for artists (it costs 204 rubles).
Materials:
- self-adhesive film;
- binding cardboard;
- dry clean rag;
- ruler;
- pencil;
- stationery knife.

Step 1. Draw on the cardboard the shape of the required size. Draw a shape on the film of the same size. Cut out the shapes with a utility knife along the ruler.
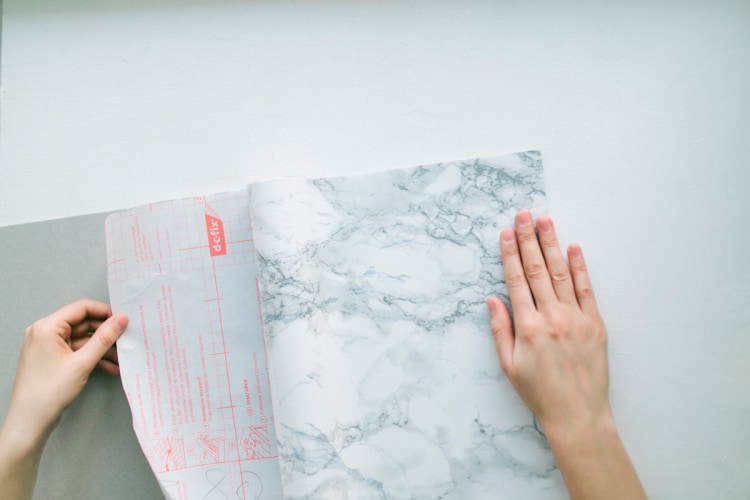
Step 2 Peel off the protective film from the paper. Gently attach the decorative pattern of the film with the adhesive side to the base, press it with the palm of your hand. With one hand, continue to remove the paper from the film, and with the other hand, smooth the design using a clean, dry rag.
Step 3 After gluing, check if bubbles have formed on the surface. If the film is stuck unevenly or wrinkles appear, it can be quickly re-glued. But after an hour it will be impossible to separate the film from the base.
That's all
The stylish surface is ready for your photo experiments. Share in the comments which method you liked the most or suggest your own version.
In the modern world, the art of photography plays a huge role; beautiful photography of a product helps to sell it faster and more profitably. Photography and photo shoots have become an important part of our lives. In the warm season, it is easier to shoot, the background for the photo can be grass, sea, field. But what if you need to create a beautiful shooting in the cold season, in the dark? The solution to this problem was found - the background for photography.
In contact with
Photophones appeared relatively recently, when Instagram appeared and advanced users decided to use it for business. It turned out that sales go much faster if the photo is taken correctly, for this they began to use various backgrounds. Now you can see that the most popular Instagram accounts are those that have a single style, a single color scheme, so photophones are now at the peak of popularity. There are stores selling photophones, however, prices sometimes bite. In this article, you will learn how to make a photophone with your own hands quickly and efficiently. Most often, photophones are used for subject photography - this is a close-up photograph of a certain object, food.
Actual photophones
The most popular photophones for filming are white and black. By choosing a light style for a photo, you definitely win. It is easier to work with a white background, many things around you can be light: whatman paper, a white blanket, white wallpaper, a gray wall. The white background looks clean and the most joyful, and joyful accounts are loved by everyone.
Often use black backgrounds, but maintaining such accounts is a little more difficult, you need to be able to catch the light so that it is perfectly black and there are no white spots.
The most practical vinyl photophones, you can buy several at once and change them in such a way that your account is colorful and bright.
Some use fabric photophones, beautiful openwork blankets, napkins or tablecloths.
Wooden photophones are no less popular; beautiful, cozy photos are obtained against such a background. The tree in accounts always looks advantageous and gives the profile a certain comfort and creates a feeling of home.
How to make a wooden background for a photo shoot with your own hands
In order to make a background for a photo shoot with your own hands, you will need:

You can also buy stain, and paint and make a beautiful double-sided photo background from wood.
Stages of making a photophone from wood

Using a Photophone
 It should be remembered that such photophones for subject photography help to make beautiful photos, however, a lot depends on the camera equipment you are taking photos with. Lighting plays an important role, it is best to take photos in daylight. This is the advantage of the background., you can carry it around and look for the best light, take it with you on picnics, so that the product photo turns out perfect.
Remember, when choosing photophones for subject photography of a certain color, try to keep your account in the same color scheme, so your profile will arouse more interest and attract subscribers. The obvious advantage of a double-sided photophone, more colors, more flight of fancy, such an account is easier to maintain.
It is important to think over the composition so that your photography is interesting, use additional small details, in the form of coffee beans, buttons, dragees, sea pebbles, etc.
Experiment! With a photophone, your photo shoots will definitely become better and more interesting.
Do-it-yourself photophones


This article is useful not only for photographers, as we photograph any of our work for demonstration on the web or for our portfolio. There are many simple tricks with which you will create beautiful photos, which means you will arouse people's interest, because beauty always attracts.
Filter
This do-it-yourself filter option is very easy. You need a plastic bag (white, colored or transparent - depending on what result you want).
It is best to take a transparent one and paint with markers on the part that is enough to wrap the lens. Look at the photo below.
We tied the package
Got this result
reflector
A set of materials: cardboard, kitchen foil, glue and adhesive tape.
It is desirable that the foil is not too thin and has an area of 1 square meter for the same area of \u200b\u200bcardboard. Having generously smeared the cardboard with glue, you put foil on it, pulling it a little and securing it with adhesive tape at the back. This is the result you should get:
Lightbox or black tile
If you want to do a subject photo session, then a lightbox that you can make yourself is ideal for this. I warn you, making a photobox is a very time-consuming process. The frame can be made of anything: cardboard, wood, plastic, iron slats. Here are some options:
You stretch a perfectly white fabric or paper onto the slats. In this case, the inner front part should be without bends.
If you don't have time to fiddle around with a photobox, but you or someone you know has black tiles, that's pretty cool. After all, it will serve as an ideal backdrop for subject photography. And if it's glossy, it will reflect the subject, and it will add impact to your shots.
flash diffuser
The function of the diffuser is to remove shine on the face, too sharp transitions, shadows, and also make the light softer. Such a useful tool is very easy to make. A sheet of paper attached to a flash with a rubber band, a plastic or paper cup, a table tennis ball, even a pack of cigarettes - all this can become a diffuser.
Time lapse and kitchen timer
Mirror
In the case of this item, you do not need to craft anything. Just remember that with a mirror you can create some very original shots. Here are some hackneyed ideas, look at them and create new ones!


It might be useful to read:
- Perfect competition: features and distribution;
- What is competition: types and types, functions, significance for the economy and society as a whole;
- Information to be included in the sample;
- Method of financial ratios The analysis of financial ratios is;
- The main financial ratios for the analysis of the enterprise's activities Analysis of financial indicators and ratios of the enterprise;
- The concept of a social group;
- Shortened working day;
- Training and improvement of the sales manager;