What bird craft can be done. Birds with their own hands: the best ideas with a photo. Master class "The birds have arrived"
Learn to make a wicker decoration on cardboard, a bullfinch from threads and other birds. Learn how to shape chickens and rabbits from threads into pompons.
How to make a chicken?
Let's start with poultry. In the year of the Rooster, such a craft will be very relevant. You can make an adult bird or chicken. To create it you need to take:
- yellow and white yarn;
- yellow thread;
- scissors;
- beads for eyes;
- seeds from apples for spouts;
- foam rubber;
- red thread for the feet;
- glue;
- cardboard for templates;
- scissors.

Cut 3 templates out of cardboard in the form of squares with sides of 8, 7 and 6 cm. Wind threads around each of them, cut them on one side. You have 3 beams. We design them in different ways. Wrap yellow yarn in the center of the longest (breast), leave the second largest (back) the same. The third will soon become wings, tie it with a thin yellow thread in the middle. Cut a piece of foam rubber, wind yellow yarn around it. This is a blank head.

Connect the parts of the chest and back as shown in the photo, intertwining them.

Tie the resulting knot on one side and on the other with a thin yellow thread. Soon, this round center piece will become the head.

Here's how to make the chicken next. With your own hands, unfold the back and chest so that the bird's head is at the bottom, we put wings on top, and on them a ball of foam rubber that you wrapped around the beaches.

We do not touch the wings yet, but we raise the bunches of the back and breasts to close the foam blank with them. Tie the back with yellow yarn to mark the tail.

The small chicken continues to form. Separate about half from the wings while working on the first part. Press these wings on the sides without pulling them tightly, rewind also in the area of \u200b\u200bthe tail. Now take the remaining strands of threads, place them over the created wings, also rewind with thread at the tail.

If in the process of work it is not possible to immediately capture the required amount of yarn, at this stage of work, thread them with a crochet hook under the thread, which marked the tail.
Use scissors to trim it to create a nice, slightly rounded shape.

Sew the bead eyes into place, glue the seed nose.

The little chicken looks great anyway, doesn't it, but if you want, give it legs. You can take pieces of wire, form legs from them, make three fingers on each of the same material, then wrap with wire.
If small children play with the chicken, then sharp objects are not needed. In this case, cut off the red threads by gluing them, form the same blanks with three fingers, after which you can glue them to the chickens.
See what else can be a New Year's chicken made of threads or made for Easter.

To create this adorable fluffy little bird, you need to take:
- yellow knitting thread;
- scissors;
- a piece of cardboard;
- colored paper;
- eggshell;
- glue.
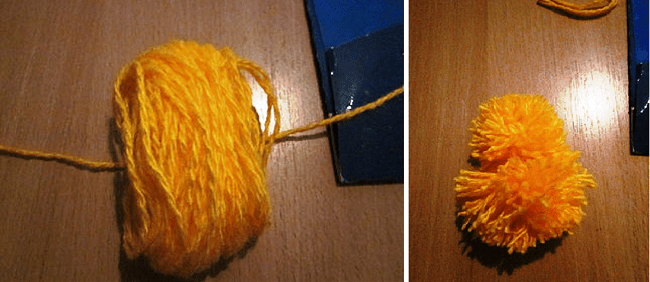
Do the second in the same way, but wind it around 3 fingers. Also tie with a thread, connect the threads 1 and 2 of the pompoms, tying them together.
Cut out two eyes from colored paper, the beak of the New Year's chicken. Glue them onto his face.

Wash the eggshells, dry. Put one half on his head, attach the other one side by side on the flooring. Cut out grass from green paper, glue it, thereby completing an interesting work.
If you want the chicken toy to be delicate and airy, then watch the corresponding master class.
For this tutorial take:
- foam egg preparation;
- yellow threads;
- cling film;
- scissors;
- pVA glue;
- colored paper;
- pins.

Allow the product to dry completely, cut the threads on one side of the egg, remove the foam blank from this hole.

Now you need to sew up the cut place with the same yellow thread, you can additionally fix it with glue. Make a beak out of red paper. You will need a small square that you need to fold diagonally in half, then bend its corner and sides, as shown in the photos.

From threads make bangs for fluffs, from red paper - a bow for a girl, legs for both chickens.

A top hat can be made for a chicken boy. To do this, cut a ring out of black paper, glue a strip on it, gluing it on the side. The bottom of the hat is attached to the top.
You will get such wonderful and cute chickens.

Other birds and animals made of thread
Creative work is very relevant in winter, which will tell you how to make a bullfinch from threads. For her you will need:
- threads of red, black, gray;
- scissors;
- apple seed for the beak.

- Using template cardboard or hands, wind the same lengths of black thread, the same amount you need red.
- Put black on them, tie in the middle with a dark thread. Remove the black threads from one half to the other, fix them here, in the area of \u200b\u200bthe future tail, with a piece of gray yarn.
- Then you will need to wind the thread of this color, place them under the central part of the bird.
- We fix this part by twisting it on one side with red threads. Bring these gray wings back, tie them with a thread around the tail, trim them with scissors.
- Glue a bone on the nose, this is what a wonderful bullfinch from threads you have turned out.

The basis for it is created from pieces of white and yellow thread. Blue ones are placed crosswise under the center of these two blanks. Then white and blue need to be lifted, twisted. The blue and black yarn will become the wings of the bird.
In this technique, it is easy to make a sparrow, other birds.

Here's how to make a rabbit from the same material.
The list of required items consists of:
- threads of gray and white;
- dense brown and pink fabric;
- cardboard or special blanks for pompons;
- fishing line;
- beads;
- scissors;
- needles.
- Wrap the gray yarn on special blanks for pompons, if there are none, cut them out of cardboard, give the shape of a half-ring. For one pompom, you need 2 pieces.
- First, a thread is laid between them, then the yarn is tightly wound in several turns. When this is done, the threads on the larger side of the semicircular workpiece are cut, you need to remove them from the device, tighten the main thread.
- Thus, two pom-poms of different sizes are formed. Tie them to each other with the threads on these parts.
- Cut out the semi-oval ears and the inside of the pink material. Glue these two types of elements together. Form a fold at the bottom, also fix it, and then the ears themselves on the head with glue.
- A hare's tail can be made from a small white pom-pom or a light circle made of fabric can be stuffed with a padding polyester and assembled on a thread around the edges. The ponytail is sewn on or glued on.
- Pass several turns of fishing line into the pink bead, which will become the animal's whiskers. Sew his shaped nose, eyes into place.

A hedgehog made of threads will not turn out to be prickly, even soft.

To create a hedgehog, you will need a special pom-pom tool, but if you don't have one, you can use a regular cardboard blank in the form of a ring.

3/4 brown wool and 1/4 gray wool are wound on any of these tools. When the pom-pom is formed, use scissors to reshape the hedgehog's face and nose. Sew on the eyes and nose. You can create a whole family of these funny hedgehogs.

Also, it is not difficult to make a lion from threads. To do this, take:
- two identical cardboard semicircles;
- threads of black, yellow, orange, pink, white;
- scissors;
- two pencils.

- As shown in the photographs, first wind a pink thread on two blanks in the center, a little black thread on the side of it.
- Now you need to close the black with white yarn. A thick layer of yellow is wound over it, and a little black in the middle.
- Place two pencils crosswise on the workpiece. First wind an orange thread around them, and on top of it 3 rows of pink.
- Cut through one side of the yarn and tighten this layered “pie” with the main thread. Use the scissors to shape the lion's head as desired.
Easy DIY crafts for the New Year
As you may have guessed, they will also be based on threads. Let's start tinkering with Santa Claus.

First, prepare everything you need, these are:
- foam cone;
- pVA glue;
- cotton pads;
- red threads;
- tailor's pins;
- scissors;
- 2 shiny chenille wires;
- cling film.
Now wind a thread around the workpiece, wetting it with glue. You can run it through the bottle that contains the glue.

At the end of this work process, leave the workpiece to dry completely near a battery or other heating device. Then it needs to be decorated with cotton pads.

Also make the sleeves with a cone, but smaller. To make the threads dry faster, make two cones, form both sleeves at once.

Their edges also need to be decorated with cotton pads, then glue these details of clothing to the fur coat. Cut 4 blanks for mittens from felt, also attach them in place using PVA.

Cut the cotton pads into two parts, decorate the collar of the fur coat with them.

Create the staff of Santa Claus from 2 twisted chenille wires, glue it to the hand of our hero.

To make his hat, wrap the foam egg with cling film, place the safety pins. Wrap the round part of the egg with threads, also securing them with glue. Make a face out of foamiran, glue the eyes for toys here. Attach the hat, trim it with cotton pads, and the mustache, eyebrows, beard are made of light wool for felting. This is what a wonderful result your labors will lead to.

For another craft for the New Year, step by step that you create, you will need:
- threads;
- pVA glue;
- ribbon;
- cling film;
- a plastic cup;
- scissors;
- narrow and wider braid;
- cardboard;
- hot glue from a gun;
- a piece of wallpaper.

In a plastic cup, make 2 holes, one opposite the other, thread the thread through them. Pour glue into this container.

In such a device, the desired section of the thread will become smeared with glue, so it will be convenient to decorate the cone with this material. Cover it with thread, then move on to the second bell.

Also dry these items near the battery, then you can start decorating them. Apply hot melt glue to the wider, shiny tape, and attach it along the edge of the bell. Use a thinner ribbon to decorate the bell further.

If you have New Year's beads, cut from this strip to the desired length, twisting, glue them in the form of a snowflake on a bell.

The bows can be made by yourself from shiny fabric or purchased from the store ready-made.

Pass strips of braid into the upper hole of both bells, tie from the inside to a knot.

Further, for this craft for the New Year, which we illuminate in stages, you need to make a beautiful bow. To do this, you need to glue a thin tinsel to a wide ribbon, tie it on a bow, using braid.

It remains to tie a bow to both bells and decorate the tree or room with them.

How to make wicker jewelry yourself?
You will find out the answer to this question right now. We will also make them from threads. Before you are the stages of creating a beautiful ornament, which can easily turn into a brooch if you pin a pin from behind or into a pendant if you attach a pigtail of threads to it.

To make such a decoration, you will need:
- 4 toothpicks;
- threads of white, yellow, blue, pink;
- scissors.
- Iris threads are perfect for this needlework. Take a pink ball, wind the end of the thread in the center of the crossed toothpicks. Now tie the tip of the yellow thread, form a rectangle out of it.
- Place 2 more toothpicks inside between the data to make them 4. Tie a blue thread to one end, wrap it around wooden sticks as shown in the photo.
- The next rows of the pattern are formed from white or light pink thread. Due to the fact that now you have 8 tips of toothpicks, the pattern is more voluminous.
- Next, there is a yellow, then a pink thread, from which we form quadrangles lying crosswise in relation to each other. The brooch is finished with a yellow, then blue thread.
pliers;

Thread a colored thread into a needle, arrange the first top row, passing the tool either from above or below the laces. Perform the next row in a checkerboard pattern in relation to the upper previous one. Having made a fragment of the desired width from a colored thread, take a black one, golden-colored jewelry looks good on it. Passing them into the needle, form such a beautiful row.

The next fragment consists of white threads, against their background the golden beads also look great. When the jewelry of the required size is formed, cut off the main threads at the back, tie them in a knot on the pendant.

Wrap gray threads on two fingers, remove from your hands, tie the blank to the bottom of the decoration, rewind it just below the middle with gray yarn, cut the edges to make a beautiful even tassel. Do some of these.

Use a pair of pliers to secure the two chain rings on top of the pendant, thread it here and secure.

The braided decoration is ready.

At the end of the article, we suggest that you familiarize yourself with a simple method that will tell you how to quickly make a wicker decoration.
Another covers the process of creating a bird from threads.
Bulky paper birds can become an original decoration.
In addition, the bird is hollow and you can put a small thing in it and give it to your loved ones!
you will need:
- a printer,
- hot glue gun or fast drying glue,
- two sheets of medium-weight paper,
- scissors.
Print out the details of the bird and cut out carefully.

Look at the video for assembling a paper bird:
Advice:
If you cut out parts from thick cardboard, then in the future they can be reused as a template.
Swallow
See how you can make such a cute swallow out of paper:
You will need black, white and red colored paper, glue, stapler, scissors.
Let's get started.
First you need to cut out the details shown in the figure from colored paper. 
Now let's take a small strip of black paper - this is the future head of the swallow. Fold it with a ring and staple it. The big black stripe is the future torso of the forked tail bird. We will fold it and fasten it with a stapler, as shown in the figure. 
Then we glue the "shirt-front" of white paper to the body and head of the swallow. Do not confuse: the shorter piece is towards the head, and the longer piece is towards the body. 
connect the head and body of the bird with glue or a stapler.
The next step is to glue the wings to the body.
Then we will shape the swallow's head - glue the eyes. They can be purchased at a sewing supply store or simply glue together from larger white paper circles and smaller black circles.
It remains to glue the beak. Take the remaining diamond-shaped piece of red paper, fold it in half and glue it to the bird's head.
Our wonderful paper craft is ready! It was not difficult to make it. Children will be happy to play with this swallow, and in the process of making it they will learn how to make voluminous paper crafts with their own hands. 
Paper swallow - costume element 
Volumetric birds
These birds will be composed of the same elements - body, head, tail, beak and eyes.
First you need to prepare strips of certain sizes, depending on which part of the bird they will be used for.
So, for the body you need 5 paper strips 2.5 cm wide and the following lengths - 7.5; ten; 12.5; 15; 17.5 cm.
For the head, two strips of the same width, the length of which is 6.25 and 8.75 cm,
and for the beak, the strip should be 5 cm long.
For the tail, you need to prepare 5 strips, 3.75 cm wide, the length of which will be 5; 7.5; ten; 12.5; 15 cm.
You should also cut out two circles, 1 cm in diameter - these will be the eyes of the bird.
A paper strip bird can be made as follows:
workpieces for the body should be twisted into a circle and the ends glued. Then put all the circles inside each other and glue at the base.
Until it dries completely, it is better to fix the bonding place with a clothespin.
Similar actions should be done with blanks for the head.
When both parts of the bird are ready, you need to connect them and start making the tail.
The tail strips should be triangular with scissors and the wide ends curled slightly.
Next, lay the parts on top of each other and glue them on the narrow side, and then attach to the body.
The beak and eyes remained.
To make the first, you need to fold the strip in half, then bend the corners from the side of the bend and fold them inward.
The eyes are made by winding a small circle around the tip of a toothpick to form a ball. Now you need to attach the last two parts to the corresponding places - and the craft is ready. 
Bluebird from egg
Many people throw out over a thousand plastic bottles every day. At the same time, few people know that many amazing things can be made of them (for example, model boxes, vases, feeders for cats and dogs, and more).
Let's look at how you can create a beautiful peacock from bottles. For work we need the following materials:
- A log of wood is a future stand for our bird.
- Metal bar.
- Styrofoam.
- Plastic bottles (green, blue, transparent).
- Waste plastic in different colors, paints, PVC glue, scissors and foil.

We cut out the peacock (body and head) from the foam and make recesses for the eyes. We fix a metal bar in a log and put a peacock on it. Carefully cut different sized "feathers" from colorful bottles.

Round the feathers, and then cut out the waves at the end with scissors. Then we make foil circles of different sizes, paint multi-colored eyes on them and give a realistic look to feathers using paints. Now we attach them with a stapler or glue to the tips of the "feathers". Glue several short "feathers" to the head and neck.

We make a tuft of dark plastic, which we glue to the head and draw eyes in the pits. From the details - "feathers" we form a lush tail, starting from the end, which is fixed to the construction mesh with a wire. It remains to attach the tail to the body.

Cute birds made of salt dough
Due to its elasticity, the dough is ideal for modeling a variety of crafts. Preparing our mass is very simple.

Starch (tablespoon) is diluted in one hundred milliliters of ice water, which is then poured with boiling water (200 ml). Next, take one glass of flour and mix thoroughly in equal proportions with salt, fill with a mixture of starch and knead the dough. We carefully divide the finished dough into five identical parts, then add the desired color of paints to each of them and knead each piece again.

We sculpt all the necessary parts of the birds using a stencil, which is drawn in advance on paper. Now our dough product must be sent to an oven preheated to 50 degrees and baked for about an hour. When the birds and decoration elements are baked, we leave them to cool and cover with paint of our choice, and then with a colorless varnish. It remains to lay out the craft in the form of a panel and attach all the details with glue.

Craft from cotton pads
If you have a little kindergartner, then you can make a craft from cotton pads with him. It takes about five discs to make one bird, as well as colorful paper, decorative ribbons, scissors and glue.

An owlet is cut out of paper. Cut out ovals from the disks - wings that are glued to the body. We glue the beak and eyes from colored paper. Decorate the owl's neck with a ribbon. There are many other cotton pad crafts that you can find on the Internet.

A feathered miracle from a raw egg shell
An unusual product is obtained from a raw egg. To do this, we make the same punctures on the egg on both sides and extract the contents from it. Let our workpiece dry well.

Now you need to put the craft on a special stand and paint it carefully. We leave the body of the bird until the paint is completely dry, and then insert the fishing line through the punctures and hang it anywhere - as if it is floating in the air.

Plasticine bird
Another craft can be done with your own hands for kindergarten from plasticine. For the bird, roll 2 balls - one larger, the other smaller. Then we make triangular wings and a tail, as well as a beak and black eyes.

Cone birds
Penguin
You can make original penguins with your own hands. We need fir cones, plasticine and white paint. First of all, you need to mold the head, beak and wings from plasticine.

We make a pretty face - we attach a beak and eyes. Now we attach the wings and head to the cone, part of which we pre-paint with white paint. Wings can also be crafted for black-painted corn cobs.

Owl
Place two pine cones on top of each other. We make eyebrows and wings from oak bark, and nose and eyes from paper. We cut the eye circles in a circle with scissors. We wrap the cuts with threads - you get expressive eyes.

Applique from cereals
For this craft you will need:
- colored cardboard;
- pVC glue;
- various groats (corn, rice, millet, beans, buckwheat, poppy seeds, sunflower seeds).

First, you need to draw a bird and a tree twig with a pencil, and carefully apply a layer of glue (medium thickness) to the drawn template. The next step is to lay out the groats on the bird blank, depending on the color and shape of the patterns, as well as the imagination of the master. It remains to apply a layer of glue on top to fix the applique and leave to dry.

You can make birds from any materials, the main thing is to turn on your imagination and be patient. To keep the process fun, invite the children, as these activities are very useful for developing their thinking and creative skills.
The most faithful friends of Spring are birds. In the spring, nature awakens from hibernation, trees are filled with life-giving sap - life is everywhere! And birds are the first to remind us of this. The hubbub of birds greets the rebirth of nature with overwhelming power.
How to make paper birds, you will find out in our step by step master class.
Bird on a paper clip.
A very simple spring craft for kids. To make these cute paper birds, you'll need scrapbooking paper, colored paper clips, glue, and a hole punch.
1. Download a bird template or draw it on paper.
2. Print, cut. To craft one bird, you will need two mirror pieces.
3. Before gluing them together, take two paper clips, straighten them to get "bird's feet".
4. Place them between the two sides of the bird, glue the sides together. Punch the eye with a hole punch. Children's spring craft is ready!


Mobile - spring birds
If you have a little time with your child, be sure to try making cardboard birds with him. You can create such crafts pretty quickly. They can be used to decorate a house, a fence in the country, or just replenish a collection of handmade toys.
This wonderful mobile "Swallows", invented from scrap materials, will perfectly fit into the design of the room, and I think all friends who come to visit will like it.

Template for download.

Paper bird
We present to you another simple spring paper craft. It can be done in just 10 minutes.
Print the bird pattern on thick colored paper (cardboard), cut and glue it. Make a hole for the wings. Now let's make the wings ourselves. To do this, fold a sheet of colored rectangular paper like an accordion. Thread it through the hole. The paper bird craft is ready! You can hang a paper bird on a string from the ceiling. Or you can make several birds and make a mobile out of them.


Volumetric bird made of paper.
Another way to make a paper bird.
This bird can be made from white or colored paper.
1. Print and cut out the bird template.
2. Connect the parts of the bird with glue.


Bird made of colored paper
For this craft, use double-sided cardboard or colored paper, as well as glue and a paper clip.
1. Draw the future bird on paper.


2. Use scissors to carefully cut out all parts.


3. Before gluing, draw the bird's eyes or cut them out of colored paper.


4. Shape the bird and secure everything with a clamp so that the glue will set.


It might be helpful to read:
- How to cancel the registration of cash register with the tax office?;
- How to fire an LLC director - step by step instructions;
- How to open a children's store How to open a children's clothing boutique;
- What metal products are in demand among the population?;
- How to fire an employee for absenteeism;
- How to correctly calculate compensation for unused vacation in case of dismissal due to staff reduction?;
- DIY interior for a photo studio;
- Instructions: how to fire an employee due to death;