From two photos make one. Ways to combine photos into one image. Connecting photos using a photo editor
Greetings, dear guests and readers of the blog! We continue our section "Computer and Internet for Dummies". We have the task: to quickly combine two different photos, but without downloading third-party applications and not having the skills to work in photo editors.
Regardless of whether you work on a computer or use this device for entertainment, in any case, you may need to combine two pictures into one in order to solve some kind of your task.
For example, you collaborate with and use that help your body transform. In this case, you are photographed before using the product, and after some time after using it.
Then it becomes necessary to combine the two photos into one and add text to thus attract potential partners and customers in the business. This is where the standard Paint application comes to the rescue, which is in every version of Windows, well, or at least in most of them.
How to glue two photos in a standard Paint application
Perhaps until that moment you did not even suspect that your computer has an application that can handle the task of connecting two photos. I, too, at one time did not immediately find out about this, but only after a while, when I had already learned to work in third-party programs.
But let's get down to business. To quickly find the Paint application on your computer, you need to open a search in the lower left corner. Depending on the version of Windows, the search location may vary. I am showing Windows 10 as an example.
Open the search and write the name of the program. The computer will give you the desired result at the top. Click on the icon and launch the application.
Now you need to upload the first photo to edit it. In the upper left corner of the program, click "File"then "Open".

Then a window will open for choosing the location of the photo. Find the right photo and just click on it. If the photo is too large, then you can reduce its scale to the bottom right of the slider.

After you have scaled, you need to trim the excess. To do this, go to the top toolbar and click "Highlight"and then select Rectangular Area.
A selection marker appears. Now you need to hold down the left mouse button and without releasing it, drag the marker from top to bottom and to the side, thus highlighting the area that we want to leave.

Then at the top of the panel click "Crop".

Now we have a cropped photo that needs to be saved.

Go to the familiar to us "File"choose "Save as", and then select the desired format. I usually choose JPEG image.

The program will offer a choice of a place to save, and you can also specify a file name.

After you save the first photo, right on it you need to open the second in exactly the same way "File", "Open" and zoom out if necessary.
Then, as with the first photo, we do the cropping. "Highlight" - "Etc pit area » — "Crop".
Now in the prepared photo you need to create a place for the second photo. To do this, move the cursor to the right edge of the photo and hold down the left mouse button and stretch the canvas to about the desired size. It's okay if we stretch more, then you can fix it.

Now on the right side of the blank canvas you need to put the first photo. To do this, go to the upper left corner of the program and click Paste, and from the drop-down list, select Paste from.

A selection window opens. Select a previously saved photo simply by clicking on it with the mouse.
If you combine photos of different formats and sizes, you can adjust the size by clicking on the top "Resize", and then select the scale in percent or pixels.
In this case, the first processed photo is smaller. Drag it with the mouse to the right side and select the size.

When you have adjusted the size, put the second photo exactly with the first and “slide” the remaining empty canvas to the right in the same way as you put it forward, that is, hold the marker with the left mouse button. If you do not need anything else, then save the photo exactly as you saved the first.
If you need text on the photo, then do the following. Push the bottom of the strip of clean canvas with the mouse. Then, on the top panel, select the TEXT tool by clicking on the capital letter.

Then left-click on a blank canvas below. Text options that can be customized are opened. Choose the size, font color, style, and then write the desired text. To reduce the size of the input field, after writing the text, simply adjust it with the mouse by pulling the markers.

To move the text to the right place, move the mouse cursor to the very edge until the cursor with four arrows appears. When the cursor appears, hold down the left button and move the text.
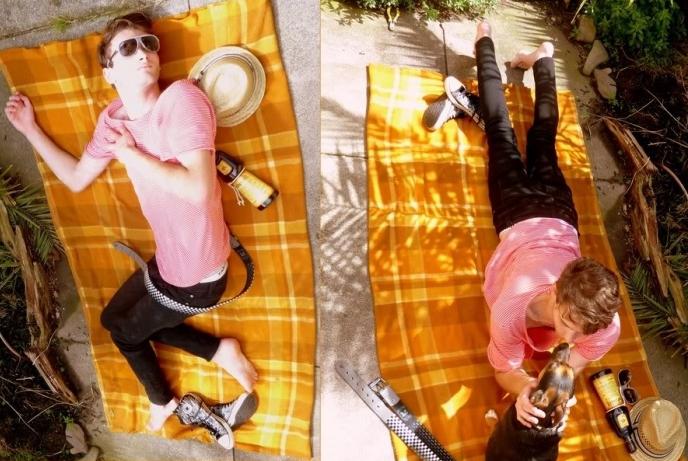
Thus, you can add several fields with text and place them in the right places. The result of the work may be such a composition assembled from two photos.

That’s all for me. I hope the article "How to combine two photos into one without Photoshop" was useful to you. The best support for me is your feedback. I wish you success and prosperity!
It’s not difficult to make one of two photos - now several dozen services have been created for this. In some of them, this is the main function, in some it is secondary. Today we will tell you on which sites you can perform this simple action in just a few minutes.
: combining several photos into one is easy!
 Pixlr has a huge assortment of useful photo editing features.
IMGonline: how to take 2 photos in one online
The IMGonline service is a real storehouse of useful functions for processing photos. Here are many tools for color correction and image enhancement, as well as the application of interesting effects. Despite all the power of the site, its design is very primitive, but you can use it even from an old mobile phone with Internet access.
To glue the photo in the "Tools" tab, you must select the "Combine two images into one" function or simply click here.
 Don't be afraid of the large amount of information on the page. If you just need to combine 2 photos without editing them, then the proposed settings will not be needed
We perform the following three steps:
- We load the necessary photos.
- We note the orientation of their location (vertically or horizontally) and, if necessary, adjust the remaining parameters of the union. Here you can rotate, crop or flip your picture, although this is done not very conveniently and generally not clearly.
- Choose the format of the finished image (jpg or png-24).
Click the OK button.
 Next, you will be offered to open or download a ready-made association
help to combine photos into one online
- Another very easy to use, but multi-functional photo editor. To make one photo out of two, first you need to upload them to the site in turn. To do this, in the “Files” tab, select “Download from disk” or “Download from Vkontakte album”. Then click "Operations" - "Edit" - "Glue several photos."
 Please note that the pictures are downloaded separately: first the first, and then in the exact same way - the second
  Here you can normalize the size of images relative to each other
 If you are satisfied with the finished gluing, click "Accept", if not - "Cancel".
 With the result you can work on or save the image to a computer or Vkontakte
 Want to make the union original? For this, Cropper offers a whole archive of decorative photo frames, as well as the ability to create a color or dynamic frame.
 It is convenient to select images for editing from the special panel on the left
 As you can see, all the proposed services can equally well combine two photos into one online. However, each site has its own characteristics, additional features and capabilities. Which ones you like best - decide for yourself.
In the process of working with existing images, the user may need to combine the photo into one online. This can be the creation of a collage, photo montage and other tasks that make it necessary to glue several photos into an integral visual composition. Specialized network services created specifically for combining several photos will provide valuable help in implementing the plan.
Features of network services for IMG connection
The network has a sufficient number of services that allow literally in a couple of minutes to combine two photos online. Some of these resources specialize in creating various types of collages in which you can combine 5-7 different photos into one single image.
Others specializes exclusively in adding photos to each other, have a simple and convenient interface.
Work with tools for bonding images is built in a template manner. You go to such a service, upload two (or more photos) to it, decide on a number of settings, and start the upload process. After that, view the result, and save it to your PC.
In the case of resources specializing in creating collages, you will need to first select the appropriate collage template (or create it yourself), and then follow the steps described above.
The result obtained is usually not watermarked, so you can safely use it for various tasks.
If you want to add any text to your photo, then the appropriate one on our website will be useful to you.
Let us take a closer look at the services for gluing photos online.
Croper.ru - specialized photo editor
Resource croper.ru is a multifunctional network photo editor that allows you to perform various operations on the photo (cropping, resizing, rotation, auto-processing, blending effects, etc.). Its functionality also includes gluing custom photos, which we use for our tasks.
To use the photo editor functionality, do the following:

Service imgonline.com.ua - a simple combination of photos online
The peculiarity of the Ukrainian service imgonline.com.ua is mainly a text interface, with minimal inclusion of a graphic component. All operations are carried out by selecting the necessary text options, and already at the very end the user gets the opportunity to evaluate the result.

Mycollages.ru - convenient collage maker
The service is intended for quick and convenient creation of collages from the user's photos. To facilitate the process, the resource has a number of standardized templates, but if desired, the user can create his own.

Quickpicturetools.com - English-language online resource for working with images
Service quickpicturetools.com - can perform various simple operations when working with photos - cropping, adding text and frames to photos, creating based on a photo calendar and more. There is also a function of combining and gluing images online, which we will use.
- Go to quickpicturetools.com;
- Click on “Add” and upload the first photo to the resource;
- Click on “Add” next to it in the next cell and upload a second photo;
- Using the options “Width” (Width) and “Height” (height), set the required dimensions of the first and second image, decide on other settings;
- To get the result, select “Generate Image” below;
- Save the result to your PC.

If you are interested in how to make a slide show of photos with music, then it may be relevant for you.
Photojoiner.net - collage generation in English online
The photojoiner.net service is similar in functionality to the mycollages.ru service I already mentioned. Despite the English-language interface, work with this site occurs in a similar way.
- You go to the resource, select the number of collage cells, click on “Apply”.
- Using the “Open” button, upload two photos to the resource, and drag them to the appropriate cells in the collage.
- The “Save” button is used to save the result.

Conclusion
To perform the gluing of 2 photos online, you should use the services listed by me above. Of these analogues, I would like to focus the reader on croper.ru, which has a fairly diverse set of tools for working with images. In general, all of the listed services have a free character, a simple and convenient interface, and can be recommended for quickly combining the photos you need online.
Simple and beautiful postcards, paintings and other art objects can be created using a simple technique by combining several separate images on one field. Do you know how to combine two photos using popular graphic editors?
Two to one: collage technique
In Photoshop or any editor that allows a new file. We add both photos one at a time and arrange them in the desired way relative to the frames. The frames may touch the edges closely, or there may be a distance between them. You can also add a colored background. An interesting effect can be achieved by blurring the edges with the same tool or adding a decorative frame. You can create a similar art in many online editors, it is convenient if there are no suitable programs on your computer.
You can connect two photos in another way. The smooth transition of one image to another looks very interesting. To get started, copy both images on one base, compare their size and impose with the necessary clearance. Now the most interesting part of the work, on the last layer we make a mask. We use a black and white gradient on the mask, maybe it’s not the first time you can achieve a beautiful blend, in this case do not be too lazy to do it all over again. Before we put it in one picture and print it, we combine the visible layers and add a little noise. Our picture is almost ready, if you want, you can bleach the image and choose a new color for it.
How to take a photo that was not?
Often from a series of photographs it is difficult to choose even one single one that fully met the expectations of the photographer and models. Most often this applies to group photos. Can I glue two pictures into one? For users of mid-level Photoshop, this is a simple task. Suppose we are not satisfied with one of the figures in the picture or its elements. But the same figure is in a suitable form in another picture. Select the elements we need and copy them to a new layer in a good photo. Then we transfer to the desired frame. The most difficult thing is to compare the sizes. We need a free transformation tool, to save the proportions we hold down the shift key. At the time of sizing, you can make the working layer translucent. When the elements are overlaid appropriately, it's time to work out the boundaries. In order to seamlessly connect the two photos, you can use blur and stamp, we remove excess parts from the top layer with an eraser.

The task is greatly simplified if we need to process the landscape. For example, add the sky from one shot to another similar. We make using the same technique, it is much easier to select and paste uniform large areas than to move small elements. If you are going to combine two photos, be sure to pre-process both to the desired appearance, this will greatly simplify the work. At the very end of the alignment, you can slightly adjust the colors and contrast settings.
When creating products from photographs, a skill is often required how to combine 2 photos. Previously, it could be studied only by downloading an expensive program on a computer. Then another time to spend on mastering an obscure textbook, and translation of the utility, because all of them were originally only in English.
The photo editor Home Photo Studio is fully Russified, has a friendly and intuitive user interface, and connecting photos into one image is carried out in it in a few simple steps:
Step 1. Download the photo editor “Home Photo Studio”
To download the utility, use the special button on the page of our website. The distribution weight is 52 MB. The program contains more than a hundred colorful photo effects, and allows you to master professional image editing skills in a short time.

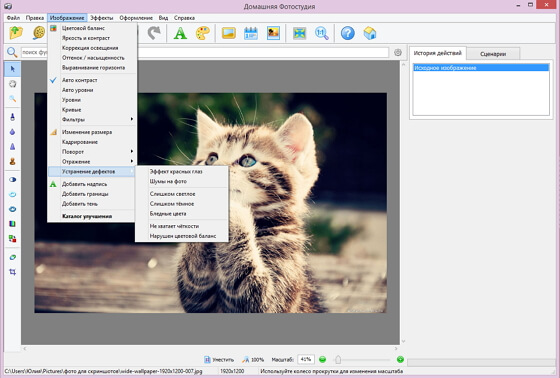
Step 3. Remove defects and add effects
Before you connect the photo, you need to remove the defects and add effects. Select the “Image” tab and then “Troubleshooting”. Here you can save the photo from excessive brightness and shading, eliminate the red-eye defect, add clarity and restore color balance. To apply special effects for images, type in the “Effects Catalog” main menu in the search bar, then go to the specified value.
Step 4. Save photo
Click on the blue diskette icon at the top of the menu, enter the name of the image and format, save it in your computer’s memory as a regular file.
Step 5. Add a new photo
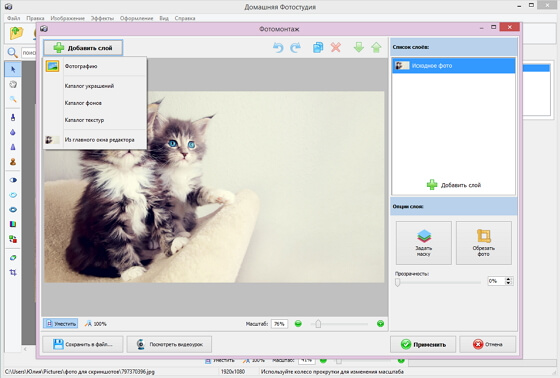
Step 6. Combine two photos into one
Click on the button “Add layer” in the right part of the window. The utility will offer several options - a photo, a jewelry catalog, a texture catalog, a background catalog, from the main editor window. Select a photo. Next, find the desired image (in this case, what was previously edited) and click "Open." A new picture with a dashed border appears in the photo. It can be moved anywhere and resized. Click Apply.
The photo editor “Home Photo Studio” will perform the processing and the two photos connected together will open in the main menu. Saving is carried out the same way as for a simple photo, including: pressing the image of a blue diskette, selecting the “Save” function on the “File” tab or using the keyboard shortcut Ctrl + S.
In the same way, the operation is carried out, how to combine several photos into one. When composing multiple images, we recommend that you use the curly cropping function, which is available in the photo montage window. You can apply not only square, but also round, as well as star-shaped cropping of the photo.
Of great interest to the creative person is the collection of masks, which is also available in the photo montage window. Click on the “Set Mask” icon, and choose from a variety of options. From the connected images you can make a beautiful card and send it to a friend on social networks, read the article:. Communicate and share beautiful photos.
It might be useful to read:
- How to be an excellent student without much effort;
- Wingless Away - a bird exterminated through the fault of human stupidity and greed Wingless Away;
- Impeccable Electronics Gallery of Nazarov;
- Department of Social Protection;
- Rules for the provision of state social assistance Subsidies and social benefits supervision;
- Solution of typical tasks. Products produced in the reporting period, thousand;
- What interesting things can you tell a girl about yourself: a few examples;
- Ways to combine photos into one image;