Crystals to be grown. How to grow a crystal. Set for growing ruby \u200b\u200bcrystals at home
Our little new acquaintance Djinn promised to show and teach how to grow crystals at home. Young archaeologists share with us their impressions and lessons learned.
What are crystals?
Crystals are solids that have the natural external shape of regular symmetrical polyhedra, based on their internal structure. The first crystal research dates back to the early 17th century.
They grow and “multiply” independently, which is why they can rightly be called “living”. To “nourish” most crystals, water is required as their main ingredient.
How to grow a fluffy crystal
Fluffy crystal - amazing and very fragile. On its basis, modern "chemically grown trees" are based. We ! And today we have completely grown such a tree ourselves.
To grow a fluffy crystal we needed:
- Polyvinyl alcohol
- Hot water
- Urea
- Dye
- Liquid soap
- Filter paper
- Petri dish or saucer
- Measuring spoon
- Glass jar
- Beaker
As in creating the fascinating, first you need to dissolve 5 g of polyvinyl alcohol in 100 ml of hot water in a glass jar in a water bath.
And now the creative process: we create a “tree” from filter paper. To do this, cut out a rectangle from a circle and make a cylinder out of it, fastening it with a stapler. After that, we cut one edge into the "petals" and slightly bend them to the side.
Fluffy Crystal Growth Experiment
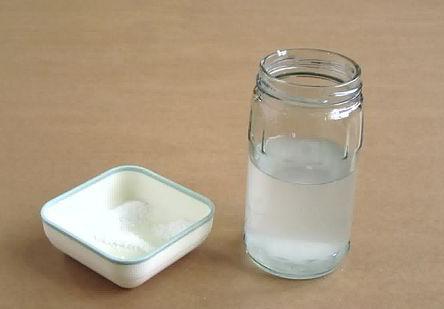
Prepare a saturated urea solution. To do this, pour 15 g of urea and several dye grains into a glass.

After stirring, add 15 ml of hot water.
After thoroughly mixing the solution, add 2 ml of the prepared solution of polyvinyl alcohol to a glass. For more intensive crystal growth, it is recommended to add a couple drops of liquid soap.

Now we pour the solution into the Petri dish, in the center of which we place the made base for crystals - “wood”. And ... we are watching and wonder!

The first crystals appeared in us after 20 minutes:

Here they were in an hour:

In a day:

The crystals grow intensively and quickly, but at the same time they are very fragile. But to be honest, this property is very fascinating for children. Because when I allowed them to do whatever they want with the trees at the end of the experiment, they with great pleasure and for a long time "broke" fluffy crystals, examined them, carefully studied, touched ...
How to grow a polycrystal
Polycrystal - This is a crystal consisting of many differently oriented small single crystals. Due to their irregular shape, they are often called crystallites.
To grow a polycrystal at home, you need to get the following:
- Dye
- Ammonium monophosphate
- Hot water
- Wand
- Thread
- Measuring spoon
- Beaker
Carrying out an experiment on growing polycrystals at home
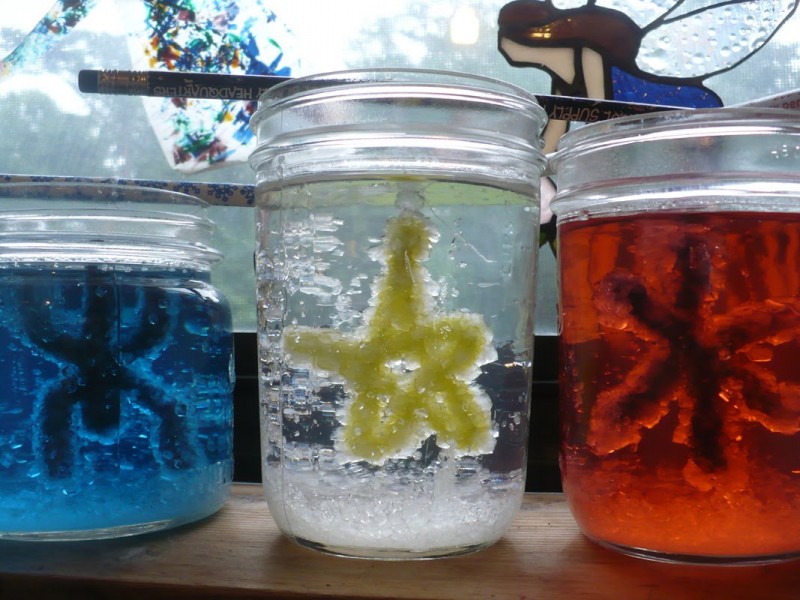
We prepare a saturated solution of ammonium monophosphate. To do this, pour the substance into a measuring cup to the level of 100 ml, add dye and pour 150 ml of hot water. Stir the solution thoroughly for a couple of minutes.

Now we attach the thread to the stick and for 2-3 minutes lower its end into the resulting solution to a depth of about 5 cm. After that, take out the thread and leave it to dry for 10-15 minutes. Thus, the mechanism of formation of crystal growth centers on a thread is launched.

Again, lower the thread into the solution and observe. Intensive crystal growth begins in an hour:

The longer the crystal remains in solution, the larger it becomes.
We watched an interesting picture. In addition to the thread, we left a stick for stirring in a glass with a solution, and now no less beautiful polycrystals grew on it, which very quickly turned into “ice cream on a stick” and for a long time carried away the son.

Polycrystals grow very beautiful. They are interesting to look at in the light. The light is refracted from the edges and gives out a small rainbow ...
How to grow a single crystal
Single crystal - a single homogeneous crystal having a continuous crystal lattice. Growing a single crystal at home requires significantly more time and these ingredients and materials:
- Alum Potassium Alum
- Hot water
- Dye if desired
- Measuring spoon
- Filter paper
- Beaker
- Stir stick
First you need to prepare a "seed". For her, we prepare a solution of 3 spoons of potassium alum and 50 ml of hot water.
Now we pass the solution through the filter, folding it in the form of a funnel. Filtering takes a long time. When the son wanted to speed it up, stirring with a stick, the paper was torn and I had to do it all over again. So, it’s better not to rush.

The filtered solution, covered with paper, must be left for 10-15 hours. During this time, potassium alum crystals are formed at the bottom of the glass, which will serve as the “seed”.
Drain the saturated solution into an empty glass, select the largest crystal and tie it to the tip of the thread. We attach the other end of the thread to the stick.
Once again, we prepare a solution of potassium alum and hot water, using this time the ratio: 9 spoons of a substance and 150 ml of water. If desired, dye may be added to the still dry substance.
When the solution cools down, filter it and lower the thread with the “seed”. We cover the glass with paper and be patient: the crystal grows for a long time - 3-4 weeks.

Unfortunately, we did not succeed in growing a single crystal. Apparently we were in a hurry and we got several foci of growth. Thus we have grown another polycrystal ...

To carry out all these fascinating experiments on growing crystals at home, we used only one set with chemical experiments for children from "" - Secrets of crystals .

Several days of experiments flew by quickly and excitingly. Every morning, the son hurried to watch how his crystals grew.
And we also had experience growing crystals from salt. The result was a beautiful white polycrystal ... Have you grown crystals at home? Share your experience and impressions!
PS: You can purchase these and other sets of the SuperProfessor series here.
I wish you an exciting summer!
With warmth
Alexey, Arseny and Lyudmila Porcepun.
Artificial stones have long gained popularity in jewelry. Indeed, for a jeweler, the value of a stone is determined not only by its deficiency in nature. An important role is played by a number of other characteristics:
- color;
- refraction of light;
- strength;
- weight in carats;
- size and shape of faces, etc.
The most expensive artificial gemstone Zirconia (synonyms: daimonskvay, jevalit, zirconia cube, shelby). Its price is low - less than $ 10 per 1 carat (0.2 grams). But it is worth noting that with the increase in carats, the price increases exponentially. For example, a 10-carat diamond costs 100 times more than a 1-carat diamond.
Artificial crystals of jewelry stones can be grown at home. Most of these experiments do not need special preparation; you do not need to equip a chemical laboratory or even purchase special reagents.
To gain experience growing crystals, start small. We will share the technique of growing beautiful crystals from everything that you can actually find in your own kitchen. You do not need additional equipment at all, because everything you need is definitely on the shelves. Also, consider the technology of growing artificial rubies at home!
How to grow ruby \u200b\u200bcrystals synthetically?

Growing ruby \u200b\u200bcrystals can even become a home business option. Indeed, beautiful synthetic stones are already in great demand among buyers today, so in case of successful implementation of the project they can bring you good profit. Synthetically grown stones are used by jewelers and are also widely used in technology.
Ruby crystals can be grown according to the standard method, choosing the right salts. But it will not be as effective as in the case of salt or sugar, while the growth process is much longer in duration. And the quality will be doubtful. After all, a natural ruby \u200b\u200bon the Mohs hardness scale is second only to Diamond, occupying an honorable 9th place. Naturally, when it comes to business, in most cases they use another method developed more than 100 years ago in France.
You will need a special apparatus, named after the inventor of this method, i.e., the Verneuil apparatus. With it, you can grow ruby \u200b\u200bcrystals up to 20-30 carats in just a few hours.
Although the technology remains approximately the same. A salt of alumina with an admixture of chromium oxide is placed in the storage of an oxygen-hydrogen burner. We melt the mixture, watching how the ruby \u200b\u200bactually grows “in front of the eyes”.
Depending on the composition of the salt you choose, you can adjust the color of the crystals, getting artificial emeralds, topazes and absolutely transparent stones.
Working with the device will require your attention and some experience, but in the future you will get the opportunity to grow crystals that fascinate with their beauty, transparency and color play. In the future, such masterpieces are well served by cutting and polishing, respectively, can be used for their intended purpose.
It is worth noting that artificially grown crystals are not precious stones, so even if you decide to engage in entrepreneurial activities to grow them, this will not require additional licensing.
The design of the device is simple, it can easily be done independently. But on the Internet, there are already enough craftsmen offering drawings of the original installation, as well as its advanced options.
Set for growing ruby \u200b\u200bcrystals at home
The principle of ruby \u200b\u200bproduction technology itself is quite simple and is schematically depicted below in the figure:
Understanding the principle of action, any device no longer seems so complex. One of the samples of the drawings of the Verneil apparatus:

Using this technology, you can also grow other expensive artificial stones, such as Blue Topaz, etc.
Growing crystals from salt at home

The simplest and most affordable experiment you can do is create beautiful salt crystals. To do this, you will need several items:
- Plain rock salt.
- Water. It is important that the water itself contains as little of its own salts as possible, but rather distilled.
- The capacity in which the experiment will be conducted (any jar, glass, pan will fit).
Pour warm water into the container (its temperature is about 50 ° C). Add salt to the water and stir. After dissolution, add again. We repeat the procedure until the salt ceases to dissolve, settling to the bottom of the vessel. This suggests that the saline solution became saturated, which was what we needed. It is important that during the preparation of the solution its temperature remains constant, does not cool down, so we can create a more saturated solution.
The saturated solution is poured into a clean jar, separating from the precipitate. We select a separate salt crystal, and then place it in a container (can be hung on a string). The experiment is completed. In a few days, you will be able to see how your crystal has grown in size.
Growing crystals from sugar at home

The technology for producing sugar crystals is similar to the previous method. You can lower the cotton tow into the solution, then sugar crystals will grow on it. If the crystal growth process has become slower, then the concentration of sugar in the solution has decreased. Add sugar again, then the process will resume.
Note: if you add food coloring to the solution, then the crystals will become multi-colored.
You can grow sugar crystals on sticks. To do this, you will need:
- ready-made sugar syrup, prepared similarly to saline saturated solution;
- wooden sticks;
- some sugar;
- food colors (if you want colorful candies).
Everything is very simple. Dip a wooden stick in syrup and roll in sugar. The more grains stick, the more beautiful the result. Let the sticks dry thoroughly, and then go on to the second phase.
Pour saturated hot sugar syrup into a glass, put the prepared stick in the same place. If you are preparing multi-colored crystals, then add food coloring to the hot ready-made syrup.
Make sure that the stick does not touch the walls and the bottom, otherwise the result will be ugly. You can fix the stick with a piece of paper by putting it on top. The paper will also serve as a lid for the container, which will not allow any foreign particles to get into your solution.
After about a week, you will get great sugar lollipops. They can be used to decorate any tea party, enthralling not only children, but also adults!
Growing crystals of copper sulfate at home

Crystals from copper sulfate are obtained in an interesting form, while they have a saturated blue color. It is worth remembering that copper sulfate is a chemically active compound, so the crystals from it should not be tasted, and caution should be exercised when working with the material. For the same reason, in this case, only distilled water is suitable. It is important that it is chemically neutral. Be careful and careful when handling copper sulfate.
In this case, the growth of crystals from vitriol occurs essentially according to the same scheme as the previous cases.
When placing the main crystal for growing in a solution, make sure that it does not come into contact with the walls of the dishes. And do not forget to monitor the saturation of the solution.
If you placed your crystal at the bottom of the vessel, then you should watch so that it does not touch other crystals. In this case, they will merge, and instead of one beautiful large sample you will get a mass of slurred shape.
Useful advice! You can independently adjust the size of the faces of your crystal. If you want some of them to grow slower, you can lubricate them with petroleum jelly or fat. And for the safety of the sky-blue handsome, you can process the edges with transparent varnish.
There are 3 weight categories of diamonds:
- Small. Weight 0.29 carats
- Average. Weight 0.3 to 0.99 carats
- Large. Diamonds weighing more than 1 carat.
For popular auctions, stones weighing from 6 carats are allowed. Stones weighing more than 25 carats are given their own names. For example: Winston diamond (62.05 carats) or De Beers (234.5 carats), etc.
1Minikel E.V. (village of Nizhnesortymsky, MBOU "Nizhnesortymskaya secondary school")
1. URL: http://ru.wikipedia.org/wiki/E519.
2. Geology of the Earth http://www.geologiazemli.ru/articles/112.
3. Kristallov.NET http://www.kristallov.net/mineraly.html.
4. Olgin O. "Experiments without explosions." - M .: "Chemistry", 1995.
5. Pleshakov AA, “From the earth to the sky”. - M .: "Education", 2002.
6. Stepin B.D., Alikberova L.Yu. "A book on chemistry for home reading." - M .: Chemistry, 1994.
7. Photo of crystal samples from the collection of V.A. Sletova, geo.web.ru/druza/a- Sletov.htm.
8. Chemistry and No. 8622/0790 chemists. http://chemistry-chemists.com/Video6.html.
9. Shaskolskaya M.P. "Crystals." - Moscow: "Science", 1985.
Crystals have played and still play an important role in human life. Crystals are widely used in science, industry, optics, and electronics. Crystals are obtained in the laboratory, but they also occur in nature. For example, snowflakes, frosty patterns on glass windows and hoarfrost decorating bare tree branches in winter. In addition, growing crystals is an exciting activity and, perhaps, the simplest, most affordable and inexpensive for most young chemists, as safe as possible. I was very interested in this topic, and I decided to try to grow salt crystals.
Theme of our work: Crystal Growing
Objective: to conduct a study on the growth of crystals from various chemicals.
Research Objectives:
1) find out what a crystal is;
2) to conduct a survey among students of 3 classes "What I know about crystals";
3) find out what conditions need to be created for crystal growth;
4) perform experimental work on growing crystals;
Research Methods:
1) The accumulation of theoretical material.
2) Carrying out experimental activities in order to obtain crystals
3) Analysis of the results of the study.
The object of study are crystals.
The subject of research is the crystallization process.
Research hypothesis: We proceed from the assumption that all salts can form crystals from their aqueous solutions.
The practical significance of the study lies in the fact that it can be used in lessons around the world, in extracurricular activities, and in the classes of the Young Chemist club.
Basic information about crystals and their properties
The history of artificial crystals
Before conducting my practical research, I had to find out what crystals are, what their properties are. Therefore, I turned to theoretical sources in this area. For this, I used Internet resources and books.
The first attempt to obtain artificial crystals can be attributed to the Middle Ages, to the heyday of alchemy. Although the ultimate goal of the experiments of the alchemists was to obtain gold from simple substances, it can be assumed that they tried to grow crystals of precious stones.
What are crystals? Crystals, translated from Greek, (krystallos) "ice". According to the encyclopedia, a crystal is a solid. Crystals grow by attaching particles of a substance from a liquid or vapor. Crystals come in natural and artificial, grown in specially created conditions. And each person, if desired, can easily grow crystals at home. But in order for the result to be really beautiful, you must carefully perform all the actions.
Types of crystals
Crystals have special properties. Crystalline solids are found in the form of individual single crystals - single crystals - and in the form of polycrystals, which are an accumulation of small crystals. Crystals come in various shapes. Sometimes dendrites form - these are crystals similar to tree branches; very fragile, but very beautiful. Crystals come in various sizes. Many of them can only be seen through a microscope. But there are giant crystals weighing several tons.
Crystal Growing Methods
Crystallization can be carried out in different ways:
1 method: Cooling a saturated hot solution or melt.
It is because of the cooling that many minerals appeared on Earth millions of years ago. The "solution" for this "experience" was magma - the molten mass of rocks in the bowels of the earth. Rising to the surface from a red-hot depth, magma cooled. And as a result of this cooling, the very minerals that we walk along formed. This process is very lengthy.
2 way: Gradual removal of water from a saturated solution.
During evaporation ("drying out"), the water turns into steam and evaporates. But chemicals dissolved in water cannot evaporate with it and settle in the form of crystals. The simplest example is salt, which is formed by the evaporation of water from brine. And in this case, the slower the water evaporates, the better the crystals are obtained. It was in this way that I grew my crystal.
3 way: In the condensation of vapors.
Crystals can also grow with vapor condensation - this is how snowflakes and patterns on cold glass are obtained.
When using all methods, the best results are obtained if the seed is used - a small crystal of the correct form or stones. In this way, for example, ruby \u200b\u200bcrystals are obtained. Gem crystals are grown very slowly, sometimes for years. If crystallization is accelerated, then instead of one crystal, a mass of small ones will turn out.
There are many instructions on the Internet on how to grow crystals from various chemicals. We decided to check everything on our own, and as a basis we took ordinary table salt, copper sulfate, alum-potassium alum, and salts of silicic acid.
After analyzing the text material and determining the research methods, we conducted experimental work on growing crystals.
Practical part
I realized that growing crystals is an art, so a little perseverance, perseverance, accuracy, and you can become the owner of beautiful crystals, but you must follow safety precautions. That is why I turned to a chemistry teacher.

Experience No. 1. Growing crystals of sodium chloride
We take salt, dilute the solution in a container and put it in a pan with warm water until it dissolves. Add more salt and mix again. We repeat this step until the salt dissolves and settles to the bottom of the glass. We got a saturated salt solution. Pour it into a clean container. Choose any larger coarse salt crystal you like, tie it to a string and hang it so that it does not touch the walls of the glass. After a couple of days, you can notice significant growth for the crystalline. Every day it will increase (Fig. 1).
Result: we got a crystal of table salt.
1. Salt consists of crystals.
2. When crystals of salt come into contact with water, they dissolve.
3. The fastest crystals of salt can form in a saturated solution of sodium chloride.
4. As the water evaporates, the salt forms crystals again.
5. It is possible to grow crystals under the necessary conditions: the presence of saturated saline and a thread with seed.
Experience No. 2. Crystal growth from copper sulfate
We take a jar of water, add copper sulfate, mix thoroughly until it dissolves. A water container is best gradually warmed up to dissolve the chemical more quickly. In the process, the water will begin to change color - from blue to dark blue. After that, we lower the “seed” into the glass jar. This is an ordinary thread tied to a pencil. And after a couple of days we see that a lot of small blue crystals have grown on the string. We continue growing until the water turns light in color and the crystals stop growing (Fig. 3).

Result: we got a crystal of copper sulfate. Small crystals grown can be used as decoration, for example, frames for photographs or other objects.
Test No. 3. Crystal Growth from Potassium Alum
Pour 4 teaspoons of aluminum alum powder into half a cup of hot water. Stir for better dissolution. After a while, the powder will completely dissolve and the solution will become clear.
Cover the jar with a special lid to protect it from dust. After 1 day, beautiful crystals appear.
Result: we got crystals from potassium alum.
Experience No. 4. The growth of crystals from salts of silicic acid
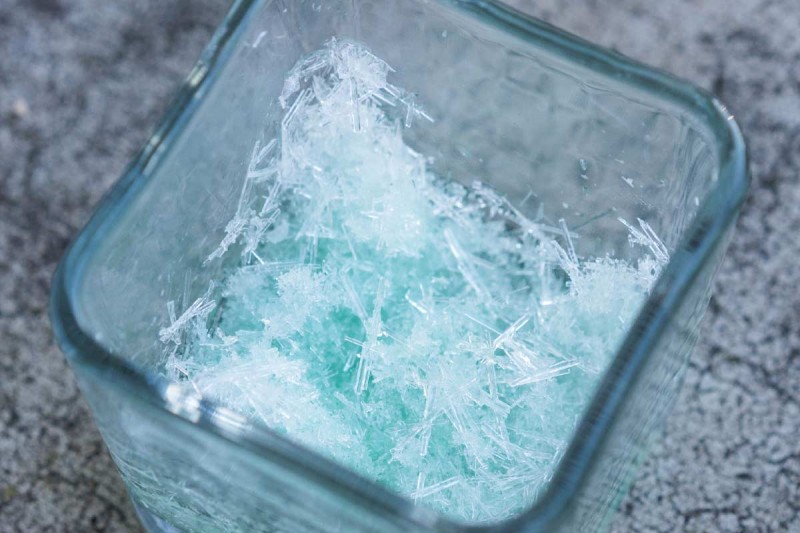
Silicate glue (an aqueous solution of sodium silicate) and distilled water were poured into a beaker in a ratio of 1: 1. Crystals of salts of various colors were poured into a glass: calcium, nickel, copper, cobalt, iron, barium, zinc, chromium and manganese. After 15-20 minutes, “thickets” resembling trees or algae appeared in a glass.
Result: “algae thickets” formed by crystals of silicic acid salts appeared in a beaker.
Experience No. 5. Growing stalactites and stalagmites
The frame of the future "cave" is made of thick paper. A little alabaster is mixed with a small amount of water until a viscous homogeneous mass is obtained. While the alabaster is not frozen, they smear it on all sides of the "cave" from the outside and from the inside. After a few hours, the alabaster finally hardens.
Then we began to grow in the "cave" of "stalactites" and "stalagmites." In a suitable vessel, a mixture of silicate glue (water glass) and water was prepared in a ratio of 1: 1 by volume. We placed a “cave” in a vessel so that the liquid level did not reach its upper arch. To the arch of the "cave" should be free access. Using a spatula, magnesium sulfate was introduced into the “cave” and crystals were poured into the solution. In the same manner, crystalline calcium chloride was added to the solution. After a few minutes, the growth of “stalagmites” was observed (the time of their growth depends on the volume of the vessel).
Then carefully removed the "cave" from the solution, turned it 180 degrees and again lowered it into the solution. Once again brought into the "cave" salts of magnesium sulfate and calcium chloride. Again we saw the appearance in the "cave" of bizarre growths. They took out the "cave" from the vessel, carefully washed it with water and left to dry (Fig. 4).

Result: bizarre crystal growths formed on the arches of the cave.
As a result of the research, the hypothesis is fully confirmed: we were able to grow crystals of salt, sugar and copper sulphate.
Questioning Results
Interested in growing crystals from various chemicals, I decided to ask classmates: “Do they know what crystals are? How do you get them? And where are they used? ”For this purpose, a survey was conducted among students of the parallel 3 classes. Students were asked the following questions:
1. What are crystals:
b) glass
c) minerals
2. Select crystals from the proposed items (several answers):
c) pearls
d) snowflake
3. How are crystals grown (several answers):
a) boiling
b) evaporation
c) cooling
d) vapor condensation
Result: the questionnaire showed that not all students know what crystals are, how they are received and where they are used. All answers are summarized in charts (Fig. 5-7), so at the class hour I introduced the children to the results of their work.


Conclusion
I learned that many prominent scientists began their first experiments with growing crystals. In addition to purely external effects, these experiments make you think about how the crystals are arranged and how they are formed, why different substances produce crystals of different shapes, and some do not form crystals at all, what needs to be done to make the crystals large and beautiful.
The hypothesis of the study was fully confirmed: salt crystals can appear when certain conditions are created and if crystallization conditions are changed and various substances are dissolved, then crystals of different shapes, colors and at different times can be obtained.
I learned to work with information sources.
I learned what crystals are, what they can be, why they grow and why they are needed.
He mastered some methods of growing crystals of various substances.
I observed crystal growth under different conditions.
He studied the solubility of copper sulfate in water at different temperatures.
I learned that crystals of different chemical composition have different shapes and differ in properties such as symmetry.
Thus, after the study, I can draw the following conclusions:
1) under favorable conditions, sodium chloride, copper sulfate, potassium alum, and silicic acid salts take the form of crystals;
2) crystals of various substances have different shapes;
3) the shape of the crystals is affected by temperature;
4) crystals of various substances have different properties (some crystals are colored, others are colorless; some crystals grow well, others - poorly).
5) a crystal grows faster and easier when a crystal is placed in a saturated solution - a “seed”.
Bibliographic reference
Amirov M.F. GROWING CRYSTALS // Start in science. - 2016. - No. 1. - S. 107-111;URL: http://science-start.ru/ru/article/view?id\u003d22 (accessed: 04/19/2019).
The term "crystal" should be understood as a substance in which the smallest particles, atoms, are arranged in a certain order. They form a crystal lattice - a three-dimensionally periodic ordered spatial arrangement.
As a result of this, the crystals externally look like regular symmetrical polyhedra. They can vary greatly in shape and have from four to several hundred faces that intersect at certain angles with each other.
Salt - a representative of the family of crystals
One of such solids with an ordered symmetrical structure is ordinary salt.

It is a food product found in nature in the form of a mineral called halite. A large number of it is found in other salt sources. If you look at the grains of salt with a microscope or a magnifying glass, you will notice that they have flat faces. So, they are in a crystalline state. In this article, we will talk about how to make a crystal of salt yourself. In fact, it is not difficult. To understand how salt crystals form, that is, the crystallization process, we suggest you carry out an interesting experiment at home. It is advisable for the child to carry it out under the guidance of an adult. Remember that the shape of the salt crystal can be different, including cubic, prismatic or any other - more complex. However, the faces of the salt always intersect at right angles.
Let's talk about how to make a crystal of salt: the necessary supplies and tools
Well then, let's get to work. What materials and tools will we need to conduct this interesting experience? Of course, water, transparent glass glasses, a rope or a thick thread, a wooden spatula. You should also prepare the ballpoint pen or ordinary pencil.

And most importantly - you need to be patient. The fact is that the crystallization process takes time - about three weeks. How to make a crystal of salt? Take a good salt, no impurities. It is advisable to purchase a product with a purity of at least 98%, otherwise the experience may not succeed. If the salt contains a large number of various impurities, then the copy will turn out ugly and will have flaws. from salt, we begin by preparing a highly concentrated solution. Pour warm water (200 ml) into a glass or jar and start adding salt. Do not forget to constantly stir the liquid with a wooden spatula. This is necessary so that the salt dissolves well. After the solution is ready (this can be determined by the fact that the introduced salt has ceased to dissolve in a glass of water with ordinary stirring), the mixture should be heated. Fill the saucepan with water, put on fire, heat the water. Then carefully place a glass in it with concentrated saline and wait until it heats up.
We continue to work on the cultivation of beautiful salt crystals
Then we take out our glass glass from the pan and leave it alone.

On the ballpoint pen rod (pencil) we fix the thread to which we attach a small crystal of salt. Put the rod on a glass and immerse the rope with the seed in the solution. It is on this salt crystal that our beautiful exhibit will grow. That's all, now we can only wait. We place the glass in a warm place and monitor the crystallization process every day. In no case should you shake, turn or lift the container with the solution. Gradually, the crystal will grow and become large enough. When this happens, you can carefully remove it from the solution. We advise you to dry it with a napkin, but be extremely careful - your copy is very fragile. Cut the excess thread and coat the crystal with a clear varnish to extend its lifespan. Now you know how to get salt crystals at home. We hope you will be able to repeat our simple experience.
Crystals from the experience of creating a beautiful exhibit

If you want to grow large, even and beautiful samples - pay attention to the following experience. For work you will need such materials and tools:
- clear glass;
- water;
- sea \u200b\u200bsalt;
- paper;
- napkin;
- wooden spatula;
- flat pebble of medium size.
The technology of the crystal growing process is as follows. First, pour not too hot water into the glass and start pouring sea salt into it, gradually, one teaspoon each. In this case, do not forget to interfere with the spatula. Salt must be added to the liquid until it stops dissolving. Now we take a napkin and filter the resulting solution through it. This is done so that the specks do not interfere with the formation of an even and beautiful pattern.
The process of creating large salt crystals
How to make a crystal from salt: after filtering, put a small pebble in the solution (you can replace it with a nut) and set it to cool. Remember that the slower our salty liquid cools, the larger the crystals will be. It is advisable to cover the glass with paper and put it in a dark place, protected from drafts. After two or three days, you will see how your pebble will grow into small crystals. Carefully make sure that the solution completely covers the "seed" all the time. You should also weekly clean the liquid from dust and excess crystals that form on the bottom of the glass. As evaporation takes place, it is necessary to add highly concentrated into the container. Make sure that it is clean and not cold (room temperature). In addition, it is necessary to periodically remove the crust that appears at the bottom of the tank. After two to three weeks, your crystal will reach approximately 2-3 cm in length. And in order to get a larger copy, it will take more time - about 6 weeks.
Correct salt crystals
Remember that you may not immediately get beautiful and even crystals. Any business needs practice. We advise you to carefully adjust the crystallization of the samples, removing not very beautiful growths. This can be done with a sharp knife, scraping them off. Also, using petroleum jelly, you can stop the formation of faces. If necessary, a layer of petroleum jelly can be removed from the sample with acetone. When your crystal grows to the desired size, you can carefully remove it from the solution. After that, gently wipe the edges with a napkin. You can cover the sample with hairspray: so your crystal will become less fragile, brittle and will retain its beautiful appearance for a long time.
Original crafts made from crystals of salt

At home, you can not only grow an ordinary salt crystal, but also make an interesting craft. To do this, you will need such tools and materials:
- water;
- salt;
- wire;
- threads
- filter paper;
- can - 2 pcs.;
- pan;
- wooden spatula.
We begin the work by dissolving the salt in water. We bring it into the liquid in small portions, adding the next only after the final dissolution of the previous one. When the salt ceases to dissolve, go to the next step. We take the pan, fill it with water and put the container on the stove on a small fire. We put a jar of saline into it. We follow the heating process. We continue to dissolve the salt, bringing the temperature to 65 degrees. That's it, turn off the gas, but until we take the can out of the pan. The fact is that temperature differences can cause glass containers to burst. After cooling the solution, you can safely get the jar out of the pan.
Solution Filtration and Crystallization

After this, we proceed to the purification of the solution from impurities. We take a clean jar and fasten filter paper on its neck. Now gently pour the solution into a new container. All undissolved salt crystals and impurities remain on filter paper. We get a clean solution. Now put the jar of liquid in a cool place and do the "seed". We take a copper wire and make any animal shape, flower, twig, asterisk out of it. Wrap the wire with thread. We place the workpiece in a jar with saline, cover the container with a napkin, leaving only a small gap. That's all, it remains only to wait until the salt crystals are grown. After the wire has grown, you can get it out of solution. This should be done very carefully, as salt crystals can break.
Crystals surround us everywhere. We eat them, walk along them, and use them for the manufacture of various tools and devices. You can conduct an interesting experiment and grow them at home. Consider the photo of homemade crystals, you can get large and small, transparent and color specimens. It all depends on your desire and patience.
Salt crystals
A simple experiment can involve children. For him, you only need salt and water. There is no need to use additional reagents, therefore it is a safe process. This is an exciting lesson, every day you can watch how the crystal gradually increases in size.


Preparing for the experiment
Before starting work, determine the place where the container with the crystal will be located. During growth, do not move or tilt dishes. It is better to take sea salt, as it does not contain impurities.

Take distilled water or boil and filter it. You can use ordinary table salt for the experiment.

Do not pour the solution into metal dishes. Novice researchers are interested in what crystals can be made independently.

The crystal size depends on the duration of the experiment, the volume of the capacitance. As a basis, choose a thread, wire, twigs or a piece of salt.

Growing
Take half a glass of water, pour into a pan. Then the dishes are put on fire and brought to a boil. Consider what crystals can be grown at home from.

The formation of crafts from table salt will take several days. Sea salt forms a crystal in 2 days. If you choose iodized salt, then the result will have to wait a long time.

It is necessary to prepare a saturated solution. Salt is added to warm water until it stops dissolving. We prepare the thread for the base, we attach a small crystalline salt to it.

The rope should not touch the bottom or walls of the dishes. The second end of the thread is tied to a pencil, which is placed on top of the container. Now you need to observe the growth.

Sugar crystals
Sweet and colorful products will delight children. To get them, just use the instructions for growing crystals at home. For the experiment you need 2 glasses of water, 5 glasses of sugar, wooden skewers, pan, transparent containers, paper.

First of all, we prepare sugar syrup. For him, you need a quarter glass of water and two tablespoons of sugar. We put this mixture in a saucepan on fire.

After that, skewers alternately dipped in syrup, and then sprinkle with sugar. Billets must be well dried, it is better to leave them until the morning.

Growing process
Pour 2 cups of water into the pan and gradually pour 5 cups of sugar. The solution is constantly stirred. If the sugar has completely dissolved, remove the syrup from the heat. Leave it for 15 minutes to cool. Cut out paper mugs. They must be larger than the diameter of the containers.

To figure out how to properly grow crystals with your own hands, you need to carefully study the sequence of actions. This will help to get the desired result.


Pour the cooled syrup into glass containers, you can add food colors to them. Then blanks with mugs of paper on them are lowered into the glasses. Skewers should not touch the bottom and walls. It takes a week to grow sweet crystals.

Note! 
Blue vitriol crystal
This experiment requires strict adherence to safety regulations. We will need water, a glass container, copper sulfate. To purchase in the store you need a uniform powder of bright blue color. In a jar, pour 100 g and pour hot water, stirring constantly. We get a saturated solution, filter it and put in the refrigerator.

The next day we select the largest crystal, fix it on a thread and place it in a jar with a filtered solution.

The container must be covered with paper so that dust does not get there. The growth process lasts several weeks. After the crystal is removed and covered with colorless nail polish.

Conclusion
Crystal growing is an exciting process. To obtain an excellent result, it is important to adhere to the technology. To practice, you can buy a special kit for growing crystals at home. Sweet products can be tasted at home-made tea parties.


At some point, the crystals stop growing. You can end the experiment on this, or prepare a saturated solution again and lower the crystal there. He will grow even more. Crystal growing is an interesting and informative process.

Photo crystals at home

Note! 


Note! 


It might be useful to read:
- Summary: Analysis of the methods of the effectiveness of the quality management system processes;
- Contract for the provision of paid educational services (training contract): we draw up the right places for education contracts;
- Hardware Diagnostics;
- Automation of the technological process of collecting wastewater treatment;
- Classification and types of innovations;
- Assembly of electronic equipment Designs of sealed terminals of electronic assemblies;
- Methodological foundations of commercial activity;
- Selection and calculation of welding modes;