Crafts migratory birds with their own hands. DIY bird crafts from various materials. Blue bird from an egg: an unusual DIY craft
Marina Suzdaleva
Spring is coming into its own. return home from warm countries, build nests and prepare for the appearance of chicks. Such changes in nature could not go unnoticed by enthusiastic mothers and their babies. The participants of "" prepared 7 detailed master classes on making do-it-yourself bird crafts. Chickens in different techniques, birds made of paper and cones, a dove of peace and a bird's nest will make your spring creative activities with children even more interesting and varied.
Dove of peace with postcard
My daughter has turned into a little why. She is almost 3 years old and is interested in everything she sees. In anticipation of the central street of our small town took. When asked what it is and why, I decided to tell about the great heroes who saved the world. Including about her great-grandfathers, one of whom reached.
At home, we decided to make a postcard for great-grandfather in the form of a dove of peace, which carries a postcard.

We needed:
- Album sheet of A4 format;
- Scissors;
- Glue;
- Colored paper (velvet);
- Paints;
- Satin ribbon;
- Marker.
The dove is made in origami style. In this video you will find a detailed master class:
When the dove is ready, cut out a small rectangle and fold it in half.
We make a slot on the card and under the pigeon's tail.
We insert the tape into the slots and tie the ends.
We hide the knot under the pigeon's tail.

Decorate a postcard. We glued a St. George ribbon from orange and black velvet paper. The inside of the card was decorated with paints and a cotton swab. True, I planned to draw a salute, but Nastya wanted flowers.
It turned out to be an original handmade gift. I hope grandpa likes it.
Victoria Pechieva with babies Nastenka 2 years old. 8 months and Matveyka, 11 months old, Belorechensk
In the first week of May, we accidentally ended up in Nakhabino, Moscow Region, so nature itself helped us in creating crafts!
We had white paper, colored pencils, felt-tip pens and a glue stick. Collected on site. They cut out of paper - a tail, wings and a muzzle so that they could be folded in half. Colored with pencils and markers. Details glued to the bump.

Now the birds decorate the yard, waiting for us on.
Olga Antonenko and Olesya 1 year 7 months, Yaroslavl.
Movable bird
We got a moving bird craft. Her wings move when you pull the string from below.
For crafts we used: cardboard, colored paper, scissors, awl, glue stick, brads, thread.

Manufacturing process: the body of a bird and two separate wings were drawn on cardboard. They cut it out, and in the place where the wings and the body were fastened, holes were made with an awl. Then they began to decorate the body and wings of the bird with “feathers” made of colored paper. At the end, glued the eyes and beak. After that, they connected the wings together with a thread (folded several times so that it was thicker). They made a loop (ring) of thread between the wings. The wings were attached to the body with the help of brads. The bird is ready.

Pull the thread from the bottom and the wings of the bird will rise up.
Salimova Olga and daughter Alena (2 years 4 months), Yekaterinburg.
Nest with a bird
For crafts we need:
Tired of the mess in the nursery? Tired of endlessly collecting toys for the child?
- pasta in the form of nests;
- brown gouache and thick brush;
- plasticine of several colors;
- a box from a kinder surprise (can be replaced with a large piece of plasticine);
- sequins (beads).
We start by preparing the nest: we paint the pasta nests with brown paint.

While the nest dries up, we make a bird: we attach eyes, beak, tail and wings from plasticine to the box from Kinder Surprise.
We roll another piece of plasticine into an egg and decorate it with sequins (and / or beads). You can attach decorations with your fingers or roll the egg over decorations scattered on the table.
At the last stage, we assemble the craft: we place the egg and the bird in the nest using plasticine.
If the child has the strength and desire, then you can make a second bird or several eggs.
Kudryashova Nadezhda and Misha 1 year old 5 months, St. Petersburg.
I didn’t have a question what kind of bird to do - that means it’s a chicken. To make a bird, I discovered a new waste material -. This is ready-made papier-mâché - soak and sculpt. I took note of this, and for today's craft I decided to take the cells themselves.

I cut out the parts necessary for the idea from the trays, and removed the rest. For the chicken, I took two recesses and connected them with masking tape so that it opens like a box.
Now all the blanks need to be painted, which my son did with pleasure. When painting, they got a little wet with us, but we left them to dry and then continued to create.

I cut out yellow wings and a beak from cardboard, and paws from orange. We glued all the blanks to the chicken, painted eyes with gouache and our chicken came to life! For the cockerel and hen, I cut out only the beaks and scallops. I glued them with PVA glue. Eyes also painted with gouache.

Here we have such a funny chicken family. You can use them as candy bowls, and the chicken as a surprise box.
Kosteva Oksana and son Sashenka 1 year old. 11 months old, Dolgoprudny.
First, we cut out two circles with a diameter of 8 cm from cardboard, and inside the large circles we cut out a smaller one with a diameter of 4 cm (we no longer need these small circles of 4 cm here).
 We put two circles of 8 cm together and wrap them with yellow knitting threads, the more you wrap, the more magnificent the pompom will be. Then we cut the threads with small scissors along the outer circle of the thread and at the same time insert the thread between the circles of cardboard, tighten this thread and tie it. Remove cardboard circles. The pompom is ready, it will be the body of the chicken.
In the same way we will make the head of a chicken, only a smaller pompom. To do this, cut out two circles of cardboard with a diameter of 6 cm, and inside them circles with a diameter of 3 cm, then similarly.
Tie two pom poms together. On the head we glue eyes and a beak made of red leatherette or hard felt, or you can knit it from red threads. Glue the paws on the body. I made from twigs, you can also use hard brown felt.
Such a funny chicken is ready!
Postcard "Chicken"
For a postcard in the form of a chicken that hatched from an egg, my daughter and I made handprints with yellow paint on a white sheet. It was possible, of course, to circle the palms with a pencil on yellow paper, but this is not at all interesting for my daughter.

While our palms were drying, we cut out an oval from yellow cardboard for the figure of a chicken, a semicircle for the shell was cut out of white cardboard, and a beak from red cardboard.
We prepared the basis - our postcard, where we will collect the chicken. The palms were cut out along the contour and re-glued onto a postcard, then a yellow oval was glued. On the yellow oval - the shell, eyes and beak.
We sign a card for memory and you can give!
Gavrilova Faina and daughter Taisiya, 1 year old. 2 months, Arkhangelsk.
Master class "Birds have arrived"
Craft for 1st grade students.
Appointment of the master class: making a paper model of a white stork for Birds Day.
Goals: to develop a cognitive interest in the nature of the native land through the manufacture of a model of a bird; develop elementary ecological and ethical norms of behavior in nature.
Tasks:
Development of fine motor skills of hands;
Formation of motivation for creative work, paperwork skills, work for results; formation of a holistic, socially oriented view of the world in its organic unity and diversity of nature, a respectful attitude towards a different opinion;
Formation of aesthetic taste in the design of work.
Equipment: sheets of white paper, scissors, felt-tip pens, a table “Do you know birds?”
Lesson progress
1. Teacher's story.
Spring. Nature is awakening from its winter hibernation. One of
The first reminders of the onset of spring are the birds that return from warm countries. The bustle of birds, their chirping welcomes the rebirth of nature.
The white stork is a bird of the sun, peace and goodness. Every year he returns to his old place at the end of March or at the beginning of April. People are accustomed to considering her as a guardian angel of the hearth, as a peaceful symbol of constancy and prosperity.
Storks are listed in the Red Book. They need to be protected. In June 2012, an action was carried out in the Novooskolsky district - a census of white storks. In our settlement, these birds live in the village of Tavolozhanka.
2. Announcement of the topic of the lesson.
I want to invite you to make such a guardian angel.
3. Work plan.
1) Cut out a square from a sheet of A4 white paper.
2) We draw the workpiece.
.jpg)
3) We color the tail and wings with a black marker.
.jpg)
4) Fold diagonally.
.jpg)
5) Cut out the head and neck, cut the feathers.
.jpg)
6) We twist the cut feathers on the tail and neck.
.jpg)
7) Turn inside out, inserting the tail into the incision.
.jpg)
.jpg)
4. Doing work by children.
5. Dynamic pause:
Let's gently wave our hands to the sides -
The birds are flying towards us.
How they quietly sit down
Let's show - the wings are folded back.
Bent over and sat down.
They sat quietly to study.
6. Summing up.
.jpg)
Why do we need birds?
Why should they be protected?
When is Bird Day celebrated?
You can make an incredible number of different crafts.
In this collection of master classes, you can learn how to make plastic bottles various birds.
Here you will find simple ways making beautiful birds with which you can decorate your house, cottage and / or garden.
You can involve children in the process of creating birds from plastic bottles - they will definitely enjoy doing something new and interesting, and you will be glad that they were torn off their computer, tablet or phone.
DIY plastic bottle chicken
There are several ways to create a chicken from a plastic bottle. It all depends on the size of the bottle itself and on its shape.
If you turn on your imagination and connect children to this creative work, then there are a lot of options.
Here, for example, is a chicken, for the base of which a 5-6 liter bottle is needed.

1. Paint the bottle yellow (on the inside). You can use regular paint.
2. The beak and scallop can be cut from other bottles.
3. Use a knife to make holes in the bottle and insert everything you did.
4. Take toy plastic eyes or just plasticine and make eyes. You can also color the chicken's eyes.
How to make a chicken out of plastic bottles

To make this chicken, you will need:
Plastic bottle
Scissors.
Do-it-yourself peacock from plastic bottles

You will need:
Scissors;
Plastic bottles;
Synthetic foam;
Glue gun;
Wooden post;
abrasive mesh;
Metal rod.
At the end of the text instruction you will find a video instruction.
1. We make blanks for feathers.

First you need to make a blank from cardboard;
Feathers should be made semicircular with cuts of different lengths.
2. We make blanks for the tail. They must be long.
Cut the bottle lengthwise and cut a strip of the width you need from it.
* Feathers should be sorted by size. Prepare bags and put feathers of the same size in each bag.
* If at the end of the creation of the peacock feathers are not enough, just finish more.
3. Create a peacock layout.

Prepare synthetic foam and cut out some necessary details(torso, neck and head);
Connect all these parts with a glue gun;
Take a wooden post and insert a metal rod into it;
Attach your bird's body to a metal rod;
Cut out a circle from a new plastic bottle (in this case it is a red bottle);
In this circle, make one incision going from the edge to the center, then twist the part into a cone - you will get a peacock's beak;
Attach the beak to the foam with a glue gun.
4. Glue the feathers.

It is worth starting from the bottom, where the longest feathers are glued, and the higher you climb, the shorter the feathers.

* Glue the feathers with an overlap.
* After the breast, go to the back.
5. To make a tuft, cut out strips from plastic bottles on which feathers are glued.

6. To create eyes, you can use plastic bottles of a different color, as well as plasticine, paint or toy plastic eyes.
7. To make wings, use an abrasive mesh. Feathers are glued onto the wings cut out of it. The tail is made in the same way.
8. Attach all remaining parts and you're done!

Video instruction
Do-it-yourself bird from plastic bottles: swan
This swan will not only decorate your garden, but will also become a beautiful flower bed for one or more flowers.

You will need:
5 l plastic bottle;
Milk bottles with a volume of 300 ml;
Wire;
Scissors;
Black marker;
Lighter;
1. Making the body.

Take a 5 liter bottle and draw lines on it with a marker as shown in the image;
Cut holes along the lines
Insert the wire into the hose, and insert the hose into the bottle through the neck - you will get a neck frame
2. We make plumage.

Take a white bottle (from milk) and cut off the bottom and neck;
Now cut feathers of any shape and size from this bottle;
Small cuts can be made on the edges of the feathers;
Each feather should be treated carefully with a lighter (on the outside);
Now start stringing two feathers onto the wire.
3. Putting it all together.
For the neck, white bottles with a cut off bottom are used (in this example there were 16 of them);
For the head, the top of a large bottle with a cut neck is used;
In the place where the hose ends and the beak begins, make two holes on opposite sides (in a plastic bottle and in a hose), then use a wire to secure the entire structure;
Make a beak from a plastic bottle painted with red paint or use a bottle of the appropriate color;
Start attaching the feathers from top to bottom and in a circle.
How to make a dove with your own hands from plastic bottles

You will need:
Plastic bottles;
Styrofoam;
Scissors;
Wire;
Toy plastic eyes or plasticine.
1. Cut off the neck of a plastic bottle (see image). This blank will serve as the body of a dove. Make a breast.
2. Make cuts on the bottle as shown in the image. Press the incised part inward to make the body of a dove, then tighten the workpiece with wire.
3. Cut out the pigeon's head from the foam.
4. To make feathers, cut the middle part of a plastic bottle. The strips should be of different lengths, and round off their ends.
5. Make 2 holes at the base of each feather.
6. Using wire, screw the feathers to the net.
7. Attach the pigeon tail to the body of the pigeon.
8. It remains to paint the pigeon's head and make eyes (glue plastic ones, draw with a marker or use plasticine).
Children's crafts from plastic bottles with their own hands: a rooster

You will need:
Plastic bottles
Plastic plates
plastic glasses
Plastic spoons.
1. Cut off the top of the plastic bottles and secure them with adhesive tape as shown in the image.

2. Cut the plastic cups with a fringe and put them on the bottle one by one.
* You can use cups of different colors and alternate them.

3. Rooster tail can be made from plastic plates. After that, attach the tail to the plate.


4. Wings can be made from leftover plastic plates.
5. You can make a rooster head out of a plastic ball. It is attached to a cut cup glued to the bottom of the previous cup.

6. A beak and comb can be cut out of colored paper. They are attached with tape or hot glue. Eyes can also be made from colored paper, plasticine, or toy plastic eyes can be used.
In the design of a garden or a playground, when decorating a children's room or setting a festive table, they can be used birds, handmade made of a variety of materials - from wood to simple plastic bottles. In addition, you can knit any bird you like using the amigurumi technique, you can get a penguin or a feathered cartoon character. Do not forget about another fascinating type of needlework - creating various figures from rainbow loom rubber bands, for example, this is how you can make original Angry birds key chains.
DIY bottle birds
A beautiful well-groomed lawn or a small impromptu garden in your yard can complement the figurines. bottle birds, handmade any member of the family can make them, but it is better to make this creativity collective, because during the process you can have fun, chat with the children and learn together with them new technology doing crafts.
Do-it-yourself bird from plastic bottles will look perfect against a green lawn or in a flower bed, so you can start doing this craft, but be prepared that in the process you will need special tools and materials, because this craft will not be easy at all.
The most beautiful do-it-yourself bird from improvised materials, which will become a real decoration of any personal plot and playground, this is a beautiful peacock with a painted tail. You need to stock up on plastic bottles in large quantities, and you will also need five-liter eggplants. Among the materials also appear blue garbage bags, foil, adhesive tape. We will do crafts with the help of scissors, a stapler, and to decorate the finished peacock, you will also need acrylic paints and a brush, varnish is used to fix the result.
When all the materials are prepared, you can begin the creative process: let's start with the processing of plastic containers. All the bottles that you have prepared must be thoroughly rinsed inside and out, remove the labels, and dry. Washing the container is necessary in order to get rid of the glue trace on the outside, as well as the remaining liquid inside, otherwise your hands will become sticky while cutting the bottles, which will complicate and slow down the work.

The most difficult thing is to make a peacock's tail, so let's start the process with it: the middle part must be cut into three oblong tongues. The neck and bottom must first be cut off.
One end of the plastic tongue should be rounded so that it looks like a feather, and then small cuts should be made along the edges. Attach a blue oval from a plastic bag and a circle of foil to each rounded tip. You can fix them at the tip with a stapler. Since the tail should turn out to be fluffy and voluminous, you need to make a lot of such blanks.

DIY birds for the garden
For the next step, we need a five-liter eggplant: we need to cut off the neck and bottom, and cut out a semicircle from the middle part, to which we will attach the prepared feathers with a stapler.
Now let's complete the bird's body: cut off the neck from a five-liter eggplant, cut off the bottom from a two-liter bottle, fasten the cooked parts together with a wide adhesive tape.
The next step will be the execution of the peacock's head: cut the neck and twist them into an oblong funnel, where the long point will be the beak. The prepared part must be connected to the cut bottom with adhesive tape, and then the workpiece is fastened to the rest of the body.

Do-it-yourself bird made of material will please you for more than one year, because all the materials used perfectly endure bad weather, plastic and polyethylene will not deteriorate in rain or snow. In addition to a fluffy tail, it is also necessary to make plumage for the body. For this we will use blue plastic bags It is recommended to take garbage bags. They must be cut into strips, make the tip pointed, and then attach to the body. The strips should be fastened in rows, overlapping, moving towards the neck from the tail.
Trunk and tail DIY birds for the garden it is necessary to fasten the rope together, for this you first need to make a hole in the place of fastening. In order for the finished peacock to be fixed on the lawn, a stick should be firmly attached to the body from below. The eyes and beak can be painted with paints, fixing the result with varnish. You can decorate the bird with a crown made from foil. To prevent the plastic figure from being blown away by a strong wind, it should be weighted; for this, sand is poured inside.
There is do-it-yourself birds kindergarten , which are much easier to make, for example, penguins, you will need paints to create them, because we will draw a penguin on the basis. You can add a penguin with a hat made of socks or threads. And if you enlisted the help of men in your creative process, then you can make more complex designs with a metal mesh as a base and foam plastic for decorating the head. And do not forget that crafts for decorating a playground in the form of birds can be made from a car tire.

DIY birds
If you look at the possible options for creating do-it-yourself birds photo, then pay attention to the variety of materials and techniques used. The most common figurine is a peacock, which is not surprising, given the beauty of this bird, which amazes the imagination with its painted tail. It is the bright tail that inspires needlewomen to use the most interesting techniques.
A beaded peacock tail can become a stylish pendant or earrings, and to make it work, you need to choose the right accessories. On a wire base, you can also make a voluminous peacock with a fluffy tail, which is performed using the French weaving technique.

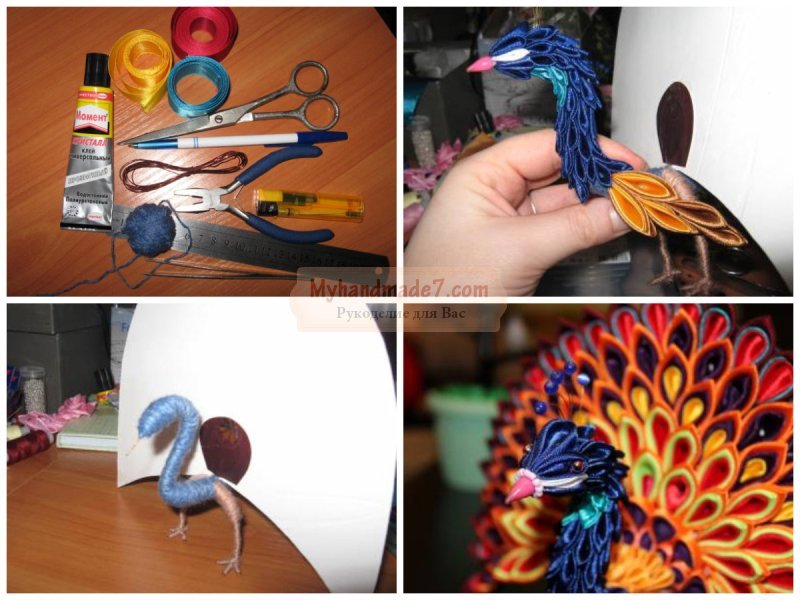
Let's not forget about another popular technique for creating stylish jewelry - kanzashi, which is common among needlewomen today. It is used not only for hairpins and flowers, but also for other original crafts. To make a peacock using the kanzashi technique, you need to make a wire frame and wrap it with threads, and a cardboard semicircle will become the basis for the tail.
Even going to a masquerade, do not forget about such a bright peacock tail, which can be done in a few hours. The skirt will be asymmetrical: the front is very short, made from stripes of brown tulle interspersed with green, but the back part will be long, it is better to use bright tulle for it - green, salad, turquoise. The main decoration of the tail, of course, is the “eyes”, which are created separately, and then sewn to the tulle. To create "eyes" you will need felt or fleece in four colors: brown, lettuce, light blue and blue. The boy can sew.

How to make a bird with your own hands
Resolving the issue how to make a bird with your own hands, let's not forget about . For example, you can make a cute yellow chicken, and the craft is quite simple, so even a preschooler with his mother can make it.

For this craft, you will really need skills on how to make pompoms from yarn. First, it is necessary to make paired blanks from cardboard: a large diameter of 45 mm and an inner diameter of 15 mm, as well as a smaller one - 15 mm in diameter. Threads can be taken any, but, of course, yellow. Threads must be wound on the blanks so that the inner hole is completely filled. To make it easier to wind the thread, you can use a long thick needle. Then cut along the outer edge, thread a thread between two cartons and tie a tight knot. Straighten the strings to make a fluffy ball. By the same principle, it is necessary to perform a smaller fluffy ball.

Two balls must be connected with the help of threads that remain from the knots. And you can start decorating: cut out a comb and a beak from felt, carefully sew them to the head, as well as two black beads as eyes.

The chicken will become the main decoration, such birds can be used to serve the festive table. For crafts, we need a chicken egg, glue and colored cardboard, scissors, a marker, plasticine and gouache paints.
In raw chicken egg it is necessary to make a neat hole at the bottom and top so that the shell does not crack. Then you need to blow the contents into a plate and rinse it with running water so that no traces of protein remain inside. An empty egg must be left in a warm, dry place to dry, after which you can start doing crafts.
The shell must be painted with yellow gouache, left to dry completely, and during this time you can cut out a beak from colored cardboard, paws and wings for it. The paws and beak will be attached to the base on pieces of plasticine. You can draw eyebrows and eyes on the top of the egg with a black marker.
Cut out paper wings should be rounded and glued to the body. You can complete the craft with a neat bow or a stylish cylinder hat.

Do-it-yourself bird made of wood
Do-it-yourself bird made of wood- this is a craft that only a real master who knows how to work with special tools can do. She is called the "bird of happiness" and, according to popular beliefs, she brings happiness to the house and protects the hearth. For example, if a person entered the house, they immediately looked at the suspended amulet: if he turned his tail to the guest, it means that the person is bad, if the head is good. Since ancient times, such a charm was considered the best gift for relatives.
For crafts, pine or spruce wood is usually used, we need a chock about 30 cm long, from which two bars need to be chopped off. One will be used for the body, the second for the wings.
On the bar you need to draw the outline of the wings, and further actions perform with a chisel: make locks and round off the tips of the wings. If the wood is fresh, then the wings can be split immediately, but dry wood must first be steamed. Creating wooden amulets is a laborious process, but everyone will be delighted with such crafts.
If you don’t have time for complex crafts, a great option for winter creativity will be original do-it-yourself bird feeder, which will also become an adornment of your garden, and the child will be able to watch the birds in winter, which will flock to feast on grains.
Every day, many people throw away more than a thousand plastic bottles. At the same time, few people know that many amazing things can be made from them (for example, model boxes, vases, feeders for cats and dogs, and more).
Consider how you can create a beautiful peacock from bottles. For work, we need the following materials:
- A log of wood is a future stand for our bird.
- Metal rod.
- Styrofoam.
- Plastic bottles (green, blue, transparent).
- Waste plastic of different colors, paints, PVC glue, scissors and foil.

We cut out a peacock from polystyrene foam (torso and head) and make indentations for the eyes. We fix a metal bar in a log and put a peacock on it. Carefully cut out “feathers” of different sizes from multi-colored bottles.

We round the feathers, and then cut out the waves at the end with scissors. Then we make foil circles of different sizes, paint multi-colored eyes on them and give a realistic look to feathers using paints. Now we fasten them with a stapler or glue to the tips of the "feathers". Glue a few short "feathers" to the head and neck.

We make a tuft of dark-colored plastic, which we glue to the head and draw eyes in the pits. From the details - "feathers" we form a magnificent tail, starting from the end, which is fixed to the construction grid with a wire. It remains to attach the tail to the body.

Cute salt dough birds
Due to its elasticity, the dough is ideal for sculpting a variety of crafts. Preparing our mass is very simple.

Starch (a tablespoon) is diluted in one hundred milliliters of ice water, which is then poured with boiling water (200 ml). Next, take one glass of flour and mix well in equal proportions with salt, pour the mixture of starch and knead the dough. We carefully divide the finished dough into five identical parts, then add the desired color of paint to each of them and knead each piece again.

We fashion all the necessary parts of the birds using a stencil, which is pre-drawn on paper. Now our dough product must be sent to an oven preheated to 50 degrees and baked for about an hour. When the birds and decoration elements are baked, leave them to cool and cover with paint at your discretion, and then with colorless varnish. It remains to lay out the craft in the form of a panel and attach all the details with glue.

Craft from cotton pads
If you have a little kindergartener, then you can make crafts with him from cotton pads. It takes about five disks to make one bird, as well as multi-colored paper, ribbons for decoration, as well as scissors and glue.

An owlet is cut out of paper. From the disks we cut out ovals - wings that are glued to the body. Glue the beak and eyes from colored paper. We decorate the neck of the owl with a ribbon. There are many other crafts from cotton pads that you can find on the Internet.

Feathered miracle from the shell of a raw egg
An unusual product is obtained from a raw egg. To do this, we make the same punctures on the egg on both sides and extract the contents from it. Let our workpiece dry well.

Now you need to put the craft on a special stand and carefully paint over. We leave the body of the bird until the paint is completely dry, and then insert the fishing line through the punctures and hang it anywhere - as if it is floating in the air.

plasticine bird
Another craft you can do with your own hands for a kindergarten from plasticine. For the bird, we roll 2 balls - one larger, the other smaller. Then we make triangular wings and a tail, as well as a beak and black eyes.

Cone birds
Penguin
You can make original penguins with your own hands. We need spruce cones, plasticine and white paint. First of all, you need to mold the head, beak and wings from plasticine.

We make a pretty muzzle - we attach a beak and eyes. Now we attach the wings and the head to the bump, part of which we pre-paint with white paint. Wings can also be made from corncobs dyed black.

Owl
We put two pine cones on top of each other. We make eyebrows and wings from oak bark, and nose and eyes from paper. We cut the eye circles in a circle with scissors. We wrap the incisions with threads - expressive eyes will turn out.

Application from cereals
For this craft you will need:
- colored cardboard;
- PVC glue;
- a variety of cereals (corn, rice, millet, beans, buckwheat, poppy seeds, sunflower seeds).

First you need to draw a bird and a tree branch with a pencil, and carefully apply a layer of glue (medium thickness) to the drawn template. The next step is laying out the groats on the bird blank, depending on the color and shape of the patterns, as well as the master's imagination. It remains to fix the application, apply a layer of glue on top and leave to dry.

You can make birds from any materials, the main thing is to turn on your imagination and be patient. In order for the process to be fun, invite the children, as these activities are very useful for developing their thinking and creative skills.
It might be useful to read:
- Conroy Avril Marie Ann (Avril Mari Ann Konroi);
- Discount coupons from Joki Joya park - maximum fun at a bargain price;
- Conducting quests for a children's holiday!;
- Exhibition of Japanese bonsai in the apothecary garden;
- Internet addiction: symptoms and how to get rid of it How to wean yourself from the Internet;
- Moscow Festival of Book Illustration Mors – How long does the festival last;
- How to find a job after graduation for a young specialist with no experience;
- Where to go to work without work experience?;