Is it possible to connect two photos in photoshop. How in Photoshop to impose one picture to another? Smooth gluing two photos
23.06.2015 27.01.2018
PHOTOSHOP lesson in which you will learn how to connect some photos to one using the photoshop program. In fact, everything is very simple and I wrote this detailed step-by-step instruction for you.
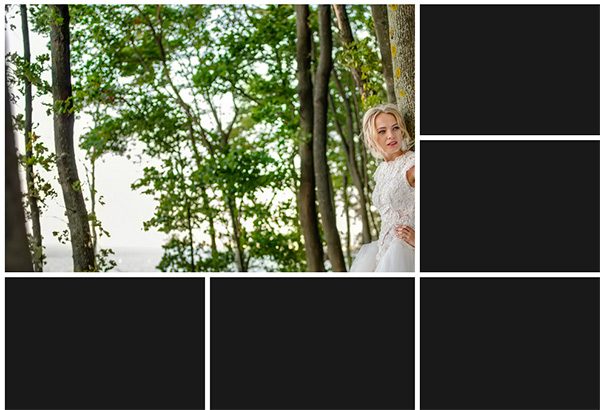
We will compile such a composition of photos. Here 6 photos Connected into one image.
- Of course, this is a reduced copy, specially fit on the website Show for example.
- Of course, I understood the whole essence of the method, you can create your own collages and patterns. Place photos as you like, anywhere and how much in one image.
Where to begin? With planning. Most photos of photoshop to create such a small collage make a lot of unnecessary actions. As usual, it happens - the photos are scattered on the eye on the working field, it will be reduced here, it will decrease there, they will cut it there, they will cut and so on. I try not to work like that in order to save my time and improve performance.
Therefore, first you need to prepare a template. What will it give? First, you can immediately and accurately arrange photos on the planned pattern. Secondly, if necessary, you can easily and easily insert new other photos using a pattern. In my opinion, the pros are obvious.
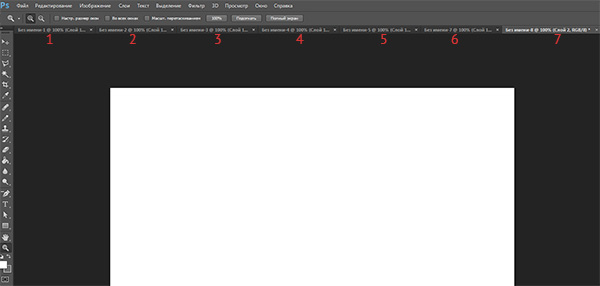
Create a new document in photoshop size of 989x676 pixels.

In addition, open all 6 photos that you will use in Photoshop. You will see that they all opened in different tabs. Leave the newly created document tab enabled, where we will create a template. Total will get 7 tabs.
Now we will create seats for photos. We will use the tool Rectangle(Rectangle.), It can be found on the toolbar on the left.

Use any color for the rectangle, if not only the color of the background so as not to merge.
Place the first rectangle in the image. Here you can do, actually on the eye, its length, width and place location on the work field. But try to stick to the scheme that we have conceived at the very beginning.
The first rectangle is the main big photo. I designated the boundaries of the image as a frame, so that you understand how I placed a rectangle on a white background.

In the same method, we draw the rest of the rectangles.

As you can see, I placed them on the same distance from each other, so that everything is rovingly and beautiful.
Place the rectangles are not paying attention to the empty sections of the image that remain in different places. After you place all the rectangles as you have thought you can crop the image (working field) from unnecessary - using the tool Frame. You can also find it on the left pane.
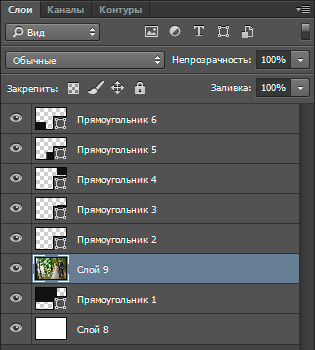
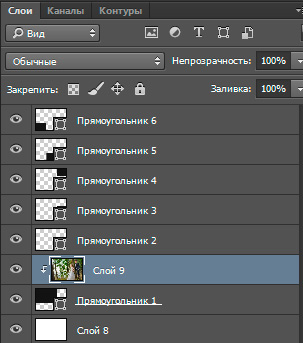
The list of layers will look like this:
Now we will add photos.
Go to a tab with any photo, highlight it with the tool Rectangular region Or simply clicking Ctrl + A.. Press Ctrl + C. To copy to the clipboard.
Go to a tab with our template and choose a layer in the layers with the rectangle instead we want to insert a photo. In this case, this is the biggest rectangle. Press Ctrl + V.and the photo inserted into a new layer that will be above the rectangle - it is important.
Now right-click on the layer with a photo and choose Create a clipping mask.
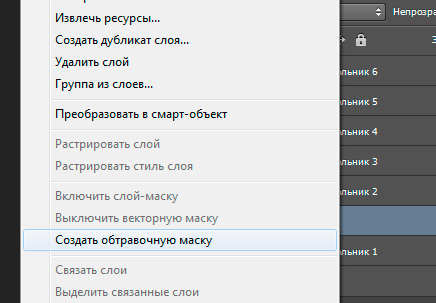
A clipping mask was created from the photo and it acts on the layer below. And the layer below is our rectangle. What does it mean? This means that the photo will be displayed only within the borders of the rectangle.
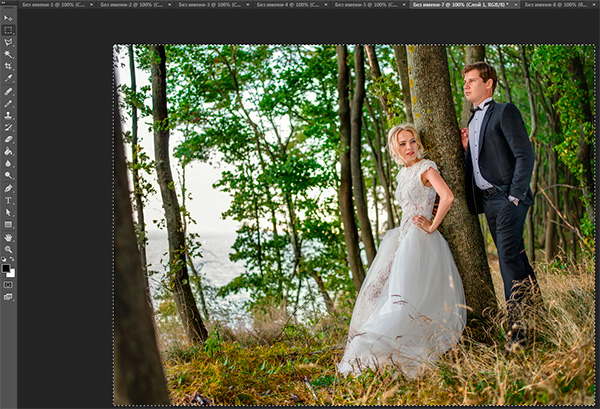
This is how it looks at the moment.
It only remains to reduce the scale of the photo so that it can be seen all. This can be done in the clipping mask mode, no failure will occur.
What should be done. Select a layer with a photo and click Ctrl + T. - So we can transform a photo.
Squares appeared on the borders of the photo - for them we pull the mouse and the photo will decrease. For example, with a squeezed shift, dragging behind the lower square diagonally upwards, the photo will decrease proportionally.
.jpg)
We reduce the photo and move a little up, so that the photo is maximally displayed in the visible area.

Click ENTER and the first photo is ready.
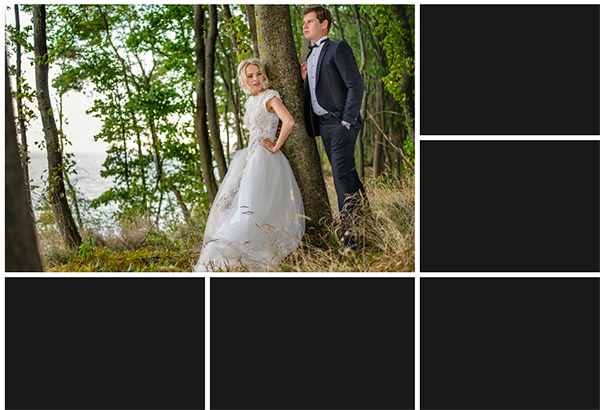
In the same method, do all other photos. Choose rectangles, insert the photos to a new layer and make a clipping mask, then adjust the size of the photo. All like this photo.

Gradually, you will do all photos. Thus, we completed the task of the previously set - connected several photos in one image. Thus, they created their own simple collage from photos.

You can download the PSD template for this work. To see how everything is arranged.
03.03.15 1.9K.In this article, we will look at how in Photoshop Elements 5 ( or in the full version of photoshop) Connect two images. There are many programs for connecting images, but this method offers us greater flexibility.
At first I did it to expand the capture of the lens, which comes with D70, but there are other advantages that gives a combination of two images: an increase in the depth of field, the best dynamic range and the ability to create photos are large in size than usual.
Start with two images, most of which are located, and the second is the front plan. Do not forget that they should have some intersection points. And both should be the horizon. Here is the photo of the sky:
Please note that the tree on the left is significantly towering against the sky, so I turned it into the horizon ... Be careful that the horizon line in the picture appears as smaller. Here is a picture of the foreground:
Thus, to adjust the images, first expand the canvas: Image\u003e Change Size\u003e Canvas ... Increase the size of about 25% ( i like black background), Align the layers, then open the (new) Camera Distortion Tool: Filter\u003e Distortion Correction and regulate the vertical perspective.
We can also eliminate concave distortion to be sure that the horizon is absolutely flat, as it will be a link line. Accordingly cut the image. Here corrected cut Image of the sky:
But the photo of the foreground. Please note that on both images the tree is now aligned vertically:
Make sure both images are horizontal: View\u003e Mesh and Image\u003e Rotate\u003e Set up.
Now, choose one of the images and increase the canvas again ( Image\u003e Size change\u003e Host size) so that you can put another image on top of the current and move it as you need - especially we need to increase the canvas vertically.
Copy the image (Ctrl + A, Ctrl + C) and insert it on the canvas of another image (Ctrl + V). Adjust the opacity (in the layers palette) of the above photo up to 50%, so that through the top image you can see how the lower is located.
Now use the "Move" tool to move the top image to the desired location ... That is why it was important to expand the canvas of the bottom photo so as not to trim the top. Now you can use the tool " Arbitrary transformation"And then configure the top image ( Image\u003e Transformation\u003e Arbitrary Transformation).
Now you have to use "Eraser" to erase part of the top image that we do not need. If your top layer is the sky, you need to remove carefully ( with hard brush) Its part below the horizon. When you finish, set the transparency of 100% and, if you are satisfied with the result, combine the layers and save the project.
We move the second photo to the previously open.
Read more about Connection Photos You can read in.
Then, using the "Move Tool" tool, you specify the location of the photos relative to each other. It is necessary to make one photo overlap the other, at the place of overlapping and the smooth transition will be mounted. For convenience, it is possible to temporarily reduce the opacity of images in the layer panel, it is also nice to put guides on the overlap boundaries.

Now we define what kind of photography will be on top, and, if necessary, change the location of the layers in the layer panel. I will have a twitter image from above.
Then we put the opacity of the layers with images back to one hundred percent.
And, now, let's turn to the creation of a smooth transition between photos, in this example we will do it with a layer mask and the use of a black and white gradient.
We add a layer of the mask to the layer with a top photo by clicking on the corresponding icon at the bottom of the palette, while the colors in the color palette automatically changed to the black basic color and white background, the mask icon on the corresponding layer will appear in the layer panel. Then open the Gradient Tool in the instrumental palette. In the upper left corner of the photoshop working window, click on the triangle for the opening of the gradient palette, and select the very first name of the name "from the main color to the background". Then we carry out the line from one guide to the other in the direction indicated in the figure.

In order to spend the gradient line strictly horizontally (or, for other cases, strictly vertically), the SHIFT key should be kept.
As a result, we obtain a smooth transition to the transparency of the right edge of the upper image, which gives the effect of a smooth transition between two photos.
On the mask icon in the layers panel, we will see the following changes, black shows full transparency, and white, on the contrary, the full opacity of the image to which the mask layer is applied.

Here, actually, and everything, the task is completed!
So, we have two completely independent who do not have anything in common with each other. I would like to combine photos from these documents to one. Let's look at a few simple ways to do.
Method 1: Drag and Drop)
Just dragging the image from one document to another is the easiest and most common way to move images between documents in Photoshop. It is carried out using the "Move Tool" tool, which is at the very top of the toolbar:
With the active Move Tool, click the left mouse button on the photo you want to move, and keep the key pressed by dragging it into the document window of another photo. When you release the mouse button, the photo will move to another document. I suffer a photo with drops to a document with a face of a woman. That's what I did:

Note that Photoshop just "dropped" a moved photo to the place where I let go of the mouse button. This result is not very good. It is better to move the photo using the Move Tool, after clicking the SHIFT key. Move the photo, release the mouse button, and only later Release the SHIFT key. SHIFT clamping gives a Photoshop command to place a moved image in the center of the document.
Cancel the previous step by pressing Ctrl + Z and try to drag photos again, holding the shift this time. Now the photo with drops of water is located in the center of the document:


Method 3: Copy and paste (Copy and Paste)
Another way to move images between documents is the standard "Copy-Insert" method, the people called "Copy-paste". This method is familiar with any computer user.
The difference is that before copying it is necessary to highlight the document using Ctrl + A. In addition, you can choose the entire image, if you click on the Main Menu tab -\u003e All (Select -\u003e All). When highlighting the entire image, "marching ants" will appear around the perimeter of the entire image.
So, the steps required to move the image from one document to another:
- Click on moverable Document for activation
- Select all the pixels of the image by pressing Ctrl + A or the SELECT tab -\u003e all
- Copy the image by pressing Ctrl + C
- Click the mouse over the target document, i.e. because, in which we will insert picture
- Press Ctrl + V
Well, finally, let's mix two of our images. As you remember. We have a photo with drops over a photo with a woman.
In order to get a photo montage - the effect of a woman's face through a glass with raindrops - you just need to apply the "soft light" overlay with drops with drops (Soft Light). That's what we did as a result:

So, now we know the three ways to combine photos in one, and how to make a simple photo montage by changes in overlay modes!
Combine two photos in one task quite difficult, for beginners who have just begun to study Photoshop in this article We will connect two images to one with the help of photoshop and PIXLR service (Photoshop online).
Why unite two photos in one thing, what is a photo collage
Hello, friends! You probably have seen more than once on the Internet photos, where other images are displayed on the same background of one picture. Why combine pictures in this way? Basically to create a new unique photo. It is necessary for those people who, for example, work on freelanse and make such pictures to order. Or to users who own their own sites, blogs, groups in social networks.
Similar drawing is called photo collage. What is a photo collage? This is one picture on which many other pictures are posted. For example, people are walking against nature. Next, we learn how to combine 2 photos in one.
Combine two photos in one online, Pixlr Express program
In addition to Photoshop on the Internet there is a special PIXLR Express service, which can combine two photos in the same and thereby it creates a photo collage. It's easy to work with it. To begin with, open it the main page at this address - (pixlr.com/express). (I will say that this service will not work if you are included advertising blockers).
To create a photo collage, click on the Collag button. Next, we offer the editing panel. Four panels will open, you can click on and choose from the computer the photos that we want to connect. (Picture 1)

So, we have two photos. Now, to connect them to one, press the Layout button, select the double layer and "finished" to save the picture. (Figure 2)

Subsequently, two Save functions appear, which means to save. Click on this feature twice and save the photo collage to the computer. So, we created a photo collage (Figure 3).

This tool will help you to combine many other different pictures.
Combine two photos in one in Photoshop
So, to combine two photos in one we use the second option - Photoshop program. Open photoshop click on the "File" button, then "Open" and select the picture from the computer to be changed.
Then add the second photo as well. Two pictures tab appeared in Photoshp. We need to go to the second to move the image to the first photo. Click on the "layers" then twice with the left mouse button and click OK. This must be done to have the ability to edit the picture. (Figure 4).


After this action, it can be removed from this background with a picture and can be inserted to another background. To insert the pictures, again, go to the first picture in the "Editing" section "Paste" in this case, you should definitely unite two photos in one. If you interfere with the background on the second photo, then you can remove it. We go to the "Layers" tab, choose the "Vector Mask" then click on the brush and slowly remove the unnecessary background. Thus, the pictures are fully connected.
Conclusion
So, in this article we considered the question - how to combine two photos in one in Photoshop and using the PIXLR service. This method of combining photos will help many users, especially in terms of earnings via the Internet.
Created collages, unique pictures can be accommodated for sale on the Internet on special services - photo sets and on this earn. Good luck to you!
Sincerely, Ivan Kunpan.
Get new blog articles directly by mail. Fill out the form, click "Subscribe"
Perhaps it will be useful to read:
- Balancing rotating parts;
- Em session securities is a document for the implementation of rights, the fully fixing right of its owner on;
- Shares fixing the right of its owner on;
- Planning and organizing the work of the structural division What is the organization of the work of the structural unit;
- How to sew fur headphones how to make soft headphones;
- Fur headphones Winter fur headphones do it yourself from the rim;
- Fur headphones winter fur headphones female from mink do it yourself;
- Events to improve the system of motivation and stimulating labor in LLC "ITC" and evaluating their effectiveness;