Beautiful lace knots. How to knot knots on a fishing line. Straight rope knot
Almost every sailor knows what a noose knot is and how to knit the strongest knots correctly. With the help of a simple but reliable knot, you can lift various heavy things, tie several things and, if necessary, save a person's life.
In other words, the nodes are necessary for a person in his Everyday life... Knots are used both for fastening very thin threads and for fastening thick ropes, which include many thin threads. Moreover, the scope of these nodes is not limited.
This knot is also called a sliding knot. This is a kind of open loop, which is very often used to catch animals. The advantage of the noose is that it can be easily loosened and untied after use.
There are several types of strangleholds:

- The straight knot is the strongest connection. It is used on strong ropes or ropes. Its advantage is that when it gets wet, the knot only becomes stronger. If you do not require high strength of the knot, then you need to insert the wooden part directly into the knot.
- A flat knot is more suitable for joining ropes and other strong materials. The knot provides the highest bond strength.
- The fishing knot is also designed to connect several elements.
Each type of stranglehold can be formed by yourself. To do this, it is enough to have thick ropes. Very often, such knots are used in their practice by fishermen.
The use of a stranglehold in fishing
What are the nodes for, such as a stranglehold:
- Such a noose allows you to create additional thickness from a regular rope. This increases the strength of the joint.
- With the help of a stranglehold, you can reliably tie up several things and transport them without problems.
- The choke allows you to pick up the load very simply and quickly. As the load on the connection increases, the knot is tightened even more.
- The stranglehold is used to lift heavy objects when it is difficult to lift them in the usual way.
- With the help of a stranglehold, you can tie several ropes, without problems with the strength of the connection. At the same time, such a knot can be easily untied, if necessary.
- The stranglehold allows you to form a separate loop on the rope, or rather, the technology of knitting a stranglehold.
- This node can always hedge, in any conditions.
People are quite inventive and have adapted various nodes to facilitate their life.

To do this, it will take a minimum of time:
- The first step is to prepare the ropes with a focus on reliability. Better if it is a rope or other strong rope. It all depends on the weight of the load being lifted. If there is no rope, then you can form the rope yourself by taking several ordinary ropes and twisting them in a spiral, in the form of a rope.
- The rope or rope is folded in half to form one long and one short end.
- A small loop is formed at the short end.
- After that, the long end is completely threaded through this loop.
- If necessary, you can easily loosen the knot and make a loop of any size.
- Finally, by pulling on the end, the loop is tightened.
This is one of the most primitive nodes, although it has the highest reliability. Anglers use this node to move loads. The size of the loop can be different depending on the size of the load, which makes this loop the most versatile.

Everyone knows that such a loop is considered the most durable nodal connection. The use of the scaffold loop led to quick death, since it instantly broke the cervical vertebrae. Therefore, the most unpleasant memories are associated with the history of this loop.
Despite the complexity of the design of this loop, it can be mastered in a short period of time. This requires:
- Select material of the highest quality and strength so that it can withstand a large load.
- The ropes are joined together and folded in half.
- As a result, you can see two ends, one long and the other short.
- A loop should be formed at the long end. suitable size and fix it with a simple knot. If it is difficult to determine the size of the loop, then it is better to tie the object with a rope. After that, the rope is released and you can see a free loop of the desired size.
- The connection is secured with the short end of a rope or rope.
The strap is ready to use. If there are doubts about the use of such a unit, then its reliability should be checked at home. To do this, you need to find a suitable object and fasten the rope on it with a "noose", try to move this object. If the knot does not loosen or even loosen, which is hardly possible, then it can be successfully used on fishing.

Another of the most common and reliable knots is the snap hook. This connection cannot be attributed to the number of popular ones, since this knot is not so easy to tie, especially for beginners. In addition, the karabiner loop has a highly specialized purpose, as it was often used by climbers.
Despite this, such fastening is used quite often, especially in cases where constant tightening of the connections is required. If you need to pull the car out of the pit, then better option than a carabiner noose you can imagine.
How does a snap hook fit:
- Purchase required material: rope or rope.
- From the rope, you need to form a junction that looks like an eight. To begin with, the rope can be wrapped in a figure eight between two objects and removed. Stumps can be used to create large loops.
- A carabiner is attached to one end, along with it the rope is tied to a tree.
- If done correctly, the carabiner should connect securely to the end of the rope.
- After that, the auxiliary rope is taken and pulled, after which the knot is tightly tightened.
A sufficiently voluminous load can be tied to such a mount. Quite often, fishermen attach their boats with such an attachment. Even with the strongest force, the carabiner will only be able to slide along the free end.

This is a knot, as they say, for all occasions. This site is used by both fishermen and sailors and tourists. Support can be any object or wet rope. Knitting technique:
- A rope is attached to the support.
- After that, a loop is formed in three turns.
- The short end makes 3 turns around the support.
- After that, the auxiliary rope is pulled up.
- Finally, the knot is released from the support.
Such knots can slip, so each time you need to check the connection for strength.
Safety engineering
- Be very careful when knitting knots, otherwise you may get injured. A strong rope is made up of many fine fibers that can cut your hands with some effort. Especially, this is important at the stage of tightening the knots, since it requires serious effort.
- Before lifting large loads, make sure that the rope is suitable for required strength... In any case, it is better to play it safe and take a rope with a certain margin of safety.
- In no case should such knots be used when bandaging body parts. This can cause blood flow to stop, with unintended results. It should be borne in mind that the stranglehold is prone to self-tightening.
- The main thing is to warn, although today there are no cases when the stranglehold has really hurt a person, except for the scaffold loop. But the fact that the stranglehold is a fairly reliable connection and very easy to manufacture, then most fishermen use the stranglehold when it is necessary to securely and quickly fasten any objects.
We tie something every day, without even thinking about it - on laces, on ribbons and bows, on a tie, at home and on vacation. One way or another, nodules are present almost everywhere. Let's figure out which of the special techniques of tying a sea knot on a rope can be useful to us in extreme and hiking situations, will be the strongest and most reliable.
How to tie a knot on a rope, diagram
We all know the simple knot required to connect the two ends of the same tape. But the version used by sailors is a little more complicated.
Figure 1. An example of connecting two ropes with different knots
Why is a knot on a rope good:
- It connects elements of the same diameter (Figure 1);
- Withstands sharp jerks well;
- Does not untie on its own and does not slip;
- Retains its properties even after getting wet.
But, like all connecting structures with a large number of weaves, it severely damages and weakens the rope.
How to tie a water knot
There is a clear sequence of how to tie a water sea knot correctly (Figure 2):
- Place the crochet stitches parallel;
- Form a closed loop with their ends, passing them under the root ends;
- Make three turns of running lengths around the root ends;
- Make sure that the ropes remain parallel during the tying process;
- Secure the structure while tightening all ends at the same time.
 Figure 2. Scheme of a water sea unit
 It can be easily untied if:
- Know the constituent parts, there are only two of them - running and root;
- Loosen the tension - the hinges will be clearly visible and the task will not be difficult.
Variety of nautical knots
There are endless types of marine weaving (Figure 3).
Among them, the most commonly used are:
- Eight;
- Butterfly or bee;
- Gazebo;
- Straight or plain bayonet;
- Anchor.
 Figure 3. Examples of different nautical knots
 In addition, they are all classified according to their intended purpose or the material used for them:
- For tying rope and cable parts - dagger, woman, oak or water;
- To strengthen the base of ropes or ropes - yufer, oyster or bloody;
- Collar with free, not tightened loops - vein, perfect, burlack;
- Classic tightening - figure eight and stranglehold;
- Decorative and special with original names - Turkish, cat's paw, amphora and royal, etc.
Straight
Universal weaving, known since the times of ancient Egypt (Figure 4). A straight knot consists of two semi-knots, which are sequentially tied in different directions, one above the other. At the same time, it can be strongly tightened under heavy load and strong wetness, which does not interfere with its quick untightening within a couple of seconds.
 Figure 4. Straight nautical knot
 Reef
We can easily say about this element that anyone who tied a bow on laces can handle it.
At sea, with its help, winches and other tackle are fastened on the open deck, tarpaulin covers are fixed on lifeboats. Below is a knot pattern (Figure 5).  Figure 5. Reef marine knot
Eight
The most common weaving (Figure 6), it is:

Flat knot
Its main purpose is to tie ropes of different thicknesses.
If there are four points of intersection, it:
- Ensures the reliability of the connection and does not tighten tightly;
- Distributes the load evenly, as it does not have strong bends.
All these qualities are highly dependent on the correct execution, therefore, the knitting principle does not accept any deviations (Figure 7).
 Figure 7. Flat nautical knot
 Simple bayonet
Easy weaving of the element allows you to hold the load in any direction and untie it underneath without much effort.
How to properly tie a knot on a rope, a diagram - you can learn from this easy way(Figure 8):

Clew knot
It is also recommended for tying strings and fasteners of different thicknesses. The material of a larger diameter is used for a regular hinge, but also on parts of the same diameter, the mount holds no worse.
The step-by-step instructions will tell you how to properly tie the clew knot on the rope (Figure 9):

Kalmyk
This type is used on sailing and Russian ships. It has long been used for naval purposes and is suitable for temporarily tying ships in the port and horse-drawn carts to a pole.
Follow the instructions to learn how to tie Kalmyk rope knots (Figure 10):

Gazebo node
Due to its simplicity and reliability, bowline is used in tourism and mountaineering, marine business. It is knitted at the edge of the rope and is a beautiful, non-tightening loop (Figure 11). A useful skill - the ability to knit it with one hand will come in handy in a number of extreme situations.
In this article we will begin to show and talk about rope knots, their types and different ways of knitting them, information will be translated and updated as new video instructions are filmed. Sometimes knots are chasing a person at every step, leaving the house, we tie a tie and shoes, in everyday life and in nature, we have to knit knots. Any fisherman or hunter already knows how to tie various knots for their needs. And in mountaineering or in the sea, people are simply required to be able to tie a dozen knots.
Knots exist for different purposes and purposes, creating loops that tighten or not, connecting ropes of the same or different diameters, for tying the rope to various objects, etc. But knitting properly takes practice. And it is better to give up the knot, and use another, if you even doubt a little about its knitting. We will start with the simplest knots and will approach more complex knots with each new knot.
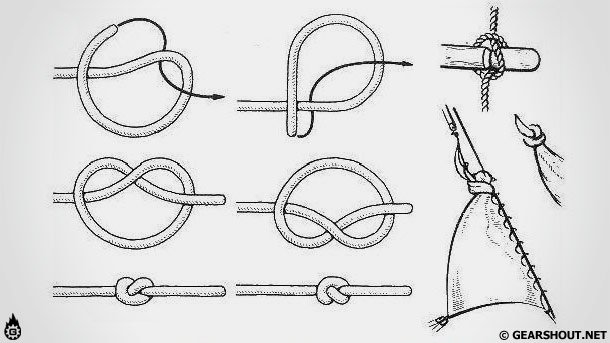
Simple knot
A simple knot is used to connect the ropes and is an integral element of many knots, it can also be tied at the end of the rope to prevent it from unraveling. Perhaps this is the simplest of all nodes and the smallest. But when the cable is pulled, the knot is tightly tightened and sometimes it is difficult to untie it. A simple knot bends the rope strongly, which reduces the strength of the rope by more than 2 times. But, nevertheless, this is the most popular node.

Straight Knot (Reef)
Straight knot, used to connect ropes of approximately the same diameter. It is not safe to tie ropes of different diameters with this knot, as a thin rope will tear a thicker rope. The straight knot was known as early as five thousand years BC in Egypt. And the ancient Greeks and Romans called him Hercules, because this is how the mythical hero Hercules tied the skin of a lion on his chest. The straight knot has four knitting options, but it is enough to know and be able to knit one of them. Control nodes are required at the root ends.

Hunter's Knot (Hunter's Knot)
In 1968, the English doctor Edward Hunter accidentally invented a knot that holds perfectly on cables and even on synthetic line. In essence, it was a successful weaving of two simple knots tied at the ends of two ropes. This invention caused a sensation in certain circles, and British patent scientists granted Edward a patent for this invention. The Hunter's knot is held on all ropes, especially soft ones, as well as on ribbons and lines. The author of the book "Sea Knots" LN Skryagin gave this knot a different name - "Hunter's knot" since the surname Hunter is translated from English as a hunter.

Counter eight
Another of the oldest knots for tying two ropes. This knot also has another name "Flemish knot". This is a reliable and durable knot, it practically does not reduce the strength of the rope. To begin with, a figure of eight is knitted at the end of one of the rope, and then with the running end of the second rope all the bends of the figure on the first rope are repeated and passed towards the root end. Then tighten. The counter eight is relatively easy to untie.

Grapevine Knot
The grapevine is the strongest knot designed for tying ropes of the same diameter. This knot has the smallest coefficient of rope weakening of 5%, such indicators are not found in other knots. When tying a Grapevine knot, you can do without control knots, it still remains fairly safe.

Bayonet Knot
This knot is a non-tightening loop that can hold a load acting in almost any direction. Another main advantage of this knot is that it can be easily untied even under load, which is very convenient. Twist the rope one and a half times around a tree, post, or even stone. Lead the running end over the root end, wind it down and pass it from under the root end into the loop formed (this is how you got a hose). Tighten and make another hose, and at the end, be sure to tie the control knot.

Knot Quick Release
The next knot may be named: pirate knot, bucket knot. This knot is quite reliable if tied correctly, and it can also be very easily and quickly untied by pulling on the running end. Recommended for temporary fastening where you need to quickly untie the knot. Or it can be used in descending situations where you need to return the rope after descending by pulling on the running end.

Prusik's Grasping Knot
This knot is mainly used as a belay when descending or ascending a rope. If a person falls off during descent, this knot is tightened and prevents him from falling. And when climbing a rope, this knot can be used as a zhumar. Pulling the knot from the bottom up, when loaded, the knot will tighten and hold the person. The knot was invented by Karl Prusik, president of the Austrian Alpine Club in 1931 and has proven itself well in mountaineering and mountain tourism. But the knot does not work well on wet and icy rope.

Austrian guide
The knot is used when you need to make a loop in the middle of the rope, to create an attachment point in case of belaying, or when you need to separate a frayed section of the rope. This knot also has other names: Alpine butterfly, Middle knot, Median conductor, Median conductor.

Bulin Knot (Arbor Knot)
This is one of the oldest and most popular sites. Bulin can be confidently called the "king of knots" for its simplicity and reliability. This knot is tied at the end of the rope and is a secure, non-tightening loop. The gazebo unit is used in maritime business, mountaineering and tourism. It will also be very useful to be able to tie this knot with one hand, which can be useful to you in an emergency.

Clew and Bramskot assembly
These knots are used to tie ropes of different diameters and the same. Knots fit quickly and easily. Control nodes are also required for these nodes.

Rabbit ears (Double conductor)
This is a knot that resembles a double bowline. Hare ears form two non-tightening loops. This knot does not require control knots, but after heavy load it is difficult to untie it. It is used mainly in mountaineering and in the case when it is necessary to transport the victim down to a shallow depth.
Lower belay system rope
Any sea knot must be tied tightly and securely, because safety largely depends on this, and at the same time so that at any time it can be easily untied if necessary.
Things to Consider for Beginners Before Learning
It is often difficult for beginners to understand the terminology that is used when explaining the basics of knitting sea knots, so initially it is worth learning a few basic definitions: 1) root end - fixed end of the cable;
2) the running end is free, i.e. loose end, from which all movements begin when knitting any of the knots.
In English terminology for nautical knots, there is such a classification:
1) knot - knots that are characterized as interlacing or tying the running end with the root end;
2) bend - knots, which are characterized as an interlacing of the running ends of two cables to combine into one;
3) hitch - nodes that are characterized as the attachment of the lead end to some object.
It is important for beginners in the maritime business to master the basic types of knots that are most often used in practice, and on the basis of which it is already easy to understand the principle of the formation of other varieties.
Main sea nodes
Arbor knot / bowline- one of the most important nautical knots, which should be mastered first of all for every sailor. It contains the elements of various marine knots, which makes it an almost universal knot, which is used for belaying, and for mooring, and for attaching the cable to the hook. Tying two ropes with this sea knot is considered the most reliable. A significant plus is the possibility of its use for cables of any diameter and from any material. It knits easily, does not slip on the cable, it is easy to untie it, but at the same time it never unties itself and is especially reliable. Because of this versatility, the bow knot is often called the king of nautical knots.
How to tie a gazebo knot:
1) create a loop from the top down;
2) stretch the running end through the formed loop;
3) then pass the running end behind the root end and thread it again into the loop, after which the running end should be in another loop;
4) tighten tightly.
Although the arbor knot is strong enough, it will not be a problem to untie it either; it is only necessary to slightly shift the loop of the running end in relation to the root end, which is slightly weakened at the same time.
Eight- a typical classic nautical knot, so named for its shape. It forms the basis of many knots and is usually used as a stopper and anchoring knot. The main advantage of the figure eight is the ease of tying and untying, even when the rope gets wet.
How to tie a figure eight knot:
1) wrap the running end around the root end, and then pull it over it, thereby forming a loop;
2) pass the running end into the formed loop, before that, leading it behind itself;
3) tighten firmly.
Straight knot- one of the oldest sea knots, which the ancient Greeks called Herculean. Its main purpose is to tie two cables of the same diameter. The straight knot is often used, but far from the most reliable sea knot. Its main drawback is sliding along the rope and being tightly tightened under heavy loads or when wet, so in such cases it is better not to use it.
Tie a straight knot quite simply: one running end is in one direction, the second - in the other (if in one direction, then you get an unreliable so-called "babskiy" knot), and for a decoupling, you just have to pull the running and root ends in different directions.
Simple half-bayonet and its more complex variations
Simple half bayonet- a widespread simple non-tightening nautical knot that underlies more complex variations of this kind. To obtain it, it is necessary to circle the running end around the object to which the cable will be attached, and then circle it around the root end, and pass it through the formed loop. Then the running end is attached to the root end. Such a knot is highly reliable and can withstand strong traction perfectly.
- a more complex version of a simple half-bayonet, which is formed from two such identical nodes. Its main purpose is to secure the mooring lines on the berths and towing. Such a knot is formed by no more than three half-bayonets. A larger number will not in any way affect the strength and reliability of the knot, which is eloquently evidenced by the English proverb, which states that three half-bayonets are enough even for a royal yacht.
Simple bayonet with a hose- a nautical knot, similar to a simple bayonet, with only one additional hose around the object for which the cable is attached. It is also used for mooring, especially during long stops, since it is more reliable than a simple one.
Fishing bayonet / anchor knot- one of the oldest and most reliable knots, which is used to fasten the cable to the anchor, as well as for all work with cables under the influence of strong traction. It is in many ways similar to a simple bayonet with a hose, only the first half-bayonet passes inside the hose, which covers the attachment object.
It is important to develop such good knitting skills that, even with closed eyes, be able to easily tie the required specific situation knot, and practice in this business is one of the basic conditions for the successful development of this art.
Without the skills of knitting knots, you cannot even lace up shoes, so everyone has an idea about this. In everyday life, there are several ways. But fishing, sailing, hiking, and the desire to stand out from the crowd can push you to explore practical or decorative pairing techniques. It takes learning to weave a ribbon nicely into your hair or tie a tie. Therefore, it is worth knowing in advance how to knit knots of different types.
Classification of nodes
Ropes, cords, ropes, fishing lines - these products are widely used for various purposes. But their main purpose is to bind something or attach to things. Without loops and knots, these actions are impossible. The tying techniques are different. There are ancient methods and modern ways how to connect the ends of the ropes or create a loop. Tying a ribbon on a gift beautifully and mooring a boat in the same way is not worth it. Connections are made from one or more ropes. Their main difference lies in the scope of application.
So, depending on the area of use, they distinguish between sea, tourist, mountaineering and other nodes. There are hundreds of ways to tie them in every direction. The connections also differ in the requirements put forward to them. For example, climbing strings should have the following properties:
- be easy to remember;
- easy to knit;
- withstand significant loads;
- untie without effort (except when knitting a tightening look).
You can learn how to knit a strong knot in practice. You don't need to memorize all the ways. It is enough to learn how to tie your chosen options and improve your skills with different ropes.
How to tie two ropes tightly
If you need to tie laces or a ribbon nicely, then the strength of the connection does not play important role... But in some cases you need to know how to tie a knot on a rope without doubts about strength... The result is achieved with the right technique and the selection of high-quality rope. It is important to know for sure the margin of safety of a product that is taken to the mountains or at sea. Each connection reduces the strength of the rope. When tying the figure eight, about 25% of the strength is lost, the bowline will reduce this indicator threefold, and the weaving one - even more!
Consider the condition of the cable or rope. A wet product loses 10% of its strength, negative temperatures weaken the material by a third. Dirt, prolonged exposure to sunlight, damage to the braid of various degrees can reduce the strength by half.
Tying the scaffold knot
The death penalty by hanging is practically not used in our time. But the scheme of how to knot a noose knot is used in navigation. This loop is perfect for mooring a boat or securing a cable to an object. Even a stranglehold with half-bayonets cannot compete with the scaffold loop in efficiency. The technique of tying a connection is as follows:
- you need to fold the end of the cable in the form of 2 loops;
- tie the running end around them several times;
- pass it through the loop facing the root of the product;
- clamp the connection by pulling out the outer loop.
The strap can be untied without any problems, which makes it even more convenient to use. Sailors apply the principles of knitting this connection both when creating a bay for storing a cable, and in preparing weights from improvised means.
An irreplaceable connection in the fleet
 A special version of the connection of the ropes was named after the tackle of a sailing vessel - sheets. To fix the sheet in the sail krengel, use this knot. If the stranglehold is useful in different areas, then the specialization of the clew knot is narrow. Effectiveness is achieved only with constant rope tension. At the slightest indulgence, the fastener will be untied. And also this type of connection cannot be applied to synthetic ropes - the running end will certainly slip.
Since it is not difficult to knit a clew knot, anyone can learn how to do it. It is tied on a finished loop made of metal or other materials. The end of the rope must be pulled through the loop, wrapping its base. Next, the rope is threaded through the loop again, only now below the base. Then it should be pulled through the hole between the base of the rope and the inside of the loop. Locking the free end and pulling the base of the rope will tighten the knot.
Aesthetic options for nodal connections
 The scope of use of knots is not limited to the creation of durable and practical fasteners. Superstitious people tie a knot to get Lady Luck's attention. And also by weaving using certain methods, you can make original bracelets and necklaces. The result looks great.
Needlework involves the use of the most different techniques , among which there are simple options. A banal "pigtail" made of ropes will allow you to tie an unusual element of decoration. It is also easy to learn how to weave the so-called cobra. This requires 4 ropes. Their ends must be connected and turned towards you. By making a loop at the end of each rope and threading adjacent ends alternately through them, you can get a crown knot. The procedure can be repeated as long as the length of the ropes permits.
A wide range of life situations require timely solutions. Connect two ropes into one, tie a secure loop for lifting something on the winch, make a tent mount that will not untie even under strong gusts of wind - the ability to knot will come in handy in these and many other cases. In order not to have to use a search engine and practice for a long time, it is better to learn how to make a node with basic methods in advance.
It might be helpful to read:
- Determination of voids in the ground How to search for voids in the ground with a sound blow;
- "Ksenia Sobchak put forward her candidacy for the presidency and said that those who are" against all;
- "An insignificant deal": Sobchak's speech in court in the "Putin case" was made public (video) Cannibals and puppets;
- Sobchak's election speech;
- "center for continuing education";
- The most ambitious aircraft carriers in the world;
- How many aircraft carriers does the UK have for a year;
- “I hate introspection Makarevich interview;