How to sculpt a rooster out of clay. Rooster made of plasticine. Necessary materials and tools
Rooster from polymer clay do it yourself, master class
The symbol of the next, 2017 will be. Therefore, in order for him to bring us good luck throughout the year, it is advisable to have a certain talisman with his image with you. For example, you can make a keychain from polymer clay "Rooster - Romantic", which will not only serve as a wonderful decoration, but will also protect you from troubles.
Necessary materials and tools:
Polymer clay (baked)
Stationery knife or blade (scalpel)
Work surface (glass, sheet of paper, tile, etc.)
Stacks (instruments)
Wet wipes
Lacquer for polymer clay
tassel
Accessories (threaded pin, keychain ring)
Glue "Moment"
small drill

How to make a rooster from polymer clay, a symbol of 2017 with your own hands, photo
In order for polymer clay to become a little pliable, it must be kneaded in your hands before work. As a result, it will become softer and more elastic, convenient for modeling. It should be noted that polymer clay "loves" various dirt (villi, dust, dyes, etc.), it attracts it very much. Therefore, during work (as well as before starting work), it is advisable to keep your hands, tools and work surface in perfect cleanliness - wipe more often with wet wipes.
- Roll a small piece of white polymer clay into a ball. Form a long drop out of it - this part will be the breast and neck of the cockerel.

- In the wide part of the drop, form a “skirt” by flattening it with your fingers.

- Using a stack or a toothpick, give the resulting "skirt" a waviness.

- Roll out a small piece of white polymer clay into a thin "sausage" and cut into small pieces (preferably the same size).

- Roll each piece into a pea.

- Soften a small piece of red-colored clay and roll it into a ball - this is the lower part of the cockerel figurine. It is worth noting that during modeling it is necessary to adhere to the proportions.

- Attach the prepared white peas to the resulting red ball, placing them in a checkerboard pattern. Tip: the cockerel doesn't have to be polka-dotted, but it won't be as romantic or fun.

- Roll the part in your hands so that the peas are well attached to the red ball, and its surface becomes smooth.

- Roll out a thin “sausage” from orange polymer clay. Cut it into six segments of the same length. Tip: If you don't have orange polymer clay, mix a small piece of red clay with yellow (about 1/5).

- Form long drops from the resulting segments and connect (in the thick part) three at a time. These are cock legs.

- Connect the parts together: the torso (red ball with polka dots) and paws. Smooth the joint well.

- Also attach the neck with the breast (white detail). Carefully smooth the junction with your fingers, trying not to disturb the waviness of the edge. Use a stack or toothpick to straighten the edge and, if necessary, give it even more waviness.

- In the place where the tail will be, slightly lift the “skirt” up.

- From polymer clay of an orange hue, roll elongated drops for the future tail.

- Attach the resulting details to the main figure.
- Make cockerel eyes. To do this, roll up two white peas and form drops out of them. Then glue two small black balls (smaller) on top. From white clay, make highlights so that the eyes of the cockerel “come to life”.

- For the beak, roll up an orange pea, then form a cone out of it. Attach the resulting part to the main figure.

- Make a cockerel "cheeks". To do this, roll up two white peas and attach near the beak.

- Use a stack or a toothpick to texture the cheeks. Roll a piece of red polymer clay into a thin bundle and divide into two identical segments. Form drops from each, connect in a narrow part - these are “earrings - tie” cockerel.

- Attach the "earrings" under the beak, gently smooth out the junction.

- For the scallop, roll out a thin rope of red polymer clay in the same way and cut into 4-5 segments. From each form an elongated drop. Connect all the workpieces, securing them in the narrow part.

- Attach the cockerel to the head and smooth it well. Give the details of the scallop the desired direction.

- The base for the polymer clay rooster keychain is almost ready, it remains to bake it. Before baking, it is desirable to carefully “remove” all dirt by wiping wet wipe. Bake the keychain part according to the instructions that came with the clay you used. Every polymer clay manufacturer has different requirements. For example, German polymer clay Fimo is baked at a temperature of 110-130 0 C for 20-30 minutes (depending on the thickness of the product). Tip: Wipe the oven thoroughly with a damp cloth after use.

- When the workpiece has completely cooled, make a hole in the upper part (at the comb) using a thin drill. Glue the threaded pin and secure the keychain ring. Cover the polymer clay keychain with a double layer of varnish and leave it in a ventilated area until it dries completely.

- Keychain made of polymer clay "Cockerel" is ready to please its owner and bring him good luck.

Creative success! Give this gift with Best wishes and good mood, then such a bauble will become a real talisman for good luck for everyone who wears it!
Evgenia Vladimirovna Smolentseva
Dymkovskaya toy - one of the Russian folk clay art crafts. Arose in the riverside settlement Dymkovo, near the city of Vyatka (now in the city of Kirov).
This is one of the oldest crafts in Russia, more than four hundred years old.
Dymkovskaya toy - product self made. Each toy is the creation of one masters. Making a toy from modeling and before painting - a creative process that never repeats. There are no and cannot be two absolutely identical products.
The most common stories: nannies with children, water-carriers, rams with golden horns, turkeys, roosters, deer, young people, buffoons, ladies.
Dear parents! Your attention is invited to the sequence of manufacturing from Dymkovo cockerel clay, which you can mold together with your child, thereby enriching your communication with a new experience. After all, material such as clay especially attracts children. A painting cockerel paints, will contribute both to the development of fine motor skills of the child, and will teach you to see the beauty and originality Dymkovo patterns.
Sequence sculpt cockerel.
1. Piece clay we divide the stack into two equal parts, each of the parts again in half - we get 4 equal parts. We take one part, cover the rest with a damp cloth.
2. We roll the ball, then give it a teardrop shape, lengthen and bend, forming a head.
3. We bend the neck and form the body, smooth everything using a sponge moistened with water.
4. Take the next piece clay, cut off a fourth part from it and set it aside. We form a stand from a drop.
5. We connect the stand with the body, using the lubrication method. Moisten the joints with a sponge and make small cuts with a stack. We also smooth everything.
6. From the next piece clay we sculpt a tail, for this we roll the ball and flatten it between the palms, forming a round cake. Wet the edges and for decorating around the circumference we grease small balls (pea size). Pinch off a piece at the bottom of the tail.
7. Wetting the junctions, we lubricate the tail well to the body.
8. Next bite cut clay in half, roll balls, flatten, form two teardrop-shaped or oval wings. To decorate the edges of the wings, pinch with two fingers.
9. We attach the wings to the body, after wetting the joints.
10. Sculpt cockerel beard and comb. To do this, we roll small identical balls, form drops from them and put them on the breast and on the head. cockerel. Sushi cockerel 2-3 days and paint.
11. Dried first cockerel we completely cover with white paint (aniline paints or gouache, after drying we apply patterns, in accordance with Dymkovo painting. You can use brushes, cotton buds and just pointed wooden sticks. Primary colors for Dymkovo ornament - red, orange, yellow, blue-blue, black and gold. The main motives of painting are circles, dots, stripes, cells, wavy lines. At the end, you can focus in some places in the form of golden diamonds. Each element dymkovo mural means something. The circle is a symbol of the sun, a loaf of bread; dot - stars; wavy line - water; a straight line is a road.
Manufacturing scheme cockerel


Cockerel, cockerel,
Through the dark forest.
Through the forest, across the river
Shout out: "Ku-ka-re-ku!"
Related publications:
Bead by bead I will collect on a thread. I know my gift will bring a smile. Mom will like it and she will say in response that it is more beautiful than beads in the world.
Synopsis of GCD on modeling in the preparatory speech therapy group "Dymkovsky Horse" Purpose: Generalization of children's knowledge about the Dymkovo toy. Formation of a respectful attitude towards folk art. Objectives: To teach children to transmit.
Master class for parents "Symbol of the year - Cockerel". Prepared and conducted by the Educator of MADOU d / s No. 37 Sokolova E. V. Purpose: to include parents.
Hello Dear colleagues and parents! I bring to your attention a master class on making such a "cockerel" for this you will need:
Today I want to present you my new master class on making the symbol of the year the cockerel in the style of "Dymkovo toy" which is in this.
Master class with photo. Description: work can be done with children from six years old. The material may be useful for preschool teachers.
Sculpting is not without reason considered one of the most interesting and useful activities for fine motor skills. With the help of plasticine, polymer clay or dough, you and your child can create a whole world of your own images, moreover, with plasticine or clay toys and figurines it’s very cool to put on performances based on famous fairy tales or invent your own stories, but first you need to stock up on characters.
The hero of many cartoons and fairy tales is the Golden Scallop Cockerel. The child will surely like this bright and beautiful image, so prepare everything you need and start sculpting.


What do you need?
A rooster is easy to make from both plasticine and polymer clay or dough - the technique for making a toy is almost the same. You can first think with your child how the future cockerel should turn out or find a beautiful picture of a rooster. You can also use special schemes or watch a video of a master class, which shows step by step and in detail how to mold a figure.
If you chose plasticine as the material for work, then prepare several of its bright colors: be sure to yellow, red, brown, you can take green, blue, and purple for the tail feathers, and black and white for the eyes.

It is best to sculpt on a special working board (if there is none, then take at least a piece of plywood or an ordinary kitchen board), you will also need a rolling pin to roll out blanks and a knife or stack (as a rule, it should come with plasticine). You can cut holes with matches or a pen, and wire or toothpicks will help you fasten the parts and stiffen them.
Toys made of polymer clay or salt dough will still have to be fired, and then painted with acrylic paints or gouache (or take color material right away).
If you wish, you can mold a rooster using some famous technique, for example, make a Dymkovo or Filimonov toy.
We sculpt a cockerel from plasticine
- The easiest way is to make a flat figure on paper. To do this, lay out the torso of the rooster from yellow plasticine (a small deformed oval with a bend, so that the head is on top). Then attach three small red plasticine balls to the head and form a comb out of them. From two red triangles make a beak, also add a beard. Roll out the red material into thin flagella and attach the paws to the body. Add a small black dot - an eye and a yellow oval on the body - a wing. From four different colors, form voluminous stripes and lay them one next to the other in the shape of a semicircle so that they form a chic tail of your rooster.
- To mold a voluminous toy, first make a blank of the body - roll up the yellow ball and bend it slightly (you will get a kind of cucumber). However, the cockerel's body can be pear-shaped or egg-shaped. Further, the manufacturing scheme will be the same as for a flat figure. From three small red balls form a scallop, from a thin orange sausage folded in half - a beak, and from two white and black tiny balls - eyes. Wings can be made as follows: you need to flatten two pieces of a cylindrical shape so that they make elongated cakes, then slightly bend them (in an arc) and place them on the sides of the bird. For the tail, make three sausages of different colors and connect them at one end, bending in a semicircle, and then attach the cockerel to the body. Paws are made from two cakes. For greater resemblance, apply thin notches on them with a match. Set the body on the paws.


Instead of paws, you can mold a stand. If you wish, you can add other details: draw feathers on the wings or make stucco patterns, decorate the cockerel's neck, etc. In the same way, a rooster is molded from colored salt dough (if you take the usual one, then you will need to color the figurine).
Making a cockerel out of clay
See how you can mold a Filimonov clay toy ( hallmark of these figurines is that they are made like whistles, but cockerels and turkeys are an exception, since they do not whistle).
- Take a piece of clay and divide it into three parts - for the stand, for small details (beards and comb) and for the main part of the figure.
- Roll the largest - the main part into a carrot. The future appearance of your product depends on what dimensions and parameters it will be.
- Bend this workpiece in the middle at a right angle. Where the part is thicker, there will be a tail, and from the sharp part it is necessary to form a head with a beak. If cracks appear at the folds, smooth them with wet fingers.
- Squeeze the thickened end a few times to get a big flat ponytail. You can trim it with a knife.
- Make a comb from a small round cake, cutting it in half - just grease the head of the figurine with slip (this is liquid clay that is used to hold the parts together - mold a bowl of clay, pour some water into it and stir with a brush) and press the comb firmly.
- Roll up the beard from a small ball and attach it under the beak.
- For a stand, mold a cone of clay. Then insert a pointed stick into its base and roll it on the table to roll out the cone from the inside. When ready, put the cone on the paper and attach the figurine to the slip on top.
- Products need to be dried for four to five days, and then burned in the oven (at a temperature of about 1000 degrees).
- Then the figures are painted (gouache is taken with the addition of PVA glue or acrylic).


New 2017 is the year of the Red (Fiery) Rooster, and its figurine or image will become the most sought-after present. The needlewomen of the "Cross" have a good tradition: to New Year's holiday prepare thoroughly. And this year will be no exception. Many of us will make or are already making a rooster with our own hands, or even not one, but several at once! After all, it is necessary to please relatives and friends with a handmade symbol of the year, and yourself with an exciting process of creating this very symbol in various techniques handmade.
Creating a kind of GUIDE TO MASTER CLASSES from the Internet is also a tradition of our needlework site, which was born a year ago. For you, dear craftswomen, we have selected a lot of only the best master classes on the net. Admire, look closely, discuss and choose the most colorful rooster! And then sew/tie/draw/blind/weave it. So, in what technique can you work on the eve of the New Year holiday?
If you don't have time to work, don't worry. The article contains links to craftswomen who sell finished work.
Cockerels made of paper and on paper
Making cards with the kids
If you are not a professional card maker, then before you start creating postcards, be sure to read our article "Learning to make New Year's cards with your own hands using the Scrapbooking technique". In it you will find not only a lot of ideas, but also get acquainted with the basic rules for creating postcards.
Any cockerel drawn by your child can be placed on a postcard. If it’s difficult for the kid to figure out how to draw a rooster with his own hands, then show him this step-by-step instruction:

And then, a matter of technology. Cut out the cockerel and make it the central part of the composition. For example, your postcard can be so simple, but cute. At work, use christmas paper and a bright red ribbon, add snowflakes, twigs and other holiday paraphernalia. When you have a basic idea, the process of creating a postcard becomes much easier!

Photo from http://itsapatchworklife.blogspot.ru
If your child likes to color in black and white pictures, give him the opportunity. Print out the rooster postcard template on thick cardboard and let the kid get to work. Further, by cutting out the blank-ball, you can supplement the card with voluminous snowflakes, glue half-beads imitating New Year's balls, etc., etc. Unleash your imagination with your baby))

YOU WILL USE
8 more templates for coloring, plus 2 step by step instructions for drawing more realistic roosters you will find in the archive, which you can download quickly and for free!
Take note of the idea with a cockerel on a stick, as on a postcard by Elena Yurchenko. Her cockerels are cut out of felt, but you can cut them out of paper.

Colored paper roosters
Colored paper appliqué can also be placed on a greeting card. But such an application itself can act as a postcard. To draw and carefully cut out all the details, children will need the help of their parents, but they can stick it themselves.

Olga-15 offers to make funny paper cockerels in her master class.
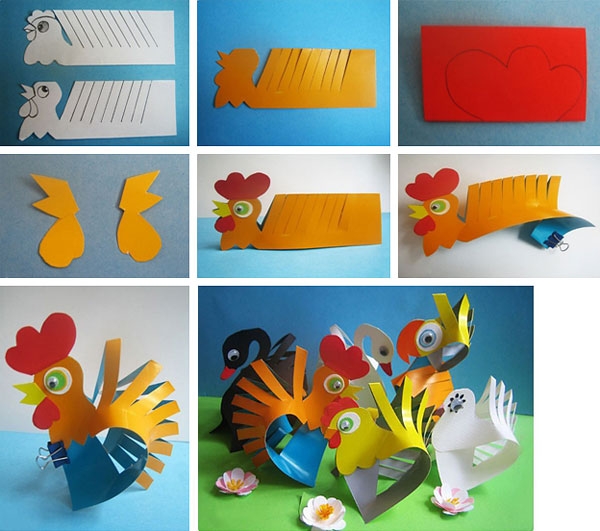
A Rooster blank is a rectangular sheet of flexible paper or thin cardboard folded in half lengthwise. Its size is 13.5 × 10 cm. We make 7-10 inclined cuts along the fold line (after about 1 cm). The angle of their inclination is 50-70 degrees, and the depth is ¾ of the height of the folded sheet.
Ekaterina Ivanova in her video tutorial shows how to make a red rooster using the Origami technique:
Roosters in quilling technique
A very interesting idea is to lay out only a luxurious rooster tail from quilling paper. It's not as confusing as laying out a whole cockerel, and it can turn out very effectively! Here is a rooster without a tail as a basis (how it looked in the original, see the photo below).

Print it on a color printer, and fantasize over the tail later. As an example - one such work (although the tail is modest here, but you will try, right?))

And if you are not afraid to make a whole rooster using the Quilling technique, then you can take this finished postcard as a basis:

Or this template:

A cheat sheet on the main elements of Quilling to help you:

Button appliqué
And here are absolutely stunning handsome roosters, lined with multi-colored buttons, half-beads, rhinestones and beads! As a basis, you can take the contours of cockerels from our archive (link just above).


Crochet Cockerels
Many needlewomen with a hook on “you” and will be happy to knit a cockerel from multi-colored threads. And "Cross" will help you decide on the model and offer several master classes on this type of needlework.

You can also buy cockerels knitted from Svetlana.


Roosters from felt
The fastest and most uncomplicated options for creating a symbol of 2017 are felt roosters. The material is easy to process, keeps the shape of the toy well, does not require seams. On the contrary, manual seams on the face of the product give it a special flavor and charm.


Photo from https://madeheart.com


Photo from the site http://ktototam.ru/
A figurine of a rooster neatly cut out of thick felt will christmas toy, and suspension.

Photo from the site http://ktototam.ru
And if you decorate felt cockerels with embroidery, flowers and other decorative elements, then it will turn out incredibly beautiful!

Photo from the site http://mmmcrafts.blogspot.ru

Roosters in Tilda style
Well, how can we do now in our life without the tilde-Rooster? The ToySew website has a master class on sewing this popular toy.

Master Vetic on her blog posted patterns of the Rooster and Hen Goroshkins based on the tilde pattern. An interesting couple will turn out if you make an effort and patience!

And for inspiration:

Cockerel Yurik from Orange Toys

A funny video clip about her tilde roosters was shot by Maria Fedorova (the link to the patterns is in the description of the video!):
Cockerel coffee toys
Aromatic or coffee toys compete with tildes in popularity. There are roosters in this technique.

The coffee cockerel can be like this:

Photo from the site http://zabavochka.com
You can easily sew it yourself using one of the patterns above. “Cross” talked about all the intricacies of creating coffee toys in this master class.
If you think that you can’t cope with such work yourself, contact the master. Julia Charikova has made enough branded coffee scented toys and put them up for sale at this address.

Fur interior toys
Oksana Svyatkovskaya will show her vision of a rooster and show how to sew it correctly according to ready-made patterns. Her Rooster is made of faux fur, but who's to say that it doesn't happen or that it's not good?)


In the workshop Everything for creativity (dljatvorchestva) there are a lot of blanks for painting and decoupage. Choose and create!

This is the beauty you can get:


If you do not want to make a souvenir in the form of a rooster, then you can decorate any wooden surface with the image of a rooster. There is just limitless scope for creativity! Here are just a few examples for inspiration:


Felted wool roosters
Other craftswomen make wool toys just like real ones! We love and are inspired! And if you really want to buy one of these beauties, then look for them at the Masters Fair (there is a link on each photo).


Elenia collected many different felted Roosters in one place and offered MK to create one of them. Turns out very cute!
Roosters embroidered with a cross, beads and ribbons
Perhaps you love embroidery more than other types of needlework. Then you can place the symbol of the year on a pillowcase, arrange it in the form of a panel, a picture in a frame or a brooch. The main thing is that the image of the Rooster warms your soul. And if you donate your work, find out the preferences of the recipient.
You will find more than 50 different patterns for embroidering roosters and cockerels in a special album
Master class "Filimonov toy"
Novoaleksandrova Elena Borisovna, educator MBDOU Kindergarten"Teremok", Ryazan region, Ryazan region, Murmino settlement.Description: the master class will be useful for educators, children of senior and middle groups.
Purpose: use for visual aids and for the artistic development of children.
Target: making toys out of clay.
Tasks:
– Learn to work with clay, sculpt toys from clay;
- To teach how to make a simple pattern according to a model, the ability of children to navigate on a plane;
– To form knowledge about the features of the painting of the Filimonovo toy;
- To form children's interest in arts and crafts;
– Develop fine motor skills of hands, imaginative thinking;
– Develop aesthetic taste, imagination, independence.
Material:
- Clay (Cambrian);
- Individual boards for modeling;
- Jars of water;
- Stack;
- Paper napkins;
- Primer (acrylic-artistic);
- Brushes for drawing No. 1, No. 3;
- Gouache (green, yellow, red);
- Cotton swabs;
- Polish for hair.
The Tula village of Filimonovo has been known since ancient times. Far beyond its borders, Filimonov's painted whistle toys are known and loved. Craftsmen make toys out of clay, and clay is mined in deep ravines. This clay is soft, obedient to hands. Various figures are molded from it: cockerels, hens, ducks, young ladies, horses, goats, soldiers ... All these toys are funny, slender and so elongated, as if they are always surprised at something, and stretched their necks in surprise. For young ladies, whistles are hidden in a jug, for birds under their tails or wings, for animals under their paws. In ancient times, the whole family made toys all winter long, and in the spring they went out with them to the Whistlers holiday.
Modeled whistle toys are fired in special ovens. And when the toys cool down, they are painted. Toys are most often decorated with colored stripes, Christmas trees, spots, simple berries, wavy lines. Colors used: red, green, white, yellow, sometimes pink. Filimonov's patterns mean different things, for example: closed stripes - a good start; triangle or semi-oval with stripes - the sun; in the middle there is a strip, and on the sides of the strip up or down is a tree.
There is a village near Tula -
Filimonovo's name is
And the masters live there,
What good is brought to the house,
And good there is not simple,
And not gold, silver,
Filimonovo toy
it is called.
children preschool age it is difficult to mold a whistle toy so that it is hollow inside, so I simplified the Filimonov toy for my children. Today I want to introduce you how to sculpt a duck and a cockerel from clay.

Required for work.
Progress:

To keep the clay soft, wrap it in wet cotton cloth for three days. To make a cockerel, we cut off two pieces of clay with a stack: one about 2 cm thick, the other 1 cm.

We roll two balls.

While we are working with a large ball, put a small ball in a wet rag so that the clay does not dry out. From a large ball we roll a thick sausage, then a carrot.

Bend the carrot so that the thin part is slightly higher than the thick one. We bend the thin tip and form a beak - this is the head and beak.

We make the tail: we flatten the thick part evenly over the entire surface, the thickness of the tail should be 0.5 cm.

We make a comb and a beard: we roll two balls of clay, a little more for the comb.
We sculpt a beard: a ball - a sausage - a cone.
We sculpt a comb: a ball - a sausage - a flat oval (thickness 0.3 cm) - we cut the oval: at the bottom with an arc, at the top we cut out a corner.

To fasten parts, clay must be moistened with water. Dipping your finger into the water, then touch it to the napkin (so that there is not a lot of water) and only then to the clay.
Since the parts are small, it is more convenient for me to attach them in a stack.

Set aside the body of the rooster. We make legs-stand from a smaller ball (which we have in the fabric): we roll a short thick sausage, then a cone. We insert a stick into the middle of the wide part of the cone (you can brush reverse side), we roll, helping with our hands until the cone becomes hollow inside, the wall thickness is 0.5 cm. You can make a stand in another way.

Here's what should happen.

We roll a lace from clay.

We moisten the top of the stand with water, put the body of the rooster, attach the parts with a cord and a stack.

Align the seam with a wet finger.

Sculpt a chicken, as well as a rooster, only the tail does not need to be flattened.

We blind another girlfriend for the cockerel - a duck.
We cut off a piece of clay with a thickness of about 1.5 cm in a stack. We roll a ball, then a thick sausage, one end of the sausage is smaller in diameter than the other.

Bend the sausage to make an arc. From the side of the thick part of the sausage we form a tail. From the side of the thin part - we slightly stretch the intended neck.

We sharpen the neck, bend, form a beak.
Toys made from Cambrian clay do not have to be dried in a muffle oven, so toys will dry in 3 days at room temperature.

We cover the toys with acrylic primer, dry for at least two hours.

We apply gouache of different colors to separate parts of the body.

We draw the details on the head and apply stripes for future painting.


We paint with stripes of different colors.

We draw snowflakes and circles with cotton swabs.

We draw zigzags and wavy lines.

We cover the toys with hairspray. Lacquer gives shine, expressiveness of the toy, fixes the picture.
Petya, Petya, Cockerel -
golden scallop,
olive head,
Silk beard.
Petya walked around the yard
Petya dropped the pen.
Oh, what a whistle
Striped duck!
Unusual, funny
And a little chubby!
- Wait a minute,
Where are you from, duck?
My duck whistles:
- Filimonovskaya me!
It might be useful to read:
- Offshore trap of "Crimean Titan": will the "dirty" plant be modernized?;
- How to choose electrodes for welding Welding a rail with steel;
- Production technology of fiberglass pipes Fpipes;
- Consumer properties of muesli bars and snack products;
- How to start the production of smoked fish?;
- Sheet metal stamping technology;
- From what and how are dumplings made?;
- The best Tabasaran carpets: description, patterns, features and reviews An excursion into history;