DIY pottery repair. Cracks in ceramics. Where do they come from and how to get rid of them? How and what to repair a crack in a pottery
Today, it is very easy to restore chips and glue the broken one with the help of epoxy glue and putty. porcelain dishes or ceramics. You can repair a crack in your favorite vase or restore your grandma's old tea set and put it back in the cupboard without anyone knowing that it was damaged.
When it comes to fixing broken crockery or ceramics, super glue will not give you enough time to expose the shards more accurately. Therefore, it is preferable to use epoxy adhesive for bonding.
As with any project, the most important step in repairing broken glassware or ceramics is surface preparation.
If the shards were previously glued, remove the old glue with a cotton swab soaked in acetone (nail polish remover).

Clean the bonding parts with a mixture of mild dishwashing liquid and warm water. Rinse the parts and let them dry completely.
Using a toothpick or paperclip, apply epoxy glue to the edge of one of the broken shards.
Use enough glue to spread over the edge of the shard ridge, applying too little glue will leave empty gaps on the surface of the ridge, resulting in poor adhesion, and applying too much glue will make it difficult to bond firmly and aesthetically.
 GOOD TO KNOW
When handling sharp debris, wear gloves to protect your hands from the sharp edges.
Work quickly, attach the parts together with light pressure to squeeze out excess glue.
Avoid moving parts, small particles may fall out, ruin the repair.Use tweezers when gluing small pieces.
If you have crockery or pottery that is split into more than two pieces, you need to plan how to attach each piece so you don't end up with a final piece that can't be easily set in place.

Remove dried glue later with a sharp blade.
If the glue line is visible, and this is not acceptable to you, then glass paints will be required.
Glass paints or ceramic paints come in a variety of colors, but you may need some mixing to match the exact color.
NOTE: Epoxy glue contains toxic materials that can get into food, especially when the food contains salts and acids. Unfortunately, any utensils or ceramics that have been glued together are not suitable as food utensils, they are not safe.
Apr 12, 2015 tigress ... s
Cracks on unfired ceramics are one of the common troubles that happen to novice potters, although no one is immune from their occurrence.
Remember that clay shrinks as it dries. That's why rule number 1
:Do not add water or soft clay to the crack! The water will expand the clay and you will think that you have repaired the crack, but you have not. When the piece dries, the clay will shrink and the crack will only get worse. If your product has a crack, show it to the instructor and discuss how to fix it. Try to figure out why the crack appeared. Perhaps you added soft clay to hard clay, which caused the soft clay to dry out and shrink more? Did you press the joint well? Was the joint too thick?
So how do you get rid of cracks in dried ceramics?
Method 1. Grouting with dry clay
If a small crack appears in a dry product and it is not visible that the crack has appeared due to deforming force, the most in a simple way The repair will simply be rubbing some dry crushed clay into the crack prior to waste firing. This will not bond the clay, but after the waste firing, the product can be covered with liquid glaze and the cracks will not be visible.
Method 2. Sugar clay
To fill a wide crack in a nearly dry piece, use a small amount of clay that has dried and crumbled. Add the same amount of powdered sugar and stir with your fingers. Sugar will soften the clay and give it plasticity. Clean out the crack, moisten the edges of the crack with a little vinegar and add some sugar clay. Good powdered sugar gives more plasticity than water, and when dried, sugar clay will shrink much less than wet clay.
Method 3. Vinegar
If you have a small piece of your piece breaking off and the fracture line is straight, try vinegar. Apply a small amount of vinegar to the break and bond together. The idea is that the vinegar softens the clay without absorbing too much water.
Method 4. Paper clay
This method is suitable for large cracks in an almost dry product. It can be used instead of sugar clay if you don’t plan to glaze the product in the future. Put a small amount of toilet paper in a jar, cover with hot water and grind with a blender until smooth. Drain off excess water. Mix dry clay with a blender in another jar. Mix 2/3 of the clay mass and 1/3 of the paper pulp. It may be necessary to dry the resulting mixture on a plasterboard. Clean out the crack, dampen the edges with vinegar and fill with paper clay. Use this dry paper clay for cracks and liquid paper clay for seams.
yuli_keramika in Ceramic repair. Get rid of cracks.Cracks on unfired ceramics are one of the common troubles that happen to novice potters, although no one is immune from their occurrence.
Remember that clay shrinks as it dries. That's why rule number 1
:Do not add water or soft clay to the crack! The water will expand the clay and you will think that you have repaired the crack, but you have not. When the piece dries, the clay will shrink and the crack will only get worse. If your product has a crack, show it to the instructor and discuss how to fix it. Try to figure out why the crack appeared. Perhaps you added soft clay to hard clay, which caused the soft clay to dry out and shrink more? Did you press the joint well? Was the joint too thick?
So how do you get rid of cracks in dried ceramics?
Method 1. Grouting with dry clay
If a small crack has appeared in a dry product and it is not visible that the crack has appeared due to deforming force, the easiest repair method is to simply rub a little dry crushed clay into the crack before waste firing. This will not bond the clay, but after the waste firing, the product can be covered with liquid glaze and the cracks will not be visible.
Method 2. Sugar clay
To fill a wide crack in a nearly dry piece, use a small amount of clay that has dried and crumbled. Add the same amount of powdered sugar and stir with your fingers. Sugar will soften the clay and give it plasticity. Clean out the crack, moisten the edges of the crack with a little vinegar and add some sugar clay. Good powdered sugar gives more plasticity than water, and when dried, sugar clay will shrink much less than wet clay.
Method 3. Vinegar
If you have a small piece of your piece breaking off and the fracture line is straight, try vinegar. Apply a small amount of vinegar to the break and bond together. The idea is that the vinegar softens the clay without absorbing too much water.
Method 4. Paper clay
This method is suitable for large cracks in an almost dry product. It can be used instead of sugar clay if you don’t plan to glaze the product in the future. Put a small amount of toilet paper in a jar, cover with hot water and grind with a blender until smooth. Drain off excess water. Mix dry clay with a blender in another jar. Mix 2/3 of the clay mass and 1/3 of the paper pulp. It may be necessary to dry the resulting mixture on a plasterboard. Clean out the crack, dampen the edges with vinegar and fill with paper clay. Use this dry paper clay for cracks and liquid paper clay for seams.
Washing the product with warm water and soap 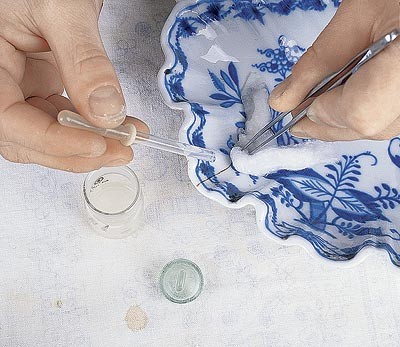 Whitening cracks with a compress
  Warming up with boiling water and dismantling the old gluing
 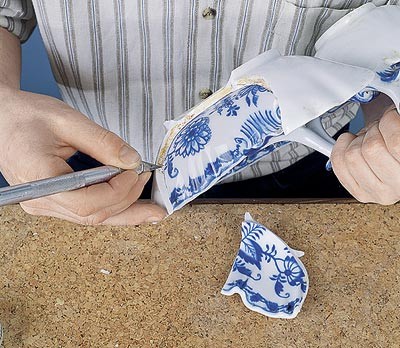 Removing traces of previous gluing
  Applying glue to the chip surface
  Fixing the glued fragment
  Removing glue that has come out on the surface
  Applying wax for mold making
  Removing the finished, hardened wax mold
  Filling the mold with a porcelain-like mass
  Sanding the cast piece with sandpaper
  Restore tinting
finished product 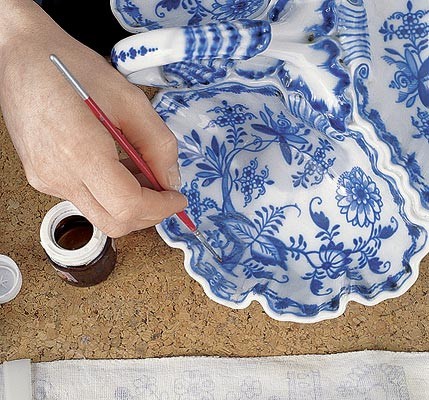 Preservation of new fragments with varnish
  Mastication of small chips along the edges
  Grinding a fragment with a file

"... The shards lay on the floor lit by the setting sun, it seemed, a playful breeze scattered them at some distance from each other, and I didn't want to believe that what had been my mother's favorite cup last night, even this morning, turned into blue porcelain petals. .. "- who does not remember the sad story about the blue cup, told by Arkady Gaidar. The feeling of a hopeless, irreparable loss mixed in memory with a child's fear of broken dishes. This story, of course, would have ended in a completely different way if it happened today and if its heroes had the last issue of our magazine.
Mom’s favorite blue cup would undoubtedly be restored, so much so that Mom would hardly notice anything special. Dishes beat at all times - its fragments are either hurriedly thrown away, or ineptly glued together with BF glue.
Now we will tell you about the restoration of porcelain according to all its classical rules.
First of all, let us forestall the restoration extremists - if you are the lucky owner of Meissen or Gardner's porcelain, temper your restorative ardor and reassure yourself that you have at your disposal a truly museum piece that can only be entrusted to a highly qualified specialist.
Our advice relates specifically to the "blue cups", that is, to those dear vases, figurines, teapots and cups, which, nevertheless, have no museum and collection value. Our teacher in such a responsible matter as the restoration of porcelain was Sergei Bobrov, the most famous Moscow restorer. Mine professional experience he received while working at the All-Russian Art Scientific Restoration Center. I. Grabar and the Tsaritsyno Museum-Estate.
Referring to a narrow, select circle of elite restorers in Russia, the master has a high professional reputation among colleagues, collectors and antique dealers. His works are adorned with private and state museum collections, they were also presented at the largest exhibition"250 Years of Russian Porcelain" at the State Tretyakov Gallery.
The work place of the restorer should have natural daylight, which is especially important when tinting and reconstructing porcelain. It would be good to protect the table with a cork or any other elastic covering, which in the event of an object falling, will weaken the impact. You should pay attention to the fact that all actions that you perform, and their consequences must be corrected, that is, on what professionals call the reversibility of the process. In no case, even with the best intentions, should you drill, grind, or scratch the original.
Let's take a closer look at the restoration process using the example of restoring a broken porcelain cabinet. First of all, the object is carefully examined; cracks, chips, places of old gluing are revealed. Then, depending on the nature and extent of the damage, the restoration plan is determined, i.e. the order and sequence restoration work... If the product is broken, you need to try to combine its pieces without gluing, find out the possibility of their coincidence, identifying the most difficult places.
Next, you need to wash the product in hot (50-600 water, using any soap with a low alkali content, this can be, for example, ordinary baby soap. Dishwashing detergents, soda are not suitable for this, as they can promote leaching or peeling of the glaze. Washing should be quite gentle - instead of a brush, it is better to use a bristle brush or a shaving brush.To remove dirt in the cracks, a compress is used - in this case, a cotton tow moistened with 10% citric acid solution or 3% hydrogen peroxide solution - applied to the darkened crack. The compress is kept until it is completely bleached.To the solution does not evaporate too quickly, the compress should be covered with cellophane or placed in plastic bag the whole product. If the product was glued earlier, it must be dismantled after washing.
Heat the seam with a stream of boiling water directed to the place of the previous gluing. After sufficient heating, without applying great mechanical force, try to separate the glued fragment. If this is not successful, pour boiling water over the product and leave for a while. This can be done several times, until the fragments easily separate from each other. Dismantle it over a plastic bowl of water so that the product or its fragment will not break if accidentally dropped.
The fragments obtained after dismantling must be cleaned of old glue with a scalpel or a sharp knife. The glue heated with boiling water softens and should easily separate from the chips. If removing the glue is difficult, you can use acetone or alcohol. To avoid damage to the glaze, it is best not to use numbered thinners, solvents, or concentrated acids. When the old glue is completely removed, fold the peeled pieces to determine the order of the new glue - small pieces are glued together first.
After degreasing the surfaces of the chips with alcohol or acetone, carefully coat the chip of a smaller fragment with glue.
As an adhesive, you can use a two-component epoxy resin EPOXY GLUE from BONDO, BIZON or the like, in the worst case, you can use a commonly available superglue, the disadvantage of which is too fast "setting".
For a more accurate match of the fracture relief, the glue should be applied uniformly, with maximum thin layer... When the fragments are smeared with glue and tightly pressed against each other, fix the gluing place with tape, plasticine, adhesive plaster. In any case, even if it seems that the product is firmly glued, it should be left for a day to dry completely, since the "setting" and complete polymerization of the glue are not at all the same thing. After you are sure that the gluing is complete, the fragments are held firmly, remove the glue that has protruded along the seam with a sliding motion of a scalpel.
If the fragments of the product are irretrievably lost, they can be made by ourselves, but only if the thing is symmetrical or is a figure of rotation. Then, with a detail similar to the lost fragment, first remove the mold using base wax produced by the Kharkov plant of dental materials "STOMA" in the form of plates 170
The plate heated in hot (50-60 water) is placed on the remaining surface and pressed tightly. The plate should be larger than the fragment to be restored, and go beyond its edges by about 10 mm. Carefully remove the cooled, hardened wax form and apply it to the lost area. having fixed it around the edges with plasticine, proceed to casting the desired fragment.
Clean the surface of the chip from fat, prepare a mass, which consists of epoxy resin (binder) and dry white titanium or zinc pigment. Grind them until they form a porcelain-like viscous mass. When filling a mold, you must first try to cover the entire surface of the mold with this mass, and then gradually increase its thickness, accelerating from the center to the edges. It should be noted that pigments containing lime (eg chalk) are not suitable for preparing porcelain imitations. When the lost fragment is completely restored, process it with sandpaper, gradually moving from coarse grain to "zero". Sand the surface, being careful not to touch the edges of the original product. Now that the surface of the fragment is almost the same as the original, let's start toning the background.
For tinting, use acrylic whitewash, refining the shades of white by adding watercolors. When choosing a shade, one should bear in mind the further preservation of the product with varnish, so the color should be half a tone lighter than the original. Also reproduce ornaments or drawings on the lost fragments with watercolors and whitewash, since pure watercolors are too bright. At this stage of restoration, patience and good daylight are the main helpers, because the accuracy of the color matching determines the quality of the restoration. It is not recommended to use oil paints for toning, which can change color in the future. The process is completed with conservation, that is, coating with MAIMERI dammar or acrylic varnish or similar, in one or several layers so that the nature of the gloss of the coating completely coincides with the gloss of the original.
If, when inspecting the product, small chips are found, you need to carry out a mastic, that is, fill their volumes with an epoxy mass imitating porcelain, the recipe for which you learned above. Grind, tint and preserve in the same sequence. Now the refurbished product can again decorate a sideboard, slide or home showcase. However, drinking tea from my mother’s cup is still not worth it, now it belongs to family history. Food use for the restored dishes is excluded - it can nullify all your efforts and adversely affect your health.
| If, turning the product over, you see similar signs on its bottom, rest assured that you have truly collectible porcelain in your hands. | ||||
|---|---|---|---|---|
 Vienna, Austria) Vienna, Austria) |
 Mason (Germany) Mason (Germany) |
 Imperial Porcelain Factory Imperial Porcelain Factory |
 Gardner (Russia) Gardner (Russia) |
 Royal Manufactory (France) Royal Manufactory (France) |
 Kuznetsov Plant (Russia) Kuznetsov Plant (Russia) |
||||

Cracks are the most offensive thing about ceramics and can upset all novice ceramists, but it is enough to get a little educational program to make your ceramic path much easier. In this article, we will talk about cracks that form in dry products before the first firing during drying.
Where? Why me?
- First of all, cracks can form due to uneven product wall thickness... If the bottom is 2 times thicker than the walls, stress is created in the shard due to the fact that one part of the product dries faster than the other and a crack forms, which is very difficult to cope with.
- Fast / Incorrect Drying... If you put the product to dry in a warm place near the stove or in a draft, then the product is likely to crack. How to equip the right place for drying.
- Poorly attached parts. Handles, spouts and grips that are not additionally strengthened with clay crack very often, so lay every detail with sausage clay, which needs to be well smeared.
- Poor quality / unsuitable weight. Clays are greasy or skinny. Clays with high plasticity are called "fatty". When soaked, the dough made from such clay gives a tactile sensation of a fatty substance: shiny, slippery and practically free of impurities. In this case, the so-called “emaciated” substances are added to solutions from such clay: “skinny” clay, sand or chamotte crumbs. But there is also the opposite situation - the product cracks due to too "skinny" clay. Such material is non-plastic or low-plastic, rough to the touch, has a matte surface and easily crumbles even with a simple finger pressure. In this case, it is necessary to add a fatty one to the "lean" clay or use other additives that increase the fat content of the solution, for example, feldspar or glycerin.
- During sculpting, you add too much water. The surface of the product is often covered with a network of small cracks if it is poured abundantly with water during molding. Wipe the product thoroughly with a sponge before drying, both after hand sculpting and after the potter's wheel.
How to avoid cracks in ceramics?
If you follow all the "safety rules" when molding the product, such as: make the walls uniform in thickness, check that the bottom of the product is not heavy, smear the details well, strengthen the handles, do not add a lot of water when sculpting. It is also important to be very careful about drying, equip a good place, carefully monitor each product and "do not rush" it, then everything should be fine.
What to do if a crack appears in the product?
Assess the scale of the situation. If this is a small crack on a huge item that you pored over for a week, then you can compete for it. If you are just studying and a huge crater appeared on your first, second or third student's plate (yes, we know that they are the most beautiful), then leave it, spend this clay and time on something more perfect and accept the experience with gratitude.
How to fight?
If you decide to declare war on a crack, we have a recipe. By intuition, first of all, all beginners take water and begin to cover up the wounded place with it, and so, I will get ahead of you: this should not be done in any case. Because of the water, the clay swells and increases in volume, you will already think that you got rid of the crack by covering it up, but it was not there, it will not slow down to return with renewed vigor when the clay dries up and shrinks. What, then, to do?
- Soak the crack with vinegar. The clay is softened by the vinegar, but does not absorb much moisture.
- You need to scratch the crack and around with a claw or a pottery needle in different directions.
- Fill the crack with a special compound: 1 part dry clay (with which you are working): 1 part kaolin. And fill the place with a "kidney" or a plastic card. Alumina or small pieces of toilet paper can be added to the composition of the healing mixture.
But it should be borne in mind that sometimes it happens that you did everything right, but still something went wrong and a crack appeared. Well, ceramics are always not only in our hands, but also in the hands of ceramic gods, we should not forget about this. Never be discouraged by failures, because they give us the most valuable thing in our business - experience.
Successful firing to you,
Always yours
Terracotta Ceramics
It might be useful to read:
- Massage, massage products Nem Yandex Direct massage parlor Sorry;
- How to start a bakery from scratch - a guide and a business plan Bakery pleasure for all customers;
- Auto shelf - wholesale supplies;
- Ideas for a profitable business;
- What is second hand and stock clothes?;
- Making ritual wreaths;
- How to keep records in an online store: accounting, tax and product accounting;
- Business plan: how to start a business selling meat;