For shooting the landscape is best suited. Remove portraits in nature. Landscape is, first of all, light
For me, landscape photography is the shooting of a natural landscape. There are many rules for shooting landscape photos, many benefits, textbooks, but you can not start shooting the landscape only after studying them. You must first get carried away with landscape photography, and then, estimating, making conclusions, seeking new techniques and adjusting the results, you can turn to the experience of colleagues of landscape players, and not only photographers, but also artists. The artist creates the perfect composition, spending a lot of time, the task of the photographer is not losing it for a relatively short time, since, heaving the creation of all new frames, it is very easy to lose the meaning of the photo. What is this meaning. In my opinion, the meaning of the landscape photo is to convey what made the photographer stop on this plot - beauty, harmony, which needs to be preserved even when making a creative hand writing.
Near the village of Popovka. Saratov district. Post-processing color photos makes it close in style for the works of the artist Shishkin I.I. This stylization helps to make the composition and color tones of photography. Sony A300, 10mm, F8, 1/200 second. Gradient filter. Tripod.
And this handwriting can be completely different. Remember the works of Great Shishkin and Aivazovsky. These are absolutely different artists, with different, completely unlike the handwriting. However, and Shishkin, with his beauty almost documented by nature, and Aivazovsky, with his fantastic amber-emerald waves of the Black Sea, were able to invest the greatest meaning in their creations, who can now influence the mood of the viewer and call various emotions. The present landscapeist is not even necessary to know the laws of the composition and the concept of the golden section. All this and without knowledge reflects on his paintings. So I, when I was already removed by the landscape, did not even know these concepts, but these laws were invested in my pictures. Nature should be felt, and no landscape officer will refute it, since I very much doubt that someone has been practiced only after studying the theory. And not so long ago, when the people were still the Internet and video tutorials, many simply could not know these rules, but they used them. And about them later ...
Now I would like to start the first questions. Namely - what. There should be no questions on camera chambers - almost any camera will suit the landscape. For those who are interested in landscape shooting, it is desirable that the photosity sensitivity of the camera's matrix began approximately from one hundred units, which almost never change in this genre, because the highest technical requirements are presented to the landscape - the maximum of parts. In general, it is not worth loan at the camera. My landscapes were removed on Sony Alpha 450 and alpha 300.
A little more attention should be paid to the choice of lens, and not so much its technical properties and lights, but the focal length. Technical properties Everyone chooses for its purposes - whether he removes himself into the collection, prints calendars, and may also be a meter banners, or demonstrates work on the Internet by resolution of 1.5 megapixels. There are several points of view and relative to the focal length in the landscape photography. Someone declares that it will be ideal 35mm (24mm for APS - C. ), someone believes that 24mm (16mm), and someone likes to shoot at even wider angles, such as 14-18mm (10-12mm). In this case, meant focal length Not equivalent, but to obtain an approximately the same viewing angle. So, if we need one viewing angle in full frame and Krope, you need to take a 24mm lens for full frame and 16mm for krop (APS - C).
The dispute about the focal length for the landscape is equal to a dispute about choosing a camera manufacturer. Meaning - someone like. There is such a point of view that when we admire the scenery, and we have a desire to appear, is responsible for this some part, in the landscape inscribed, not the whole composition. Thus, if we want to convey seen, it is necessary to finish the frame only this detail, building the composition on it. Perhaps, but not always. Adherents of this theory are close to focal lengths of the Filling and 35mm lens.


Rock Stepana Razin. On the left, the photo taken by a 10mm wide-angle lens, on the right - TV 75mm. In this case, it is more profitable to show the rock with a telephoto set.
There is another theory, the opposite - the scenery composition should include the widest range. Yes, instantly we can watch only point (in general, this statement is true only for men who do not know - women's vision has a different character), but the speed of perception is huge, and for moments we can inspect the picture entirely, and not one item. I personally am a supporter of the last theory, and I'm closer to the landscape lenses in the landscape shooting.

Popovka. Wide angle (10mm Crop) allows you to transfer the space and volume of the natural landscape.
These theories are opposite, but do not exclude each other. It all depends on our taste and meaning we want to invest in a photo. A wide angle is capable of transferring the space, narrow - scale. Perhaps everything lies in the psychology of perception and needs. But, in any case, shooting, for example, the mountains, we try to transfer their scale and greatness than space, and for this it is wiser to use a long-phocus lens, and the angle in width can be maintained by creating a horizontal panorama of several frames. If you shoot the mountains from the plain, that is, not in the mountains directly, and where the mountains form a background, on a wide corner, then they will become insignificant, relative to the frame as a whole. Removing directly in the mountains, you can use wide corners to show huge spaces between the vertices.

Rock Stepana Razin. Duram Mountain. Removing the mountain with a wide angle (20mm), we can easily lose its sizes on a wide background of the surroundings.

Rock Stepana Razin. Duram Mountain. Transfer the scale, namely the height of the mountain will help the telephoto lens (75mm). Panorama of four vertical frames.
Removing the steppe, fields, meadows, on the contrary it is better to remove the width that transmits the space. The telephoto lens will make the plane flat, it will bring not only any object, but also reduces the space. In the width, the frame can capture the smallest of space, and in depth everything that is up to the horizon itself, and the tens of kilometers of real space will be squeezed in the photo into airless layers, and the foreground is likely to be completely lost.

Popovka. The landscape, filmed by the telephoto lens, most likely will be very flat, the set of layers up to the horizon are closely refined and form strips. The burning horizontal in the village will be only a few hundred meters, and the distance to the horizon is tens of kilometers.
The composition depends only on the vision of the author, and in each case it can be finished. Do not think templates.
The lines in the frame play an important role. With their help, space is transmitted. Lines in the photo can serve as roads, power plants, forest stocks, edges of ravines or hills slopes. The lines cling to the look, and they are sent either to the semantic centers or into space. So, if the road is present in the frame, leading the distance, the look will surely continue on it, and the more the road is wriggled, the more interesting the plot.

Volsk. Osinovka. The photo is very easy to find a focus center. The look immediately slip on the road in the distance. In the same place as a view of the line of clouds and the line of electric pillars. The road here mites a lot of lines - ruts, traces, grass on the side of the road, and all lines are touched by the center. The effect of lines is enhanced by a wide shooting angle (10mm).

And imagine that the road passes through the frame horizontally, which will be in this case. And nothing, only throwing a look at the image, consciousness begins to follow on the road, and instantly goes beyond the frame borders. Therefore, landscape players at the level of instinct depict the road to the distance, and not a look at the frame of the frame. The more lines should be in one direction, the better the rhythm is visible. The composition should not just grab the look, but also to hold it. It is best for this to put the finished geometric figures in the frame.

Popovka. The dam has the form of the finished geometric shape, which will help keep the look at its framework.
Now about the golden section. For a long time I did not hear about this concept, because I did not study at the art school, I did not read the benefits for landscape players and the video tutorials also did not look. However, I always understood that in the traditional landscape the sky should take 2/3 images, and the land - 1/3. So it creates a feeling of freedom, if you leave the sky 1/3 - it will now begin to put pressure on the composition. The television drivers even have the use of this science - Western TV channels are removing reports in Russia, actively using the tertay rule - a golden cross section. Leaving the sky 1/3, they create pressure on the subconscious, including in the frame of dirt, garbage, dogs and TP. And if you want to shoot from the height of the belt to approximately, you can create such a sense of alienation that I immediately want to run from here. Do not believe - driving their channel and wait for the report. Although if the sky takes 1/3 pictures, the lower third will take the earth, and the central forest or mountains - the composition will be quite normal. Learn to affect the viewer.
A real landscape player sees the composition. It gives the picture also the weight, so it is important to leave the composition in equilibrium. Suppose, remove the field and the tree standing in it. How we construct the composition. The sky, of course, will take 2/3 spaces. The field is the lower third, while if there are hills or mountains, or the forest, we will send them to the sky. And where to post a tree? Let's try in the center, and the snapshot will become too heavy. And if you place it on a third to the right or left, the composition will acquire an equilibrium, slightly closer to the edge, and the composition begins to face, the feeling is immediately created as when the horizon is littered. If at the same time the heavy wind blows and bends the branches to the right, then we can only place the tree on the left, so that in the frame there remains a place for movement, in this case wind. Or if the tree trunk is tilted to the left, then placing the tree is more correct on the right. The slope of the trunks of trees in the photo symbolizes the dynamics, as mentally we teach the movement in the frame.
Consider an example on a simple composition:


Weching the land on a third, and the image becomes more "comfnoted" for us. However, the perception of the tree, which has just been perceived in the center.

Shifting a tree into the left third, we get an image that so and wants to fall left. Comfortable viewing and can not.

Having placed the tree into the right third, we get the block right, seemingly more due to the bending of the trunk.

By placing a tree between the center and the left third, we get a practically perfect composition, but check how the tree will look at the center:

And in this case, the composition seems even more harmonious. The space remains the left - the air. Read we used to the left - right, we also read the image. Therefore, in motion we come to the center of attention - wood. Under normal conditions, the curved to the right, the trunk could play against this composition, but in our case, all the tree has the outlines of the numbers "9", and the position of the crown compensates for the barrel.
The rules for constructing the composition exist, but not necessarily remember. It is just important to know that a good composition, this is the one at which viewing the image becomes comfortable and keeps the viewer's view within the photo.
Now, with regard to the technical side of the issue. As I mentioned, most often when shooting a landscape, I use a wide-angle lens - sigma 10-20mm. Optimal diaphragm value for landscape shooting - F. 8. With a greater value, the resolution of the lens is reduced, with smaller, the sharpness at the edges is lost. Almost for all systems F 8 optimal.
Often the attribute for landscape shooting is a tripod - in order to avoid a coil, especially noticeable at high permissions. In cloudy weather, when it is necessary to significantly increase the shutter speed, the tripod will become necessary tool. And certainly without it can not do if you need to make several pictures of one place with different exposures to create HDR images.
Auxiliary instruments in the shooting of the landscape are light filters. Most often it is polarization, gradient and neutral dark filters. When and for what they apply.
The polarization filter in landscape shooting makes sense to apply in sunny weather. The essence of its work is to remove reflections from non-metallic surfaces - from foliage, which makes it more rich and bright, from the surface of water, making it absolutely transparent, and other surfaces. When using Polyarik, the sky is also becoming more saturated, it is preferable, which allows you to clearly reveal the clouds line, which at the same time become lighter and acquire volume. Many authors say that the appropriate time to use the polarization filter is an accident morning and a pre-ordinary evening when the sun is low above the horizon, and it is detached to use it at noon time for the picture, since the darkening of the sky is uneven. Here I do not quite agree again. I often use the polarik at the day, but not at pure heaven, and when cumulus clouds appear on it. They allow you to divide the blue sky on the part - why the polarization unevenness becomes almost invisible. At the same time, paints become bright and rich, which helps to make a landscape extraordinary.

Photographing without polarization filter (left), and with a filter (right). The difference is visible immediately, Polyric gives photos of saturation. The blue sky is darling, which gives him a depth, drawing the clouds. The shooting was carried out by half a third of the day, at an angle of 45 degrees to the Sun - in this position the rooary filter works as much as possible.
But in the evening and morning hours in the polarik, I do not feel, as it is important to convey natural beautiful colors of sunrise and sunset, and the polarization force in such a light is very doubtful.
Polarization filter - the first thing I buy after purchasing a lens for a landscape. I consider it an indispensable tool of the photographer-landscape player.
Gradient filters are applied in other conditions. The gradients are different - on the density of the enlightenment of the dark part, by sharpness of the transition from the light part to the darkened, in form. Most often, the gradient I use it into cloudy weather to muffle the too bright sky and save his items, save them from overexpasses and drops from the range. The minus is that the gradient cannot repeat the landscape shape, and the blackout is linear, that is, trees, mountains, and so on can get into its area. Or you have to sacrifice part of the sky over the horizon.

Neutral dark ND filters are used to use longer excerpts under equal conditions, without closing the diaphragm and without waiting for the daily time of the day. ND. the filter reduces the amount of light passing through the lens. These filters are also different - with different degrees of force and construct. Very convenient for the landscape will be a filter with variable force. These filters are used mainly for water experiments - shooting waterfalls, surf. At the same time, moving over time streams become more like fog streams than on water flows.
36405 Improving knowledge 0
The shooting of landscapes can be divided into several components, the main of which are landscape survey and urban landscape. The first part of our lesson will be devoted to landscape photography.
Landscape shooting is one of the most complex and problematic directions of photography. I will say that I have a photographer with experience, the shooting of the landscape still causes difficulties. It is not as difficult from a technical point of view - it is enough to have a tripod, a wide-angle lens and pay more exposure attention. So what makes this kind of photo so difficult?
First of all, it is necessary to approach creative to shoot a landscape to be able to capture the mood and transfer it to the viewer. If the technical side of the question can be described, you can only advise on the creative component of the photo - you need to develop your vision to truly unique pictures.
Equipment
Let's start with the simplest. Which lens to choose? Despite the fact that excellent photos can be obtained using any lens, preferably, still use wide-angle lenses. They allow you to capture the space of the scenery, underlined perspective, which adds depth image. If you are using DSLR Camera from APS-C sensor, then pay attention to the wide-roller with FR 10-20mm; For full-frame cameras, there is a choice of lenses with FR 12-24 mm, 16-35 mm, 17-40 mm. Zoom lens is convenient in work, however best quality Provide lenses with a fixed focal length. In the range of EFR 12-24, a wide viewing angle is provided, and 16-35 and 17-40 provide a significantly lower viewing angle, but they provide smaller optical distortion, especially in the angles of the image. The use of ultra-wide-organized lenses and lens of type " fish eye»Make pictures more expressive and original. But to shoot all the frames only "Fish" will be uninteresting, so it is good as an addition to the main lens.

When shooting landscapes, almost always, small aperture values \u200b\u200bare used, to obtain high depth of field: usually f / 11- f / 16. It is recommended to avoid very small aperture values, such as F / 32, as this will reduce the image quality due to the diffraction (the effect of reduced sharpness and contrast of the image).
When shooting landscapes, you only need to use manual focus, especially when shooting objects in the foreground near the camera.
ISO sensitivity It is necessary to set the smallest, which allows the camera, is usually ISO 100-200. It is not recommended to use the ISO 50 extension available as an option in some cameras due to a reduced dynamic range. Removing the ISO 100, the image will be almost no noise, with a wide dynamic range and excellent picture quality, the sharpness of which can be improved during processing, without fearing the appearance of strong noise. Exposure: As you understand, the combination of a small aperture and small ISO values \u200b\u200bwill give a greater exposure. Depending on the illumination, the shutter speed may be from a split second (1/250 or 1/500) to a few seconds or even minutes.
If you are seriously fascinated by photography of landscapes, we must understand the need to use a tripod. The tripod is the main element that provides sharp, detailed pictures, especially with long exposure. Moreover, the tripod allows you to carefully pick up and think over the composition. Using a tripod, it is possible to use a special technique that allows you to make stunning pictures: at sunrise or sunset, make a pair of pictures of the same scene - the first to expand on the sky, the second to the foreground, then align them - the original frame with the widest dynamic range. When shooting with a hand, it will be impossible to remove the two absolutely identical frames.
When landscape shooting, it is recommended to use filters - polarization, and. Ultraviolet and protective filters are useless, as they can reduce image quality, reduce sharpness and increase the likelihood of glare. When choosing filters, it is important to take into account that their use on ultra-wide-organized lenses (18 mm and less) can lead to an undesirable effect of uneven illumination of frame and vignetting.
Preparation for shooting
In many ways, the success of photography depends on how well you prepared for it. It is necessary to thoroughly think about what can interfere with shooting or make you return. The more possible nuances you take into account, the higher the likelihood that the entire focus on the shooting. Solve organizational issues: how you get to the place of shooting where you stop. If you do not plan to stay at night, you still need to think over the option with the night - you can not calculate the time, circumstances may change.

Dress up so that clothes and shoes do not create inconvenience. Take a umbrella or a hooded jacket. Consider protection of technology in case of strong shower. Under hand there should be a lantern. However, from the forest or the mountains try to get out of darkness, because to spend the night there is not the most the best way. Check the map of the area, focus on it and on objects that cannot be confused. It is not bad to have at your disposal and compass.
Do not forget to take water and food. In distant and desert places it is better not to go alone. Make sure that the mobile phone accounts are money, and its battery has been fully charged. If you go on the car, check the "spare tire", fill in the gasoline tank, do not leave on a faulty machine. Tell your friends, relatives, where exactly are you going (riding) and the oriental time when you return.
Before shooting, check the camera settings, charging the battery and place on the memory cards. Optimally shooting in RAW by setting the White balance setting on the car, then you will pick up the desired balance in the converter. With different white balance settings, you can provide more attractive color reproduction.
Shine
Light is an integral element when shooting landscapes. The correct light can transform even a rigorous object, and the wrong may spoil even the best scene. Busy, but many novice photographers believe that a clear sunny day and a cloudless sky - excellent conditions for shooting - however it is not so - these are the worst conditions that can be represented to shoot landscapes. The best light is not a bright, midday, but soft light of sunrise or sunset. Shadows become clear, color warm, saturated and pleasant to the eyes. Experienced photographers call this time.

It is necessary to get up early and lie later to capture the landscape in this light, but the result is worth it. Sometimes, you can make fantastic pictures even before sunrise - it is quite possible to make beautiful landscape pictures even at night. When it is possible, capture in the frame of the moon - it will make it more interesting.
If there is no possibility or desire to wait for sunset or dawn, remove at noon - this is another strategy for getting better lighting. If the sky is cloudless, try to exclude it from the frame, as much as it is possible and, on the contrary, if the clouds form an intricate drawing, be sure to make the sky part of the composition. The polarization filter in this case will help to emphasize the contrast between the clouds and the sky and make more saturated paint.
Another opportunity to get great picture - Black and white frame. From the photo, removed even with poor lighting, you can get a great picture, converting it into black and white mode, but not all pictures will benefit from "bleaching". In black and white, the frames are clearly won, rich in textures, edges and other contrasting elements, while others may look "flat". In any case, do not break with the experiments with the contrast when post-processing in a graphic editor (not intracerer!).
Midday shooting, at sunset or sunrise - not the only time when the photographer can do high-quality snapshot. Even when the sky is tightened with clouds or under a torrential rain, you can get an excellent frame. Clouds and stormy sky will add photos of the appropriate mood, allow you to give landscapes an unusual look.
Mood
Some and the same places may look very different. Weather, time of day and many more different factors affect the environment - it never happens the same.
In two pictures shows the same waterfall. The first shot was made in the summer, on a sunny day - the waterfall is practically not noticeable, and the light is not very pleasant. In short, it is a typical picture made by a typical tourist. The second shot is made on the day when no one would think of visiting this waterfall. Cold autumn day, fog and rainy weather, enhancing the waterfall filled the mood shot - it fascinates.


Do not be afraid to shoot in the rain or snow - professional lenses and cameras dust-moisture-proof (you can learn from the description of your photographic equipment), and even if there is no, then get 100% protection against humidity by purchasing a special plastic or polyethylene casing.

Using a gradient filter, achieve a decrease in the brightness of a cloudy, colorless sky and manifestations of cloud texture. This will give your picture an extra volume. When the Blue Sky fragments are turned on in the clouds break, the action of the gradient filter on them will be equivalent to the action of the polarization filter.
Seasons
Every time of the year gives the photo artist his gifts, so do not postpone the shooting of the landscape only on the summer vacation.
Shooting in autumn, in cloudy weather
Photographing the rain, it is necessary to strongly diaphragm the lens to remove with high exposure. In this case, the rain drops will be in the form of strips, which will create an impression of rainy weather in a picture. It is only necessary to monitor that the rain drops do not fall on the lens. Drops will lead to image blur.

Spectacular landscapes can be removed in foggy weather. The impression of the fog can be strengthened by placing a rare silk tissue grid in front of the lens. To transmit the depth of space, in the frame in the foreground, you need to put any dark item.
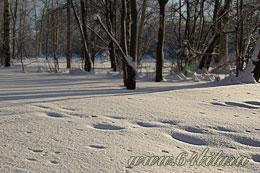
WINTER LANDSCAPE
In bright, sunny days, the contrast of the landscape is very large, which is caused by a combination of dazzling bright glare on the snow and, say, dark trees, especially coniferous.
Winter landscape is better to take pictures in the morning or in the evening when the sinking rays of the sun create elongated shadows, it revives the composition and highly emphasizes the texture of the snow.

Snow on a winter snapshot should be well worked. Therefore, when the landscape is photographed on which the snow occupies most of the frame, the exposition is determined by measuring the brightness of the snow. If the snow and the dark objects of the plot are equivalent from a visual point of view, the exposition is determined by their average brightness, but taking into account the larger study of parts on the snow compared to dark objects.
Composition
1. Telecom rule
A good composition is an integral part of the photo of the landscape, but it is precisely the most difficult task. There are several "rules" that will help you improve the composition, but you must constantly develop a "creative" look, to obtain decent pictures.
The most common error of novice photographers is the placement of the horizon line in the center of the frame - as a result, static and unbalanced image. The first step of improving the composition is the shooting of the landscape according to the rules "third". We have already considered it in our previous classroom lessons, but it will not be superfluous to remind. Everything is very simple - mentally divide the frame into three parts horizontally. And remove the 1/3 foreground in the proportions, 2/3 of the sky or vice versa - 2/3 foreground, and 1/3 of the sky. In other words, create an asymmetrical composition.

Naturally, the rule "third" will not be a panacea for all photos, but it is necessary to remember it.
2. Front Plan and Perspective
One of the most effective ways to create a strong composition is to use a wide viewing angle and place some object (flower, stone, etc.), in combination with a strengthened wide-angle lens perspective, will give a feeling of depth.
The depth of field must accommodate all objects. Therefore, it is recommended to set the values \u200b\u200bof the F / 11 or F / 16 diaphragm.
3. Other composition elements
In nature, there are many elements to help create an expressive composition - the most influential ones are diagonally. Use diagonal lines to emphasize the viewer's attention to the object. If you look carefully, you will see that everything around is subordinate to some guides. Look for guides and try to enter them into the composition.

Patterns (repeated forms) and textures - another elements in the composition. Display in nature Natural patterns are not easy, but different textures are common: small sand particles, trees bark, stones and many more interesting objects will help take a picture more interesting.
The main thing in the frame
Determine what will be the main thing in the frame. It can be a lonely tree, rock, mountain, picturesque forest, slope, road. Using the composite grid on the LCD screen (in the viewfinder), divide the frame on a third and place the main object at the intersection of the vertical and horizontal line of the grid.
Try to make it so that three plans attended the picture: front, medium and far - so the landscape will look at the bulk, and the space will be transmitted better. The foreground should be drawn clearly, in detail, the rear may well be blurred, hidden atmospheric haze.
Try to the landscape not "empty." Empty space is better, if possible, fill. There may be clouds in this filler. In the foreground - shrub, high grass, stones, leaves, branches, animals.

Do not strive to put in one frame at once all that you see, get rid of the accidental and monotonous space, which inexpressively fills most of the frame, - water, sky, foliage. Leave only the most important, beautiful and interesting. In the forest are looking for outdoor places.
Too thick foliage, the branches create a variety, small glare and very thick shadows that look in the photos as "black failures," such pictures look worse than a well-thought-out composition.
If it is impossible to select Filling, Pain the image so as to highlight a more interesting part of the landscape. You can go a little and make different pictures - directly or at an angle, from the bottom point. Climb the hill, hill, any building - from there you can make a multi-faceted spatial panoramic picture.
Choosing the plot, look for the main element of the landscape, on which the emphasis will be made, as well as the way the environment will emphasize and complement it. Completing the frame, follow the object harmoniously fit into the plot. For example, a tree should not grow from the bottom limit of the frame - leave a little place at the bottom; Do not cut the mountain from above, leave a bit of "air".
Photographing the landscape, always pay attention to the fragments, because it is not necessary to shoot only general plans. Attentive glance can allocate an interesting part of the landscape, beautiful and expressive details. But do not get carried away with strong zooming - here you need to keep the integrity of the fragment, otherwise the picture will be escaped from general Plan Abstract piece, deprived of meaning.
Panorama
Finally, practice in shooting panoramas. Here should be guided by several rules. All future frames of your panorama should have the same scale of the object being removed, so do not focus closer or further. The diaphragm value must be left permanent. Frames need to be done with some allen on each other. Otherwise, due to lack of information on the frames of frames, the program on stitching Panorars will not be able to collect a final picture.

You can use the breaking feature in your camera to avoid exposure errors.
Water shooting
If you need to take pictures of water, exhausted ripples or a slight wave, then it is removed at a counter-side illumination at an angle of 35-45 ° to the optical axis of the lens.
Water against light is photographed when the rays from the Sun, a hidden cloud, fall into the water, creating expressive shiny stripes. But it is necessary to ensure that the sun does not fall into the field of view of the lens.
The sea is better to shoot from a high point. Then the water space occupies a significant part of the frame, the photo is more expressive.
The surf is usually photographed with a low point with an exposure of at least 1/1000 s.

Current water is better removed with a small exposure. In this case, there is a slight lubrication of the image, which creates the impression of water movement.
Mountain landscape
In the mountains it is better to remove early in the morning. In this watch, the air environment is transmitted to the most effectively. Cloud weather also helps to obtain more expressive pictures.
On sunny days, the plot must be selected with the dark foreground, on the brightness of which and determine the exposure. In this case, they would be given somewhat redesigned and will be released on the imprint, than the foreground, which will emphasize the depth of space, fill the scenery by feeling air, space.
The best is the lowest lighting, as it emphasizes the shape of the mountains, and the chimka-lored rays creates the impression of the depth. When the sun is behind the camera, the image becomes flat. When - in front, the snapshot is very contrasting, the details, especially in the foreground, disappear.

Photographing a mountain landscape in the afternoon at a high sun position reveals image details, without sufficient contrast.
When determining the exposure, it is necessary to take into account that the intensity of solar lighting increases with a height in the mountains, and it acquires a different character than on the plain. With a height, there is a decrease in the brightness of the shadows and an increase in the brightness of bright sections of the landscape. Therefore, when the distance is removed without the foreground, the exposure compared with the shooting on the plain area is reduced: at an altitude of 500 m per 1/4, 1000 m - on 1/2, 2000 m - on 3/4, 3000 m - twice.
To get glare on the surface of the glacier, you should take pictures at the opposite light.
The main question of the topic: How to learn to see beautiful landscapes?
A beautiful landscape is built on the fact that the plot unites everything in the frame and subordinates the environment of a common idea - author's thought, creating a certain mood, emotions, findings.
Successes you and all photographic!
Where to begin
I understand perfectly well that not all newcomers can surprise such terminology as an excerpt, aperture, focal length. Nevertheless, I still advise you to first examine the "Textbook Photos" ("Landscape" is directly continued), and at the same time refreshing and terminology on the Photo Slovar page, in order not to return to clarify key concepts: it is more convenient (and more useful) than Run each time links and back. And most importantly, it will be useful not only for reading how to shoot a landscape. I understand, you intend to photograph, and not just read :)
Lens
You can remove the landscape with any lens, from fishing eyes to long-focus. And if you have only one lens, you get magnificent pictures, then you should not get another one - specially "for landscapes." And then the text should be perceived solely for familiarization, and not run to the store for wide optics, so that "more in a frame".
I generally advise unprofessionals to shoot any subject with one lens and learn to do it so that all the plans come out with a bang. For
Buying expensive optics (or a new camera) never adds any skills to shoot.
And yet there are some rules that should be known. Before you start shooting landscapes, you need to choose from your collection "Right" lens (or the correct focal length if the lens is only one). For owners of soap, compacts and other cameras with non-free optics, the question does not disappear. The lens of them is integrated into the chamber, but they also need to be able to use. Put it in the "Wide Angle" position, "put forward zoom" here is not needed. More precisely, there is no need for this. Next, read with the "mirrors" how to remove the landscape correctly :)
So, we take a wide-angle lens, or we put in the minimum focal length. Wide-angle optics gives a larger viewing angle, greater sharpness and therefore are more often used for landscapes. Of course, on average corner and in the television (and even a very long-phocus television lens), you can also shoot landscapes with not worse results, for much depends on your designs. But still the landscape is more often removed on wide corners, because the landscape implies the space and the depth of field across the entire field (which is difficult to achieve long-phocus optics).
All examples consider on a specific (and quite budget) model: Pentax Da 16-45 mm F / 4 lens. Consider that I regained it :), but the owners of Canon and Nikon should not be upset, or fall into the "religious dispute"! Your technique is no worse and even better! Walk things. We are now interested in the differs on the lens 16-45. This is a focal length. Since I have a digital mirror, and the aspect ratio of the frame (matrix) in the pentax is approximately 1.5, then we multiply 1.5 on our diquses and get an equivalent focal length (EFR) 24-68 mm. This recalculation I did so that you can compare your focal length with him. Who did not understand: I strongly recommend reading the focal length of 35 mm equivalent (EFR) again :), since only the equivalent focal length will be indicated. As a result, we have a lens with a wide angle (everything that is less than 35 mm is "wide"), a small television in 68 mm and constant for different ends of the "zoom" of the light F4. As you can see, this is not the most outstanding "zoom", but his wide angle is quite decent.
What is distortion
So, we put the lens on the most wide-angle position, in this case it is 24 mm. Of course, you should not shoot portraits on a wide corner, because a wide-angle lens (even dear!) By virtue of its design, it can give (and gives!) Geometric distortion, or as they say "distortion". What is distortion?
This is the curvature of the image in the lens due to an uneven increase in items from the middle of the lens (lenses groups) to its edges. 
And now the same, but simpler: it's when straight lines look with curves, the central part of the snapshot is progressed, the background seems further than it really is, and the prospect is distorted :) Why is it going on? In any lens, everything is worse around the edges, here the consolation is one - with distortion, the sharpness of the image is not broken. Of course, in a specialized wide-angle fixes, the distortion is minimized, but even there it is still there.
In the picture, geometric distortion is clearly visible with a naked eye, the shooting was carried out on the widest corner (EFR \u003d 24 mm). It is especially noticeable as a naja house on the right, similar to the Pisa Tower rather than a residential building. And if he falls? :) How to shoot a landscape and live all your life with this grief in the heart? Is distortion disadvantaged shot? Or lens? Of course, the lens is involved (and the wider angle, the more distortion), but the creative questions remains, and no one knows the exact answer.
Undoubtedly one: distortion is always a smaller drawback than the unsuccessful frame :)
Well, for completeness of sensations:
The absence of distortion is always less dignity than a well-condensed frame :)
And already in the case of an ultra-wide-organized lens of the type "fish eye", distortion from the discharge of disadvantages smoothly goes into undoubted advantages :) And in general, there are pictures where in a similar way try to emphasize the expressiveness or dynamics of the plot. At the end of it Nelishna, add: the distortions themselves are very bad :) Well, they explained ... completely confused! - Says other. In fact, the situation is such. Empty and deserted highway. There is no traffic light, and you need to the other side. You, of course, will go - do not wait, in fact, when the traffic lights put :) But violate the rules road - It is very bad ... it is better not to break! And the conclusion? And the conclusion is simple: everything comes with experience! :)
To reduce distortion, or vice versa, increase its influence (for example, for artistic purposes), it is necessary to know that such distortions are especially expressed, if you take off the bottom of this frame where you have vertical lines (pillars, trees, buildings walls, etc. .) And especially if these lines are closer to the edges of the picture. Distsiscy decreases significantly if you have a zoom (increase the focal length). And, of course, no one forbids using high-class optics, such as
sMC Pentax DA 15mm F / 4 Al Limited lens, or similar wide-angle and high-quality fix - exist with a wider angle (and powerful luminosity). The optics of the same class is available in many other systems, but the PC & Aacute reviews of all the "landscapes" I have no opportunity, due to the lack of time. The overall disadvantage of such lenses is one - the beats appeared at the price, and not in the eyebrow, but in the eye. But Ideally correct distortion can not even the most expensive of them. Therefore, many might distortions in Photoshop, and we will return to the shooting of Landscapes to our 16-45 / F4.
Landscape and diaphragm
In general, the wide angle is good for landscapes, and for the portrait it will optimally be a focal length of 50 mm and above. For the landscape, the diaphragm, as a rule, is covered - so that everything is sharp, "from Pup to infinity", as often happens from compact cameras: on the landscapes there can not cover the diaphragm at all :). The mirror is more difficult to use (in order to speak in advertising there!) - The light lens can give the forefront of the forefront when focusing on distant objects. And not even very light, as in our case, we look at the example:
Landscape number 1. Track to the sea.
F4 diaphragm, 1/2000 exposure, EPR 39 mm.

By increasing the snapshot, we will see that the foreground pebbles are slightly blurred. Why? It is known that all sorts of distortion increase to the edge of the lens and decrease to its center. With a lens of a diaphragm, we make a working only central part of the lens. Those. Reduce distortion. These are the laws of optics. It concerns this and sharpness - with a decrease in the aperture hole, the flu is increasing (the depth of the sharply depicted space). I will not torment you evidence: believers are looking for materials in the Bible, or believe everything will say that the preacher will say; Atheists will take the textbook of physics and will find in the Optics of the formula for constructing optical systems and the properties of a simple lens; Photographers will simply trust their experience - the choice for you :) Let's return to the snapshot. Here, the F4 aperture was installed as open as possible for this lens, as a result, the grip and pebbles in the near plan in this depth of the sharpness "did not get" - they are slightly closed. Why is the foreground blurry? Because focusing was made on a rather distant distance (on the coastline). To "focus on" on the pebbles, it was necessary to focus on them, and then everything else would be blurred - and the sea and the coastline. And what to do, if we want to have a sharp frame of the frame? Right, remove the scenery of the soapie! And the unfortunate owners of the mirrors will have to be very difficult to think their head :) - for example, how to clamp aperture: And for this you have to read the instructions, and then still study the camera, and then search, where there is this lever or wheel to control the diaphragm, and even think What position is it to turn it, and what the tsiferki mean, which will change and what will be sharpness - in general, everything is not so fun ... :)
And if seriously, the very short exposure applied in the picture allowed you to cover the hole up to 11 (in this case, all the light rays forming our picture go closer to the lens lens center!) - And we would then get a snapshot sharp from pebbles in your melee - to the sea inclusive. At the same time, an excerpt was obtained at 1/250 seconds, which is more than enough for static shooting. In theory, at a focal length of 39 mm, there would be enough shutter speeds at 1/60 seconds, but to reach extreme values \u200b\u200b(both shutter speeds and diaphragms) without particularly not recommended.
Landscape number 2. Track from the sea :)
Diaphragm F8, shutter speed 1/500, EFR 24 mm.

Blur of the neighbor (or long) part of the picture in the landscape is not at all necessary. That is why I advise you to cover the diaphragm even on a compact - to develop a habit called "Right photo". For a mirror chamber, this is a necessary reality - if you, of course, do not want to intentionally take a piece of the picture. On the right, you can see a similar example, but made with a pinned diaphragm and focusing on the palm trees and girls :) ⇒
Yes, yes, this is the same track, but now she is no longer to the sea, and back :) But we are not interested in palm trees and girls and quite different. In this photo and the far and close plan is quite cutting. It is easy to make sure that by increasing the snapshot to compare the cloud with the near pebbles of the track.
Here the diaphragm could be covered up to 11 - excerpt at 1/5,000 seconds allowed to do this, turning into 1/250, which would also be quite enough for a wide angle. With such a good lighting, it is very comfortable to photograph the landscapes, almost any camera can cope with the module on the machine, and I think any photographer :)
It is believed that landscapes are better removed when the camera is horizontal. However, as can be seen from the last two pictures, they may well stretch out and bottom to up! If this requires the plot (and he demanded here!), Then with a vertical (still say "portrait") photo landscape looks no worse than horizontal.
What is hyperfokal
Thirst the sharpness to the horizon itself is an almost indispensable condition when photography landscape. How to focus? The easiest way to do this by installing the lens to infinity (icon from the distance scale). In this case, it will be all sharply from a certain border and to the horizon, which allows you to fully focus on choosing a composition without being distracted by the focusing of the lens. However, at the same time the flu will be somewhat less than the maximum can provide a lens.
Here you can focus not at infinity, and right on the mentioned neighboring border so that the horizon remains quite sharp, and the near border of the depth of field moved even closer to the foreground. This is called the installation on the hyperfocal distance.
Therefore, removing the landscape is important to remember:
Focusing on the hyperfocal provides maximum sharpness from half of this distance to infinity.
Sometimes this half is just lacking for the sharpness of the Middle Plan. There is a simple formula for practical calculations, which, honestly, never use himself :-)
H \u003d F 2 / D * Cwhere
H - Hyperfocal Distance
F - focal length (not EFR, in meters)
D - number of diaphragms (denominator)
C - Blur circle \u003d 0.043 / 1500 / k (i.e. 1/1500 The length of the film is diagonally in meters, K is the crop factor of your camera).
We get the hyperfocal distance in meters.
When landscaped shooting, it is extremely inconvenient to engage in such calculations, so you can combine the "infinity" symbol on the lens scale with the division of the depth of the sharpness, which corresponds to the installed diaphragm. If the scale is missing (new optics is almost always!), Then learn to determine the distance to the eye. In general, nothing unusual, everything is as always :)
Below is a table of hyperfocal distances for some cameras, typical focal lengths in EFR (for clarity comparison) and most landscape diaphragms. The distance needs to be divided by 2. For example, on a mirror with a 50 mm lens and a diaphragm F8 focusing on the hyperfocal will be 7 m, it means that we obtain the flu from 3.5 m to infinity. As we see, the smaller the matrix, wider the angle and stronger the diaphragm, the greater the possibilities to capture in sharpness and the near and distant plan.
| Hyperfocal in meters | ||||||||
|---|---|---|---|---|---|---|---|---|
| Matrix size | EFR | F2.8. | F4.0 | F5.6 | F8.0 | F11 | F16 | F22. |
| 36x24 k \u003d 1 | 24 mm | 7 | 5 | 3,6 | 2,5 | 1,8 | 1,3 | 0,9 |
| APS-C k \u003d 1.5 | 24 mm | 4,8 | 3,3 | 2,4 | 1,7 | 1,2 | 0,8 | 0,6 |
| APS-C k \u003d 1.5 | 28 mm | 6,5 | 4,6 | 3,3 | 2,3 | 1,7 | 1,1 | 0,8 |
| APS-C k \u003d 1.5 | 35 mm | 10 | 7 | 5 | 3,6 | 2,6 | 1,8 | 1,3 |
| APS-C k \u003d 1.5 | 50 mm | 21 | 15 | 10 | 7 | 5,3 | 3,6 | 2,6 |
| APS-C k \u003d 1.5 | 100 mm | 83 | 58 | 42 | 29 | 21 | 15 | 11 |
| Compact 1 / 1.8 "k \u003d 4.8 | 28 mm | 2 | 1,4 | 1 | 0,7 | - | - | - |
In this situation, it is better for everyone here a compact (not even with the smallest matrix). Real landscape! I did not give compacts with smaller matrices, they also have everything sharply from the sneakers to the horizon. Nothing terrible, such cameras have a lot of other problems :)
How to remove the landscape in the summer :)
And shoot landscape in the summer is easiest because good lighting It happens much more often than in winter, and the colors are more saturated. But other subtleties of the landscape shooting no one canceled.
Snapshot No. 3 is quite typical: sharpness at infinity is especially important for landscape photos in which the background has no less meaning than the close plan. But the shooting of a magnificent Ladoga landscape at the origin of the Neva was carried out for greater effects with a very low point, which made it difficult to get a depth of sharpness from stones (close to the camera close to the camera) - to the horizon, significantly from these stones of the remote. Installation on infinity did not help: Everything was wonderful other than the foreground, which hardly did not want to fall into the flu even with such a clamped diaphragm.
But the installation of the hyperfocal was helped for a distance closer than infinity - focusing on a stone in the water (the hyperfocal estimated on the eye). The diaphragm was clamped to F11 (it didn't want to clamp the F13-16 in view of the possible diffraction) and, of course, helped the widest angle. As a result, the depth of field moved to the most closest stones, continuing at the same time to reach the horizon.
The focal length for landscapes is usually chosen less than standard, it is also provided with a greater depth of field inherent in short-focus optics, and wide-angle (in the frame "will fit more than space"). In the landscape number 3 all the possibilities were used: "the right" hyperfocal, a sufficient diaphragm, taken as wide as possible (for this lens) angle.
Of course, the landscape can be removed on a longer focus: it all depends on what you want to take off, from an angle, from the possibility to come closer. For example, I did not have such an opportunity - to "learn kicks", photographing the landscape number 4 - as it would have drowned together with the camera, and the parachutist wanted to get bigger, for he is an important "detail" landscape ... :)
The following landscapes are removed on a wide corner. If a gorge with a mountain river (No. 5) was filmed on a long focus, then the frame was treated either a cloud or a river, for retreating back it is extremely difficult. In the mountains often from behind you gaps the abyss, or the impregnable wall snaps like: Neither step back, without a wide-angle lens there is nothing to do here! But it is even worse: when you have shoes in the mountains, the case can end much more sadly than broken legs. Yes, and they will have to smash them much more if the barefoot jumps with the camera on the journey of the wreckage of stones, and, of course, not to immediately return back, but in order to take a more beautiful angle :)
Often you can hear that the photographer removes the landscapes only twice a day: in the morning and evening hours. It is right, sunsets and dawns are incredibly beautiful. But still the main raisin is an expressive sky! The reflection of clouds on the water may even be blooming even the most rigorous pond, in this case and the midday shooting can bring a lot of pleasure.
In general, how to relieve the landscape you already understood. We develop a route, I do not jump into the abyss, we do not climb into the water, we do not climb on the rocks, and most importantly, we carefully choose the lens and shoes :)
Photo number 7 will tell us about the shooting of the sunset in the evening. Here you need to remember that the sunset can quickly disappear, so you need to choose the point of shooting in advance to determine the aid - what and how it will be in the frame (and, of course, in order for the photographers who escaped from all over the districts! :)) - in General, be ready.
Immediately put the exposition, I do a measure on the sky, because, when you have a sunset, we need a good drawing of exactly the top of our wonderful landscape. Well-proxposed lower part of the frame is not needed with the left heavens of the left heaven and without any sunset. On similar flap and methods of measurement learn at the end of the page.
So, since such lighting requires long exposures, it is best to use a tripod, or to put a maximum diaphragm. Because There was no tripod at hand, I chose the last, as a result of which I received quite acceptable exposure. And turned on the outbreak for the foreground to fix and at the same time to highlight for a larger effect of the shock of the stone. As you can see, sometimes the landscape can be removed with the flash :)
Landscape number 7: ninth shaft :)
7. 
The diaphragm F4, excerpt 1/60 s, EFR 24 mm.
A typical example of a multifaceted snapshot with a neighbor, middle and long-range plan. Do you know that in this photo the most difficult? It will protect the lens lens from the splash of salt water :) A protective filter, whipped on the lens, can help a photographer in such situations.
How to shoot a landscape. Tips for photos of typical landscapes:
8. 
diaphragm F8, excerpt 1/500 C, EFR 27 mm.
I will not list and then widespread tips: Avoid symmetry in the frame, do not cut the horizon line a snapshot (or head) in half ... Be sure to use the "Rule of the Golden section" (or simplified "tertéy rule") to position the semantic centers of photography not in the center , and on the lines th one third distances from the edge of the frame, or the intersections of these lines ...
Make only multifaceted pictures, with mandatory focus (sharpness) in the short terms.
First, in symmetry, there may often be its own charm, this is especially true of the converging prospects. In addition, many photographers deliberately use prospects geometry regardless of the presence of symmetry. Or the lack of availability :) The prospect may not only emphasize the depth of the space, but also to direct the viewer's wandering look at the desired point of the frame (in the center that is not deprived of the point). For example, so:
City Landscape: Perspective :)
9. 
Secondly, the semantic centers each photograph can be different from the tertéy ... There will be no normal person to have, say, a lonely tree (or person) all the time in the same point of the frame. Nevertheless, such advice on the shooting of the landscape (and not only) give almost always ... I will say easier - to make excellent pictures, the rules can be observed at least than to break them - and get an excellent result. Equally, how not to get :) If everything was so simple - to do a simple set of rules and get a masterpiece - the photo would have to bury ...
Imagine, a certain critic appears on a photo exhibition and says: "Oh, it is a great still life, the apple coincides with one of the points of the golden section - what is the unsurpassed composition! But admire - it's a breakdown snapshot, just a disgusting portrait - because the back background is not closed (! ). But the landscape, a decent hand of Aivazovsky: The horizon line is not in the center, but, as it should be, shifted by a third from the edge of the frame! Please note the gentlemen, the next photo is a real masterpiece, everything sharply until the horizon itself ... "
However, it is very smacking with insanity, isn't it? :) However, I do not see anything bad in the knowledge of these rules and their creative application, but not a stupid consequence to them always and everywhere. I will advise the newcomers to start shooting rather from complying with these rules than with denial of these, but extremely careful and unobtrusive. I will allow myself slightly postpone, so the next paragraph can be safely skipped :)
The photo should first of all express any idea, the idea, or the worldview of the photographer; Or to be at least just beautiful (and, of course, technically high quality), but even all of the above is not a guarantee of a masterpiece ... and so much is not a measure of values. The amount of money earned by a professional for pictures is a measure of values \u200b\u200band prestige of his customer, Advertising, for example, toilet paper :), or sent in warehouses and unclaimed, but already made (big parties!) The unsuccessful model of army boots :) And more money - measured punctuality of the photographer of the order and the promotion of his name ... This is not a stone. in the garden of professionals, it is just a stereotype of cultural and moral values market economy:) Do not consider certain samples of creativity and non-commercial photos of your submissive servant, in any case, these pictures should not be such samples, as they were chosen purely for training purposes.
How to shoot landscape in winter
There is nothing worse and more boring than the photo in winter ... fingers are shied on the trigger button of the camera. The dead season, there is neither greenery, nor bright juicy paints, but there is only the despondency of a cloudy sky and a cold-gray longing of snow. Ice air suggests a sad thought, and whether the jacket will crack from Frost, whether the injected flaps do not have the injected flaps right under the feet of the stunned photographer ... :) Maybe you can take a photo of photography until the summer, and the camera on the mezzanine? However, the following example I like much more than a different bright colorful summer picture, as well as a sharp pain in the eyes of a white winter landscape. We are still so stubbornly driven by sharpness, isn't it?
Landscape number 10. Winter evening.
10. 
Lens 50 / 1.4, ISO \u003d 400, the diaphragm F2.4, excerpt 1/6 C, EFR 75 mm.
This winter evening is removed with a light "portraight" on ISO \u003d 400, and without a tripod. I remind you if the sensitivity of the sensor is clearly not specified, then there iso \u003d 100 - by default :) Why the diaphragm is exhibited 2.4 when the lens lightly allowed it to open it up to 1.4, thus reducing more than twice the shutter speed, or ISO?
The perspective of the plot (or perverted plan) was such that I did not want to climb the foreground even more, which was inevitable at the maximum open diaphragm. By the way, to shoot with such a light without a tripod - not a sign of laziness and bad photos of the author (as you, of course, thought), and simply the author is too frozen to run home behind the tripod and back for the photo and ... frostable hands :) I was So confident in the lips of your lens and chain hands, which did not consider it necessary to carry a tripod behind him, or run behind him. Okay, you will not be held - I confess that it was specifically taken by this fix, in order not to take a tripod :) But the point, of course, not only in this. You should know: if the "frame" likes - it should be removed at once, because you can't do anything exactly, even if you come back. It will be difficult (or impossible) to find the point of shooting, besides the lighting will change, and in general - everything will be wrong. But this does not mean that the author calls to climb everything in a row without parsing. You should always ask yourself a question: Do I really need this frame? Isn't it worth returning here later when lighting change and everything will be completely different? :)
Ordinary winter.
11. 
The diaphragm F11, excerpt 1/750 C, EFR 24 mm.
Couple of useful tips. In severe frosts, you need to remember that the battery sits quickly - think about the spare if you plan much, and the camera (and the lens) can be worn if it is made from the street into a warm room without a cover. Blend do not neglect, it not only helps with the sun, but also protects the lens lens from the snowflakes. "What is Blend?" - I asked me in one of the letters. Who laughs at the issue of a novice, that in vain does it: we all once learned the first time what a camera, lens, blend ...
This is a blend with a thread 67 mm lens 16-45 / 4 with blend


12. 
Green spot spoils good in general. Unfortunately, this is not always happening, otherwise no one would forget to carry a blend on the lens :) and especially, with bright sunlight. Naturally, this applies not only to the photo in the winter!
That was how Alexander Sergeevich would have written, if he knew about the birth of a photo, which was officially acknowledged 3 years after the death of the poet. And if a hole of the camera-obscura is hard to call the modern lens, then one fact does not cause any doubt: the poet clearly understood the lot in the art of creating a winter landscape! :) And indeed, the low-spiriting winter sun can greatly revive the picture, thanks to long shadows and frosty clean air. . Mysterious long shadows, which trees are discarded to sparkling snow, can be the basis of many fabulous winter plots.
| Landscape winter morning. |
Three pines :-) |
13.  The diaphragm F8, 1/500 C, EFR 30 mm. |
14.  The diaphragm F4.5, 1/1000 C, EFR 36 mm. |
High humidity and frosts - a faithful satellite for a successful shooting of the winter landscape, but it is hardly happy to confirm the opposite fingers of the photographer, forever stuck to the shutter button :) Therefore, never go out of the house in such cold weather, if you do not want ... to capture Silver from Inea Trees, lightly fallen on the snow shadows, and wonderfully sparkling in the sun, sparkling the joy of crystalline frost! This is a real star hour for big sharpness of the snapshot :)
Landscape №17: Frost and sun. Landscape №18: star photographer.
the diaphragm F8, 1/1000 C, EPR 31 mm. Lens 50 / 1.4, F4, 1/1500, EFR 75 mm.
17.  18.
18. 
Br-p ... -16-18 Celsius, the star photographer has not yet appeared, but the snow in the photo number 17, indeed, sparkles beautifully ... But in №18 there is some incredible mix of landscape with macro. And why is the "star photographer"? After all, there is an icicle in the short terms and grasped "at the speed of 1/1500 second" a drop, and the sun on the second, far.
However, the sun is a star. The central object of the solar system, a split plasma ball with a diameter of 1 million 392 thousand km, with a temperature of 15 million degrees. And although this star is located from the ground about 150 million km, it gives our planet energy for all processes, which means the entire planet's biosphere - life, and lighting - photographer :)
We also know that the photo is impossible without light!
How to remove the landscape in the fall.
The causes of unsuccessful autumn pictures is not a terrible camera and cheap optics, but the lack of photographer's experience in choosing the plot, the nature of lighting and even the state of the transparency of the air. The air should be not saturated with moisture (and all the more exhaust gases), and clean and transparent! For expressive photos, it is best suited for clear, sunny days and lack of wind, if you want to be visible every leaf. The choice of the winning version of the lighting determines the success of the picture and makes the shooting of the golden autumn affair is pleasant in all respects.
Favoring foliage creates in the foreground excessive yellow motion and makes it too light, which can worsen the transmission of the depth of space. And then the frame is built so that the foreground is in the shade (of course there are exceptions to the rules, if, for example, you need to focus the attention of the audience on false foliage.) However, the falling leaves attract their eyes in their own way, they bring the dynamics in the plot, create The atmosphere of the golden autumn is even more tangible! The riot of crimson, yellow, green and blue paints give birth to a magnificent autumnal palette.
No. of interest

the diaphragm F6.7, 1/250 C, EPR 24 mm.
When shooting a scenery during the "golden autumn", the shadows are well highlighted by the reflected light flow from the yellow foliage, so the shadows turned out to be quite well worked out. Actually, it is no need to look at the photos completely dark.
Determining the exposure when shooting such autumn landscapes of difficulties does not usually cause. The camera and itself copes well! The only thing that I did not want to clamp the aperture is stronger (it is quite sufficient) so that the exposure remains not longer than 1/250, otherwise the falling leaves could smell a little. I still doubt, it is correct, or not, since local lubrication on the background of a clear picture could increase the dynamics of the incidence of the fall. Or not?
That's the trouble, now it's not to fall asleep from the problem :-)
Autumn beautiful, sad and rich in paints. As the poet said -
But the illustration of this is not a photograph of a non-Boldinskaya autumn, and the removal of a completely different place ... where I turned out to be the will of the fate, desire and location of the stars ... :-)
Old Russian city Kashin.
№19. Kashin autumn!

the diaphragm F8, 1/125 C, EFR 24 mm.
In fact, I do not like autumn (and the magnificent nature of fading too!), Therefore, I limited the whole pair of photos. To beautifully remove the crimson you need to wait for a good soft light, then the picture will play with the paints even better. Look for good light and then with the scenery will handle any, even a cheap camera! And for the lack of lubrication of small parts, catch the moment of ulution and, in addition, use a tripod or emphasis.
But I was more involved in the search for an interesting perspective in this situation. You know when there is no main object of shooting in the landscape, the search for an unusual perspective happens, sometimes, so necessary, how much light and wealth of the paints together are taken :-) Otherwise ... Sad time will be already at the photographer!
How to remove the scenery in the spring.
Spring to shoot very simple: ringing streams, kidneys, flourishing nature, first green leaves, flowers, buzzing May beetle and other joys. And I have a spring for 24 mm at F8 it turned out like this ...
20. 
Photographic architecture.
When you take a camera in your hands, sometimes it is very difficult to determine - the architecture you shoot, or the city landscape ... But the point is not in the title, but the choice of the shooting point, so that the view of the beloved city does not rebound the advertising signs that even the historical buildings are hung out The center, insulating and killing not only our story, but also the part of the inner world of each of us - even those who have disliked the lessons from school bench :)
There was a time when the city blocks were drowned in green parks, and the mother walked with wheelchairs near the flowering lawns, and the gardens of the gardens were distributed by a happy baby. But what happens if the money turns into an end in itself, and useful things forget in favor of the Golden Taurus. Now whole quarters are not equipped for people living, but to profit. We look quite a documentary photo of the near future, where there is no place to people ...
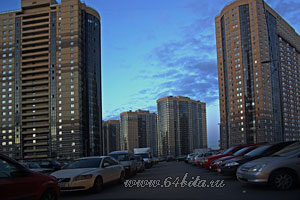
And this picture is documented because it is not a collage, not installation, but a very real photo, so to speak, sketching from nature.
Who said that the wide-roller can not remove the architecture from the bottom up? Is geometric distortion possible? But the wide angle will benefit, emphasizing the passing up the perspective lines, thereby enhanced the effect of the height of the Grand Arrangements. Fantastic mixture of an old tower and an ultra-modern glass and steel skyscraper ( water tower The Vodokanal Museum is in the picture 24), and the majestic and fancy architecture of the Savor-on-blood church - both are built in St. Petersburg, and especially for the photography of a wide-angle lens :). What? Well, of course, kidding!
On both pictures, the diaphragm is open to F6.7, EFR 24 mm.
24.  25.
25. 
On such a wide angle (focus 24 mm), even a very clamped diaphragm 6.7 gives a greater depth of sharpness over the entire height of the buildings, and already with a close removal distance. With a wide-angle lens there are no problems in this, difficulties in the other.
What to do if you remove the architecture from the bottom up undesirable? This often happens, and the reasons may be different:
1. The frame requires horizontal construction of the plot ... Uh-uh ... on the contrary, the plot requires :)
2. I want to cover the entire building, and not just the upper part.
3. Need architecture without geometric distortion.
To get to the next building? For example, like this, with a winning sightseeing point. Well, right a whole excursion in Peter: Here you and the Petropavlovsk fortress (bastions and the cathedral on the left in the background), and the Neva with a "meteor" on the underwater wings, and the admiralty (foreground) with a shoe on the spire (65 kg, by the way) - One of the symbols of the city, and the Hermitage to the right (green building).
Petersburg, city center.

Diaphragm F8, excerpt 1/750 seconds, EFR 67 mm.
But the shooting with a high point is not always possible. Yes, and paragraph 2 is not fulfilled, the entire building of the Admiralty was completely covered, and it is dominated here as the main object of shooting. The solution is obvious, it is on the surface! It should be graduated from the Academy of Arts and draw any architecture with brushes on canvas in that perspective, in which they thought. I did not understand, what did you actually like it?
Well, well, well ... Take the camera :)
Cityscape, St. Petersburg, Exchange Building.
27. 
The diaphragm F6.7, excerpt 1/180 sec, EFR 51 mm.
As you can see, everything is simple - we moved back and put not the wider focal length of 51 mm, which does not contribute to the distortion. And a monument to the architecture of Russian classicism from the French architect Jean Francois Toma de Tóz, who created a real ancient Greek temple from Pudosky Limestone: a rectangular building, framed from four sides by the colonnade ... And most importantly, almost without geometric distortion :-)
It is unlikely that the artist at the picture would be better in the picture, because in this case she herself would not get into the frame, but someone had to draw paintings, isn't it? :) Please note that the girl enjoys a tripod for drawing a landscape, and that's right! Okay, let it be easel ...
What if you move back nowhere?
Nothing, put a wide angle!
Smolny cathedral.
the diaphragm F7, excerpt 1/320 seconds, EFR 38 mm.
 By the way, this cathedral is removed not by a specialized shift lens (removing the perspective distortion by the shift of the lenses parallel to the plane of the matrix), and the usual ... compact. The secret of the picture is simple - the distortion and noise are removed in Photoshop :) Great Rastréley, who laid the cathedral in 1748, it did not come to mind that his creation can draw without a hand and canvas (and then correct to ugly in the editor) any painter Pijon, nothing Meaning neither in painting, nor in architecture :) But why go far ... I look at this Smolny Cathedral and Diva I give: Well, what kind of Pijon takes off the architecture :-) This is the mind incomprehensible!
The bottom of the building is cut off, which is not permissible for the classic shooting of architecture and, moreover, for its construction. Well, it is necessary so the masterpiece of the architect to disfigure ... Honest word, I did not shoot, but a camera! Rastrelli was easier, he, thank God, there was no such bad photographic equipment! :-)
Pussy Riot and them like! Please do not defile museums, churches and cathedrals. Temples need not to be considered as a place for sacrifice to the gods (whom no one has seen), not as a place for trade without taxes, and not a platform for your cheap "political" self-levels. These are historical sights, the creations of the architecture of great masters and the architects of the past. These buildings are our Russian culture and history. Museum is not a place for dancing, sex and other destructive orgies! Do not be cattle, do not insult my feelings of a deep unbeliever person and other cultural people! I understand perfectly well what perfomb and freedom of expression is. Exactly as long as it does not interfere with the other.
And now let's reflect all aspects of photography of architecture in more detail.
In fact, for this genre, special requirements are presented, especially in terms of the so-called. Documentary or classical architecture photography. To begin with, we will begin with the obvious: the photo should be elementary well simple, the horizon is not littered with the sideline, and the focus should be on the building, temple, monument (i.e. on the object of shooting), and not a tree in front.
Special requirements are concluded in the exact transmission of the shape, the color of the object and its proportions. Buildings must fully fall into the frame, cutting the roof or spire is unacceptable! The lower part of the building should also fall into the frame, and if it does not fit, try to move back or find another angle. It is very desirable that people, advertising and parked by car do not fall into the frame (if possible). Nothing should distract from the main object of the photo! And even if it fails to avoid this, then you need to remove so that the car does not block a quarter of the building.
The same applies to pedestrians and zooak ... A person who is clearly posing in front of the lens in the foreground always distracts attention, even if nothing lights up, because for classical and, if you like, the documentary photograph of the architecture is completely unacceptable. Why? Well, we are talking about the genre "Architecture" now, and not a Rostov portrait :-)
As you have already noticed, the authorus has not really performed the photo (to one degree or another), the requirements for documentary classical architecture, since more supports for other visual means, which should not disturb you. Attending the viewer to the main object of shooting can be the most diverse methods, and not only by the rule of the third, golden cross section and other geometry. All you need to know - it is said, and how to use it, you will decide.
The following shot of the creation of the Arch Republic of Montferran - Isaac's Cathedral - I cite as an example of such a non-compliance with the requirements listed, although imperceptible. Rough mistakes, however, no. The foliage framed the temple and even sends a look at him, creative questions were solved, the color rendition is in order, with the problem of ZEVAK (knocked out not just to get into the frame but also to obstinate it) was radically finished by the Kalashnikov machine with a choice of a certain point of shooting and long-lasting waiting for the moment of deserted :-) And the minuses are in trees, slightly closing the bottom of the building and, in part, colonnade, as well as in a small distortion, but the monferrand is not to blame for this :-) In terms of artistic shooting, there are no minuses, but is a classic approach to the architecture genre? And yes, and no, and not quite ... And I will pull the postcard with the views of the city.
Petersburg, St. Isaac's Cathedral.

Diaphragm F8, excerpt 1/250 second, EFR 30 mm.
By the way, all this abundance of temples suggests that during the Soviet power they did not crush them everywhere and purposefully due to the complete rejection of religion, as it is now approved, but on the contrary, they have retained. There was a rejection, and the temples remained. All architecture masterpieces were kept and saved in the USSR for the state account, as well as everything in state ownership. And museum values, too, although the media (rugers of the bourgeoisie) shout about the fact that the Bolsheviks stole everything, robbed, destroyed. Go to the Hermitage or Russian Museum, admire the results of robberies and destruction.
The next urban landscape is really such, because it is removed in the city, and the topic of architecture in one or another is always present in a similar genre. Or must be present :-) You are in front of you the Kazan Cathedral in St. Petersburg (more precisely, the view of his wing with Kazan st.), It was built in 1801-1811 former serf peasant (!) Voronichene Andrei Nikiforovich in the style of Russian amp. No, not a typo, not a vampire :-)
At first, this temple served an awrying establishment, then a monument of Russian military glory, with Soviet power - the museum of the history of religion and atheism with rather wonderful and terrible exhibits of the Inquisition times (funnels, through which the heretics in the mouth was flooded with water (or molten tin), "Spanish boots" For crushing of legs of legs, "crying" icons with copper tubes behind the eyes, and other historically interesting exhibits about religion), which immediately disappeared from the temple after he stopped being a museum and again became an awakening institution: first a joint museum and religious, and Finally, finally left the worldly life with the construction.
But not for photography of architecture :-) Exhibits are lost, but the temple remained ... Soft evening sun often creates lighting with such a colorful color, which will benefit and the most nondescript photography, and magnificent creation of architects.
Left wing of the Kazan Cathedral.
It is right, if you look from the Nevsky Prospect :-)
30. 
Wide angle, diaphragm F8, excerpt 1/180 sec, EFR 24 mm.
With all the advantages, the shortcomings of the picture in this genre are obvious - it is not suitable for documentary architecture for a variety of reasons (find yourself!), But it will quite pull on a good city landscape. She tried to her, the author, allocated the main object of shooting and light and color, and all the unnecessary hidden in the shade, in order to emphasize the elements of architecture. You can throw a stone into me, but I did not dare to call the tow truck :-) dare, you will get better!
Typical errors
Below another sample on how to remove the landscape. Or rather, as not correctly: the horizon is littered (the horizon line is not parallel to the frame line), there are other cons - glare, especially clearly visible on the enlarged picture. The skyline will spoil the shot, it is a bad taste. A clear technical marriage is hopelessly harmonizing with a creative marriage: and what is actually depicted? What did you want to show the author at all, what dreamed to bring to the viewer?
Beauty of nature? Masterpiece architecture? Bulk designs?
Hmm ... concerns not only night landscape :)
The horizon is littered
31. 
Consider another defect, which is called "Crossing Sky", see below. This terribly ugly thing many is called a "small dynamic range of the camera." Or a narrow photo mixture :) It is believed that the dynamic range is a lack of digital cameras in contrast to film. In fact, the film either can also be good to convey the details, both in the shadow places of the plot and in the illuminated. There is such a confusion usually with bright sunlight due to the high contrast of dark and bright sections of the picture. And now the Blue Sky looks like a picture completely sealed with a well-proxposed foreground. Or, on the contrary, the sky is normally worked out, and the foreground at the bottom is completely dark, no details are visible. Or vice versa :) But so I want the blue sky, the bright sun, and the green grass in the shade!
That is why they are not advised to shoot at noon time when the sun stands in Zenith and especially brightly. Some are trying to pull the missing details in Photoshop, assuring that it can be done from the RAW file without any problems, unlike JPG ... Indeed, patience and work in Photoshop will achieve everything, however, it is better to solve the problem before, and not after. Because any graphic editor is such a thing in which the newcomer easily and can easily make a bad photo, but on the contrary, it will not always work with difficulty :)
Snapshot №32: The sky is completely crushed ... Snapshot №33: How to remove the landscape.
32.  33.
33. 
Snapshot №32. In the sky there are no details, everything is mounted. Indeed, a small dynamic range can be the root cause ... But I ignored this fruitless idea and simply rooted the excerpt from 1/180 to 1/750 seconds, without changing the diaphragms - and received a picture number 33. A small dynamic range suddenly became incredibly large! :)
You can do it even on the machine - measuring the exposure through the sky, and not in the shadow sections and shoot. Wrapped on the sky, it turned out. Thought on the contrary - it turned out the opposite :) Quickly, simple and angry. The disadvantage of this holy simplicity is obvious and lies in the fact that you are shooting either the sky or land in shadow areas! :) But even here you can smear, the highlightened to the outbreak failed in the dark. In such cases, it should be enabled, even if the chamber's stupid vehicle considers the opposite. Of course, the foreground should be (and there is usually no newcomers in the photos of newcomers), and should not just be, but to be within 3-4 meters, otherwise the weak flash can not reach it. And it's not closer to the meter-one and a half so as not to reboot the neighbor ... In addition, do not try to highlight the Eiffel Tower on the background of the city landscape - exactly will not fit :)
The second way. You can make a measure on the bright part of the frame, remember it and make a measurement on the dark site. Auto mode Before this can be used as a photoExponometer, i.e. First, find out the view of the machine (in order to establish an initial exposure), and then experiment. Here you should put manual control and without changing the diaphragms, set the average shutter speed - between the dark and light part of the measurements. Then bring the camera to where they wanted (and not only on the sky, or dark plot) and do a frame. Conveniently, if the camera has a "remember the exposure" function, so as not to torment the operational memory of your brain. In this case, look at the camera at the desired point and make a frame without switching to manual mode.
There are other methods, for example, exposure bracketing (it is a fork, or a bus station) - it turns out 3 snapshot with different exposures: darker, normal, lighter. Then choose the best :) In addition, in many cameras there is a function of exposure correction: - / + (darker / lighter). Sometimes it is called compensation. Here it is notchless to read the instructions for your own camera: whether to twist whether to twist, press the button, or rummage in the menu.
In general, functions can be a lot, and manual control replaces everything: just click some pictures with the same diaphragm and different excerpts.
Sometimes it is easier than rummaged in the menu, painfully remembering - where did this bracketting hide there ... And maybe it is called the bus station? Or maybe it's not in the menu, but on the buttons? Or maybe it is better to use the exposure compensation? Or compensation in the instruction is called correction? Or I'm not looking there, but maybe I forgot something? Devil!
One hundred thousand devils, hell, devil and hell! Be three times and forever curse that Satanian day when I bought this hellish digital vacuum cleaner in the devil shop! Gori blue fire in the wooden coffin of the dog instruction in Turkish-Chinese!
To be easier, much (and not only bracketing) is easier to make exposure and aperture. Sometimes it seems to me that modern cameras are completely overwhelmed by duplicate each other (and therefore meaningless) functions that incredibly complicate the menu and work with the camera, and the learning process ... Forget everything! In fact, in the camera you need to explore the following things well: focal length, exposure, diaphragm, photosensitivity, focus, flash. These things though also improved, but many decades did not change in principle, for example, the autofocus appeared, but no one has canceled the manual focus, and sometimes without it and not to do. Do not torment the camera, remove the diaphragm and / or manual control mode. And everything else - from the delicious uncle with horns ...
However, it happens that the narrow dynamic range of the camera still prevents common human happiness. It is possible to achieve a good result with the "bad" sky by winding a good gradient neutral-gray filter on the lens - half the painted stroke, passing one half less light. There are other filters, for example, polarization, ultraviolet, neutral gray (can also be used for other tasks). The light filter itself is "bad" by what additional money costs, bad because cheap filters can degrade sharpness, and expensive are more expensive :), and in addition, it will only fit for lenses with the desired diameter on which the filter threads are provided. This means that most compacts (as in the case of RAW) flies, for there are no threads, nor Raw ... I'm not talking about soapboxes, in which there are no manual settings for shooting. The owners of these cameras solve the problem 5 ways:
You can also be content in different ways. When nothing happens, you need to decide what is more important - bright or dark places. Or rather, choose the main object of shooting and try to measure it. If the object is small, then in advanced cameras, you can use the "point measurement". If you have a soapbox and there are no such functions as a class, and the object in the bright part, they trust automation. If in a dark one, then you can highlight it with an outbreak to study parts in the shadows. However, in the landscape shooting I want to remove everything, and the main object may simply be missing! Then I advise you to find it, or re-read items from the 1st to the 5th :) Now you understand why it is very bad when the eye in the landscape is not for what to catch!?
I would not advise the beginners to immediately run to the store and buy light filters for all occasions. First, there are a lot of subtleties to work with filters, secondly, the filters need to be able to use, unconditionally understanding - how, why and why, otherwise, laying out money you will not get the result to which they sought. To this you need to come about the way, as you have come to the fact that you simply need a mirror camera, and not a compact. Or vice versa :) The only thing that can be advised unconditionally is a simple and inexpensive protective filter, which will protect the lens from dust, dirt, splashing and mechanical damage. It can be chosen according to the following principle: the more expensive the lens, the more justifies the acquisition of the filter.
Well, in fact, so far everything, but the topic "how to shoot a landscape", of course, is not exhausted. Rather, it is a brief information about what and how to remove budget optics. When I will prepare the following materials, lay out them on the site.
Successful pictures!
Yes, travel planning is also a job that will help you create beautiful pictures. Wherever you are going to go, you need to prepare as you should prepare and collect as much information about these places. Familiarize yourself with satellite images and maps of terrain - they will help you understand what tops of the mountains, if any, will be highlighted at sunrise or sunset. For example, I shot in Abkhazia:
Look for photos of the same area made by other people. No matter what cameras they are made on. Even shots from the soap box will help you get an approximate view of the place where you go. Try to highlight interesting features of the terrain, which can be captured in the pictures - the tree of unusual shape on the shore of the reservoir, for example.
Examine the terrain
For shot of landscapeit often happens that a person is trying to capture a beautiful natural event too late. For example, you saw an amazing sunset and began to fuss, trying to take a picture at least somehow. This is a wrong approach, and get good frames will be difficult for you.
Therefore, try to always pre-explore the surrounding area. For example, if you stopped on the shore of the reservoir, spend your time to study the adjacent territory, look for interesting perspectives, unusual stones, streams or something else like that.

Take a walk along the wood along the reservoir, find the slope higher and pick up on it - so you can find something really worthy to shoot. Do not forget during walks to make test frames, which can be found in the evening and choose the most interesting places - a kind of bacstage. And when the next time the sun will sit down, you will already be in the right place with a prepared camera and without fuss will be able to make excellent photos.
Remember that the landscape is first of all the light!
One of the main mistakes of lovers - shooting at noon, when the sun shines in all power, and the lighting is very tough. Such pictures are always pretty flat, and colors are dirty. Therefore, ideal time for shot of landscape The sunrise and sunset is considered. In this watch, the lighting is especially soft, and the photos begin to play with other paints.

When you walk, choosing a place to shoot, capture a compass with you - it will help you determine where the dawn and sunset will be.
Selection of photographic equipment
Always take a tripod with you. It is better to take it with you than another lens. Tripod Even the usual chamber turns into a powerful tool that is able to make beautiful landscapes in any conditions. It is important that using a tripod a camera can be installed on any height - at least 20 cm, at least 2 meters. The weight of the tripod will have a value for you only if you decide to make a storm wind.
In any case, there are a hook on the tripods to which you can hang a pair of stones in the package for stability. The lens is best used wide-angle. For landscape shooting, it fits most.
Do not be afraid to shoot from low position
For example, if you have attracted interesting flowers or crumbs of moss stones, lower the camera on the tripod of downgrade.

So you can make an emphasis in the foreground, and the photo will become more expressive.
What to use the depth of field?
IN shot of landscape It is important that the whole shot is sharp - and the grass ahead, and the mountains away. To ensure the desired depth of field, you need to use large diaphragm values: from F / 8 to, approximately F / 16. Know the more this value, the sharper will be a snapshot. But do not forget that with large values \u200b\u200bof the diaphragm, the sharpness can be worse due to possible photos of defects.
How to avoid problems with a dynamic range?
The dynamic range is such a parameter that means the difference in the brightness of the very dark and the brightest section of the scene. When you remove dawns or sunsets, the camera often does not cope with a large dynamic range, and in the photo crossed areas or dark spots arise.

To avoid this, it is enough just not to remove in the control light. For example, instead of shooting the sunset itself, turn the camera for 90 degrees and try to capture the mountain peaks filled with sunset rays or glade.
How to make a landscape in bulk?
We always see a surround image, because we have two eyes. But the camera has only one "eye", and efforts should be made to create volume.
The surround effect is created in the picture due to the tonal and spatial perspective. You can enhance the volume with light. The most surround landscapes are obtained with side and control lights.

Try to choose a point for shot of landscape So that the photos were both close objects and remote. Well, if there is a smooth transition between the front and rear plans, for example, in the form of a streaming stream between them.
Go around late, and get up early
In fact, this is a very important advice. Always get up an hour before sunrise and get taking pictures, regardless of weather conditions. Yes, sometimes get out of a warm sleeping bag at 4 am quite difficult, but it is worth it. In the same way, do the hour before sunset.

Do not forget that after the rain there are amazingly beautiful sunsets with rainbows, and you will have to get wet to capture them.
Show patience
Beautiful lighting is quite rare, and to wait for it, you will have to be patient. Successful pictures are a rare phenomenon, and you still will not get a stamp of successful scenery with hundreds per month, and no tips will help here. The best photographers engaged in filming landscapesSometimes spend 10 days to do one-only frame - and all this time they expect suitable light.

Therefore, always count the time of your trip. If, for example, you stay in one place for just a couple of days, then it will be quite difficult to get a good frame, but it's worth trying!
Now, dear readers, you know how to shoot landscape And if you do not want to miss new photos about photography, please, please, a blog subscription.
by Sophie Ouch
For many newcomers, photography training begins with the development of the shooting of the landscape. Maybe it is associated with peace and slowness, which has a better development of technology, an understanding of the exposition in the photograph and mastering the lessons of photographs about how to photograph the same landscape.
Photo lessons are diverse, tips can be found for every taste and preparedness. But it has long been known that there is no little information, it never turns out to be unnecessary for neophytes, and "Repetition is a mother of teachings," so I remember important!
Tips on landscape shooting, or how to photograph nature correctly
1. Maximum use of depth of field
MARC ADAMUS.
Although photographers sometimes want to experience more creative approaches and experiment with a shallow depth of field, nevertheless, the classic in the landscape photo is considered when most of the image is in focus. The easiest way to get a big flu is to use the minimum possible number of aperture, which is available for your compact or lens. The smaller the diaphragm, the greater the depth of the image.
However, it should be remembered that a smaller hole of the diaphragm requires more time or higher ISO. And sometimes the other at the same time.
2. Use a tripod
Leif Erik Smith
Mandatory attribute in the arsenal of the photographer-landscape -. You may need long excerpts to compensate for the selected small diaphragm hole, and therefore additional stabilization of the camera. Not every excerpt, removing from the hands, you can get technically advanced frames. Especially the tripod will be useful in the case when the photographer uses for additional stabilization of the camera remote control For shutting the shutter.
3. Look for a semantic composition of the composition
Mitchell krog.
For any photo you need a visual composition of the composition. Landscape snapshots are no exception, because when shooting nature, the lack of a semantic point gives a boring and pretty empty snapshot, in which, as they say, "the look is not caught."
Pkarwski.
The focus can be anything - a building or structure, an interesting shape of a tree, a boulder or a mountain peak. Do not forget only to monitor not only the focus, but also by where you have a significant object. The reference rule of the third is though both disturbed periodically, but no one has canceled it!
4. Think out the foreground
Daniel řeřicha.
One of the elements that helps to take place to your landscape is an formed foreground. Place your semantic points on the front of the picture, and you can transfer the depth of the image.
5. Do not forget to turn on the sky
Trevor Cole.
Another practically inseparable element of the answer to the question of how to remove the landscape - the sky and its reflection in the water. The secret of the landscape photo in most cases is that the sky or foreground is dominated in the picture. Look at your images, if not, then most likely, they are considered boring and little interesting.
Ryan Dyar.
If during your photo shoot the sky turned out to be uninteresting, do not allow him to prevail - move the horizon line to the upper third of the picture, pre-make sure that the photo does not lose even more.
Andrei Baciu.
But when the sky is full of dramatic clouds or blossomed not characteristic of himself shades, air space May be your ally. Take him more places in his picture, and see how much it can benefit such a retreat from the rules.
Remember the filters. Using polarization can add color and contrast photos.
6. Operate lines!
MyRedcar.
The most important question that usually ask the photographers-landscape players, sounds like this: "Will the spectator see a picture in full, as I see it?"
There are many ways to transfer the natural beauty of nature by static image fixing. For this, there is a reception, with which the active lines are included in the snapshot composition. During their account, the photographer can redirect the viewer's view from one point of the frame to another than to create a kind of closure of space, "looping".
The use of lines gives a certain algorithm and adds the scale and volume of photographing. The lines themselves can be attracted and create their own "patterns" in the photo.
Danskie Dijamco.
7. Fix the move!
Most people, reflecting on landscaped photography, most often represent a calm and passive picture. However, the landscape is scenery, and you can pass the movement (the same water, for example), which will fill with a snapshot with dynamics and create a mood, interesting to many spectators who will be happy to admire not only relaxing landscapes, but also consider the rusty of elements and the fury of nature.
Andrea Pozzi.
For example, try to "catch" the blow of the wind in the trees, the movement of the waves on the beach, the movement of water flowing under the waterfall, fix in the dynamics of flying birds and floating clouds above the head.
Carol Dorion.
"Fixing" means that the photographer must use longer excerpts (sometimes about a few seconds). Of course, high excerpts will provoke the receipt of more light on the photosensitive element of the chamber, but for the correct use of this fact you have options: the choice of a diaphragm or photographing at the beginning of the day or in the evening, when in principle, less light on the street.
8. Work in tandem with weather and time
The Golden Rule of the landscape photo says: "The scene can drastically change at any time, depending on weather conditions."
Andrei Baciu.
Many novice photographers seek to go out on a photo progress on a sunny day, because they think that this is the best time to create photosholes. In fact, a cloudy day or even rainy and thunderstorm, besides the likelihood, wet the camera and wet the legs, gives the widest opportunities to get wonderful photos filled with mood and sinister overtones.
Bill Church.
How to shoot a landscape in this weather? Look for a storm, wind, fog, dramatic clouds, the sun through the clouds on the dark-dark sky, rainbow, sunsets and sunrises and work with these changes in the weather and on these conditions, and do not wait for the next sunny day with a boring blue sky.
Greg Gibbs.
And one more wonderful advice from a professional photographer-landscape player: "Never remove the day. You can not be more likely to be photos. Your golden time is at dawn or at dusk. It is better not light when landscapes come to life."
9. Diffirable horizons
Christian Bothner
Most old CouncilBut he is good because it does not lose its relevance today. Before finally press the camera shutter, check the horizon line.
It should not share the frame clearly in half, it should not be inclined, it should not be completely in a landscape picture. Of course, the rules exist in order to break them, but in the case of the horizon, the third rule works more than ever.
Tramont_ana.
10. Change the point of view!
Even when the expanses are scattered in front of your eyes and it seems that it is enough to raise the camera and in it in itself a beautiful image will arise ... Stop. And think. Look at the area through the lens, turn into one and the other way, change the angle, shift the horizon line or try including additional items into the composition.
Auttapon nunti.
Do not hurry to press the descent button, you will always have time to do when you take pictures of the landscape!
Perhaps it will be useful to read:
- Working nanny: Psychological experiences;
- How to open a business for the sale of tickets to cultural and entertainment events Tickets to the theater in distributors;
- Information Security;
- Let them say - under the microscope: the revelation of the expert on the "drunk boy" (17;
- Scenario Fairy Tale "Goldfish" for adults on a new way;
- When to get out of vacation to work?;
- Where you can collect scrap metal;
- Forge of Empires Daily Tests Tests: Secrets Forge of Empires;