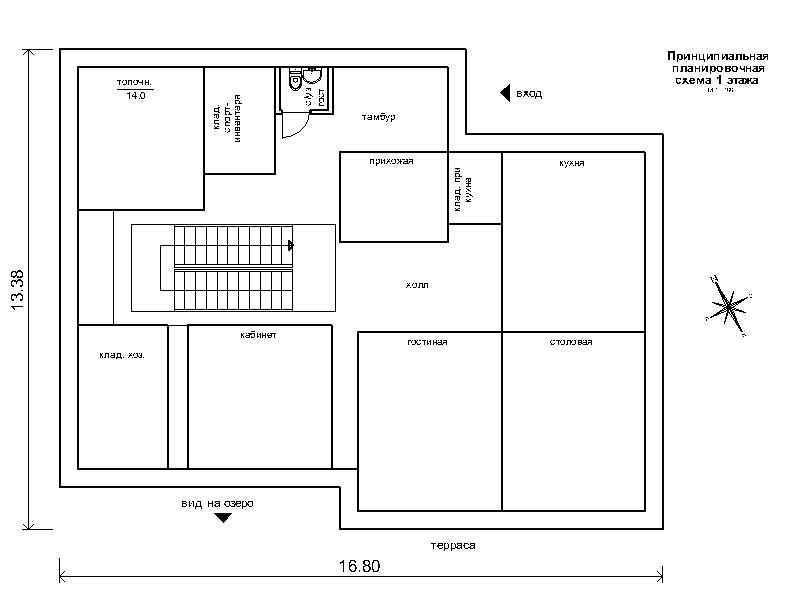
Sketch plan of the house. Sketch design of a house. Project with a terrace
Development preliminary designs are carried out when it is necessary based on the review protocol technical solution or technical specifications.
The main purpose of development preliminary designs is to establish those circuit or design solutions that are fundamental in nature and allow one to get a general idea of what the general structure of a particular product is, as well as what the principle of its operation is. The preliminary design is created mainly before the bulk of the working documentation and technical design are developed.
While creating preliminary designs developers carefully study and analyze all possible options for the design of the product or its individual parts. This allows you to clearly define all the requirements that apply to the design. finished products, as well as ensure compliance with all requirements that are imposed on it.
The complete set of documents that make up the preliminary design consists of a document developed in full accordance with the requirements ESKD design documentation, as well as those drawings, diagrams, technical and technological regulations, etc., which are provided for in the protocol for reviewing the technical proposal and terms of reference.
It should be noted that in preliminary design those documents that were developed before the material model was made are not included.
It is not the original documents that are subject to the review, approval and approval procedures preliminary design, and their copies, although by special agreement with the customer they can still be provided.
As for such an important point as the form in which all documentation of the preliminary design is presented, it can be paper or electronic, and is indicated in the protocol for reviewing the technical specifications. If there is no such indication, then it is determined based on agreement with the customer. In addition, electronic and paper documents can be included together in the preliminary design documentation package.
Composition of the preliminary design
Preliminary design, includes documents such as drawing general view, statement of preliminary design and explanatory note.
Draft general view drawing (or electronic model assembly unit considered equivalent) must include the following:
- An image of the product, as well as various inscriptions and text that allow you to understand the principle of its operation, how exactly its components interact, as well as the features of its structural design.
- Designations of all components of the product and their names. If necessary, it is also necessary to provide references to general view drawings that allow you to understand everything important features product design, composition of its individual components, etc.
- Product dimensions and other data that are printed on the image.
- Product diagram (in cases where it is really necessary).
- Technical data and others important characteristics which the product must have. They are required to make it more convenient to compare different options using a general drawing.
A document such as a statement preliminary design, must contain the names of all those design documents that are included in it.
Column " Note" may contain an indication of the option that corresponds to this specific document.
It is also allowed to include in the preliminary design those documents that are equivalent to those provided, but only in a different form of presentation. In this case, it is necessary to make a corresponding note in the column “ Notes».
The explanatory note of the preliminary design is drawn up in accordance with all standards accepted for text documents.
Here I will talk about how one of our projects was made, the project is an example of how a preliminary design is made, and you can see the process from the inside.
From a technical point of view, this work most often takes place on Skype - there you can show each other a drawing or model of a house and exchange opinions.
The work is divided into three stages:
1. decisions on the master plan of the site,
2. house layout,
3. Appearance solutions.
where to locate the house, where to start "> where to locate the house, where to start
We start with the site: where to place the house and what its shape should be; what will be visible from the windows of the house, how to orient them according to the cardinal points.
general plan, nuances
What we did at this first stage may change after receiving the results of geological surveys. Most often, the soil allows us to build a house in the intended location, but sometimes surprises happen (swampiness, a peat lens, a landslide-prone slope), and then we are forced to move the building and change decisions.
There may also be nuances with engineering solutions. If geology shows the absence of soils with sufficient filtering capabilities, then the septic tank will have to be replaced with a regular cesspool, the contents of which will have to be pumped out periodically.
If the soils turn out to be waterlogged, then in this case, instead of a septic tank, it will be necessary to make a cesspool, but this one will be maximally sealed. And the possibility of installing a basement under the building in this case will be accompanied by expensive waterproofing.
As mentioned above, simultaneously with the general plan of the site, the PPP is also being developed (we remember that this is the basic layout diagram of the house).
 Here the shape of the building's spot, the location of the rooms, and the orientation of their windows are decided.
Since the building is located between the pond and the road, I propose to orient the windows towards the road office premises, and to the pond (and to the River behind it) - residential.
This PPS will then change more than once, the staircase will move, but the principle of orientation of windows and entrances will remain.
On master plan plot, now I place the building site of the house, with entrance and exits, window orientation, and completely real dimensions. There, on the general plan, I now adjust the teaching staff, bringing the layout to the desired level.
And one more thing - it is now very important to correctly place utility networks on the site, taking into account the fact that there will be a lot of networks and buildings here. Building codes strongly recommend that network routes be set back both from buildings and from each other (at a distance of 1 to 5 meters), so it is better to deal with this issue right away.
So, we finish with the development of a general plan for the site and all its subsections.
 Having completed work on the general plan, you can make detailed plans for the house (based on the accepted PPP), and now the first version appears, which we review together with the client via Skype, ...
 ... and then a second one, with a larger area.
At the same time, we are selecting designs, and we
a scheme with load-bearing walls and prefabricated reinforced concrete floors was chosen.
Therefore, the distances between the walls are already made for certain panels.
 The third, fourth, ... and now the fifth version.
A ventilation arrangement has appeared. canals, sewerage and water supply risers.
Engineering systems do not immediately receive the optimal solution; there were also options.
note: the transformations of the 1st floor are shown, but work is also being carried out on the 2nd
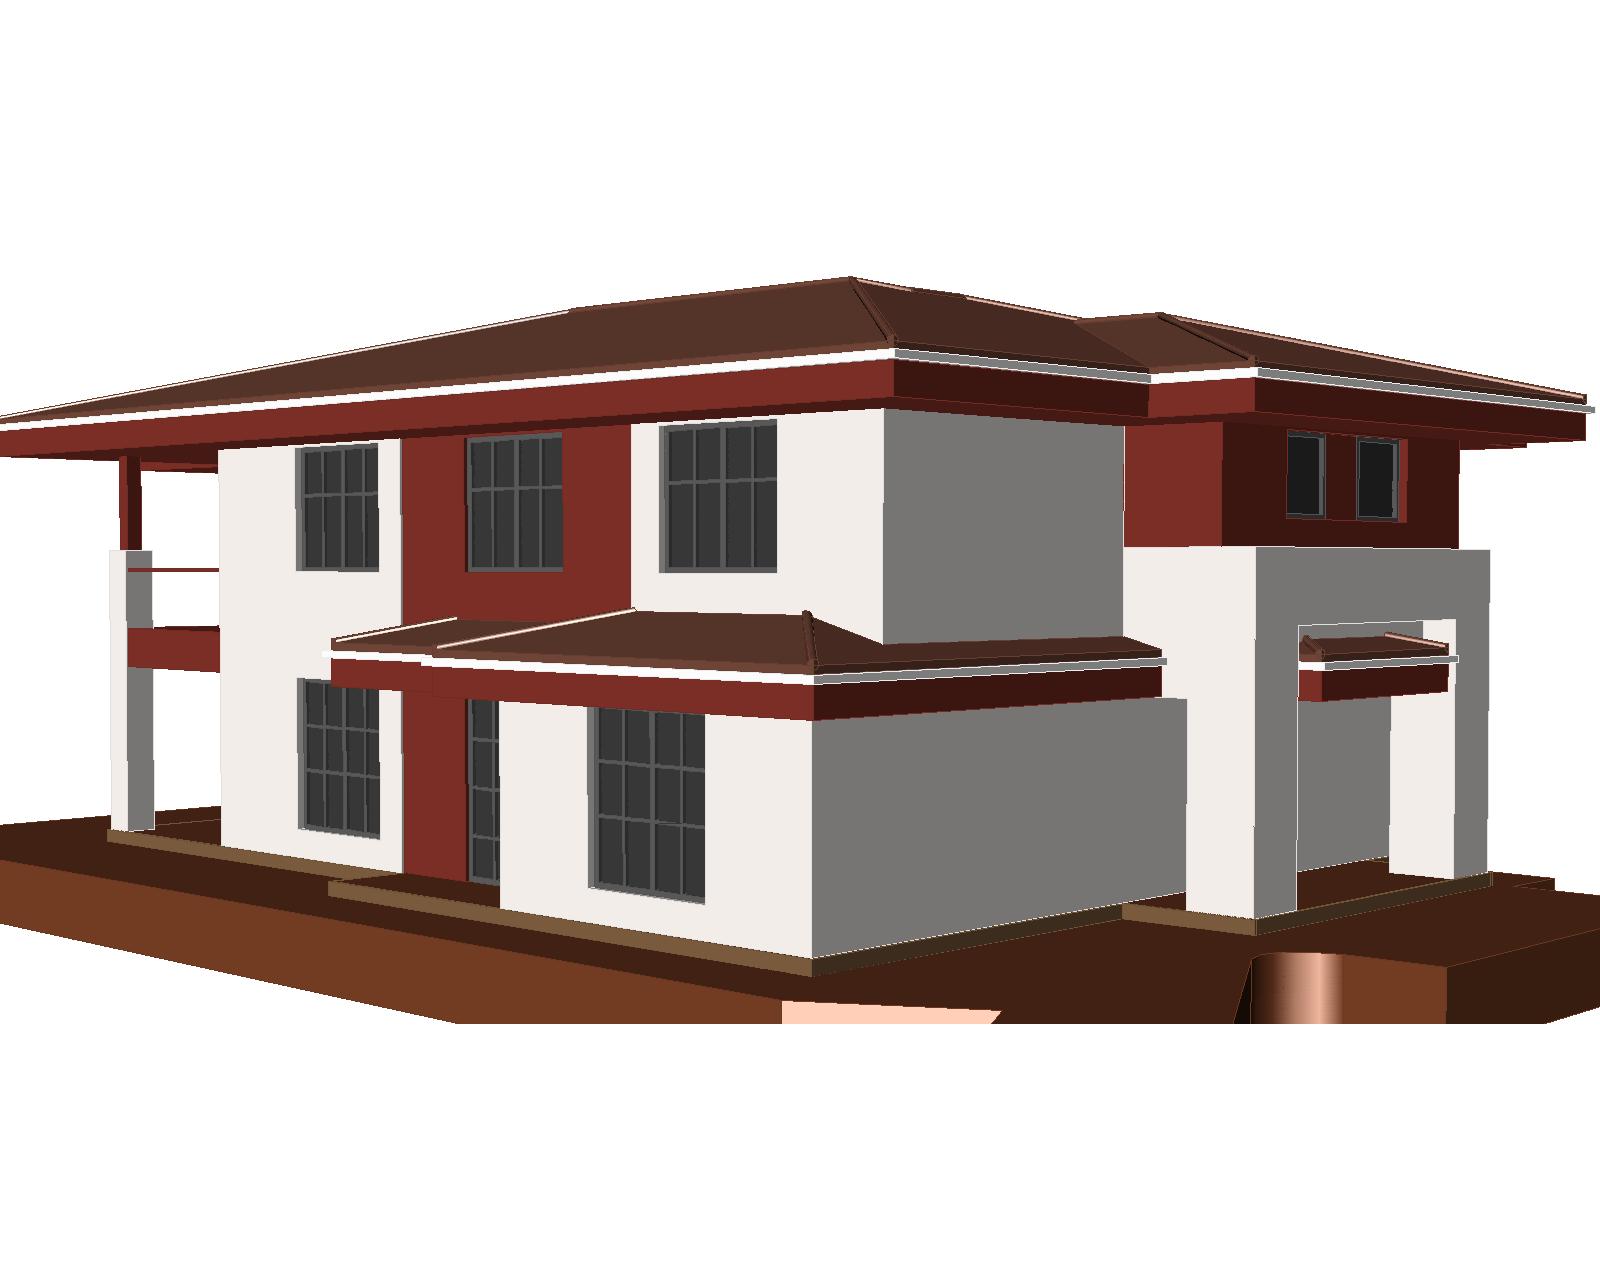
 Now I like the layout and suit the client, and it’s time to shape the “body” of the building - for now in a simplified form, without windows and wall materials.
This is the so-called simplified 3D model building. Unlike photorealistic, it does not show the color and texture of the wall decoration, but on at this stage this is not necessary. Now it is important to decide on the shape of the “body” of the building - and select the “makeup” for it only later. A model is an opportunity to see a house from different angles. At this stage, the work ceases to be joint with the client; he will only see the finished version.
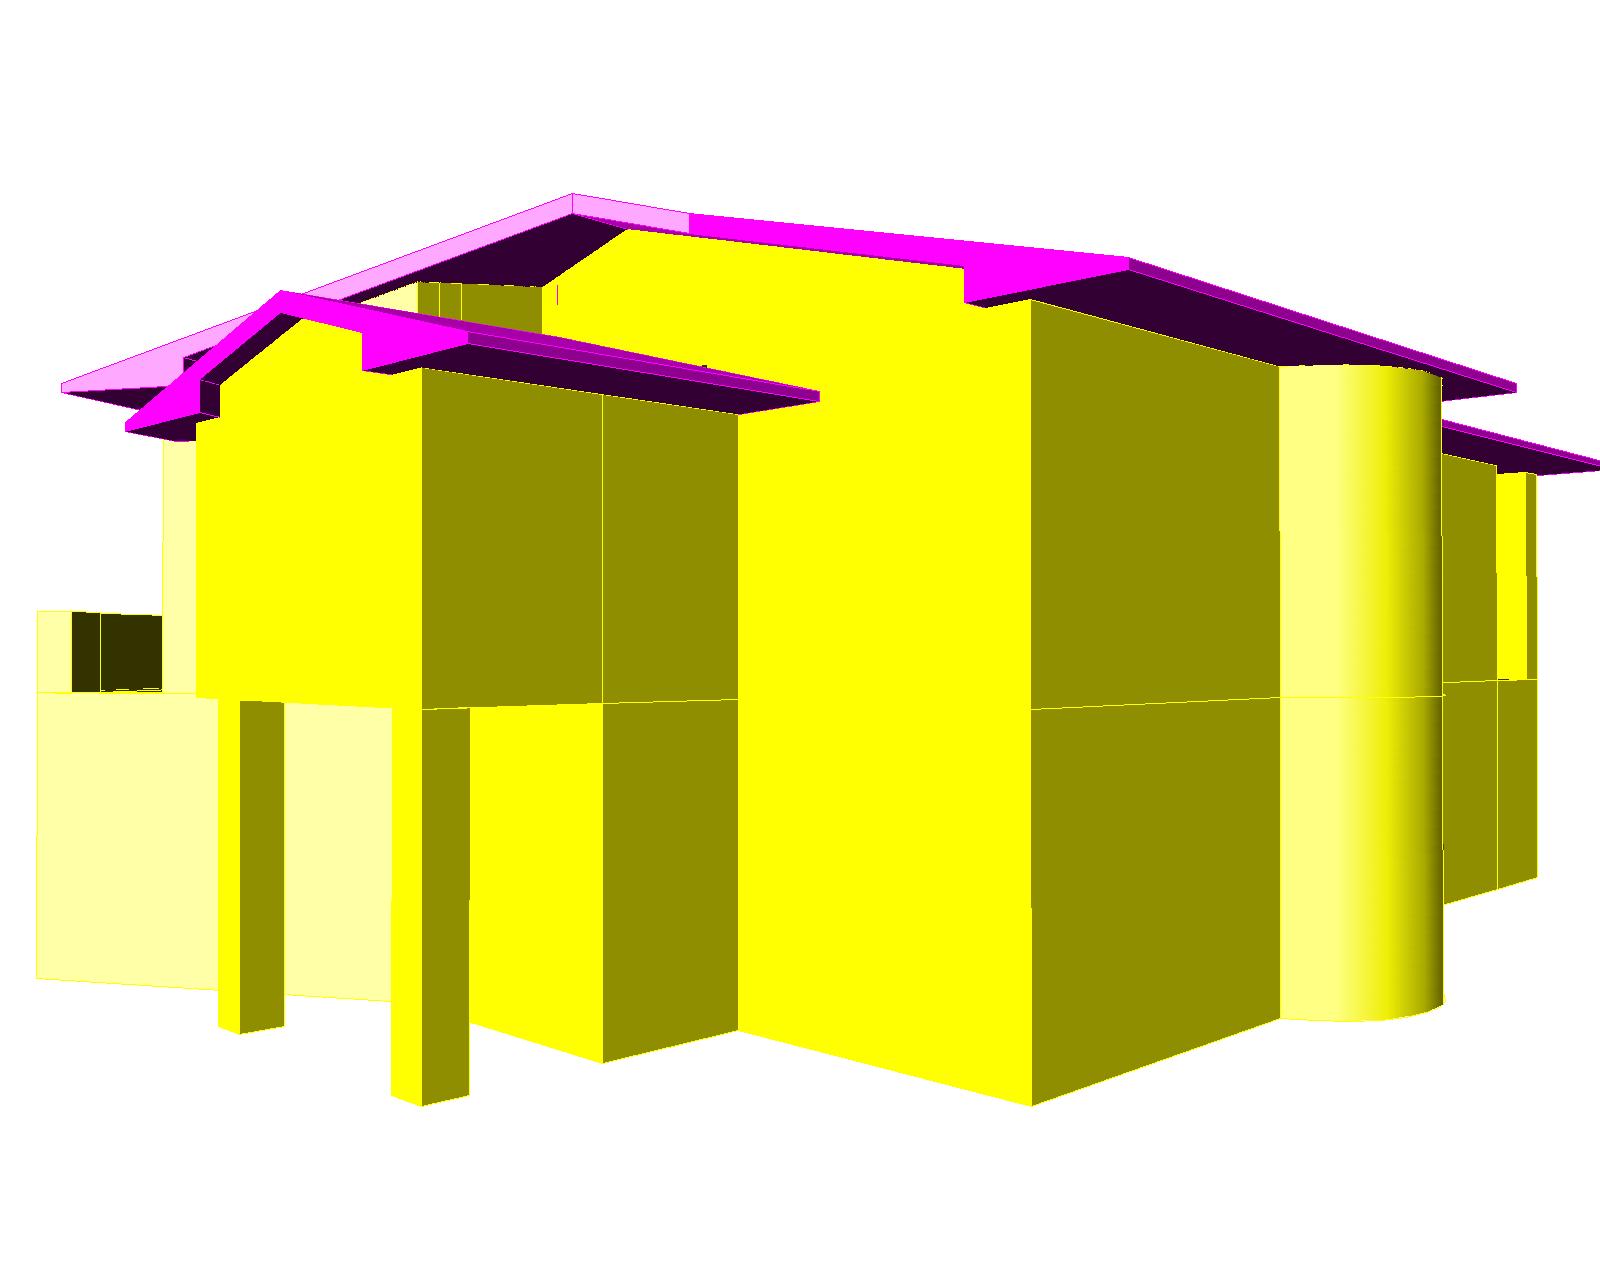

 I had to look a little for the shape of the staircase, which looked very tempting at the stage of drawing the plans. But in the end I didn’t like any of the options and it was decided to cut the rounding.
But I like the shape of the building - plastic, alive - precisely because it is irregular and not pretentious. After all, the more “correct” the form of a building is, the more solemnity it has – right up to the scale of a palace.
Here and for this young family of modern and energetic people, I want to create a home that is light and not very, perhaps, serious and important; organic both for these people and for the landscape around.
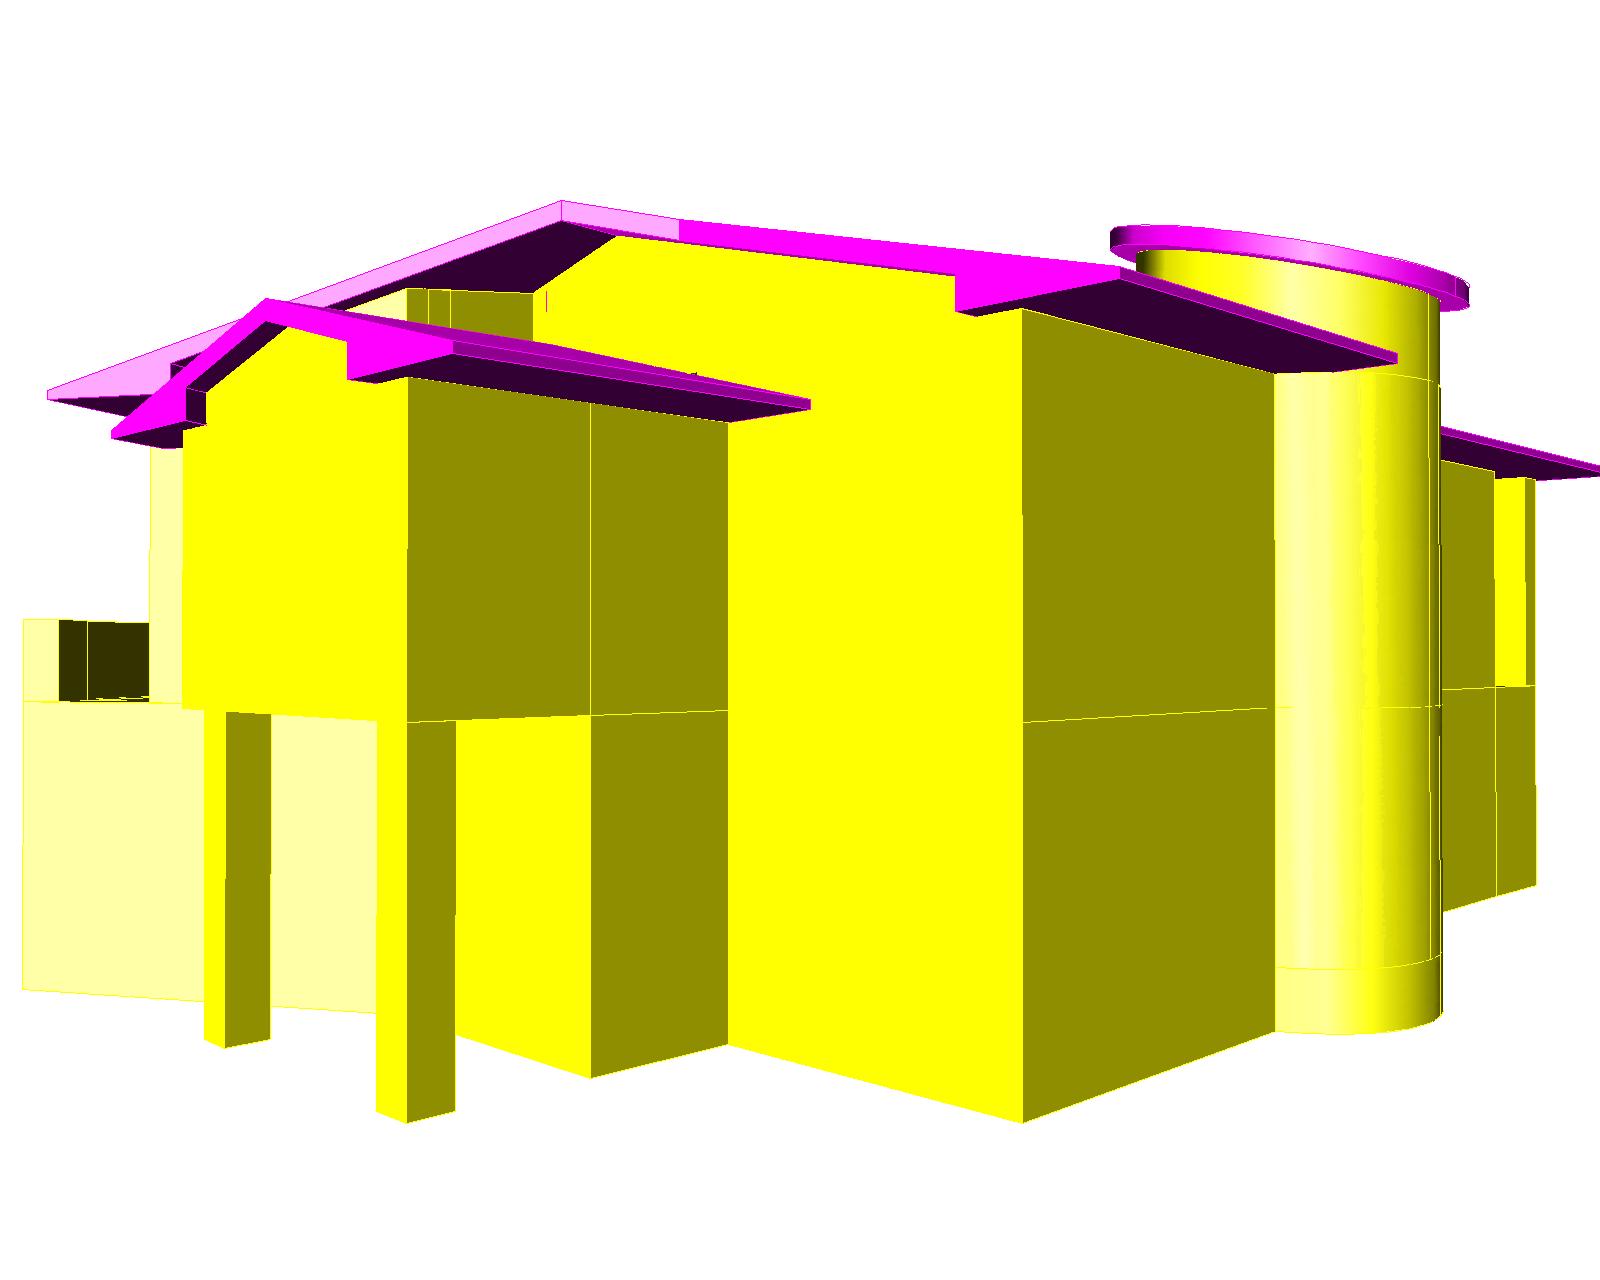
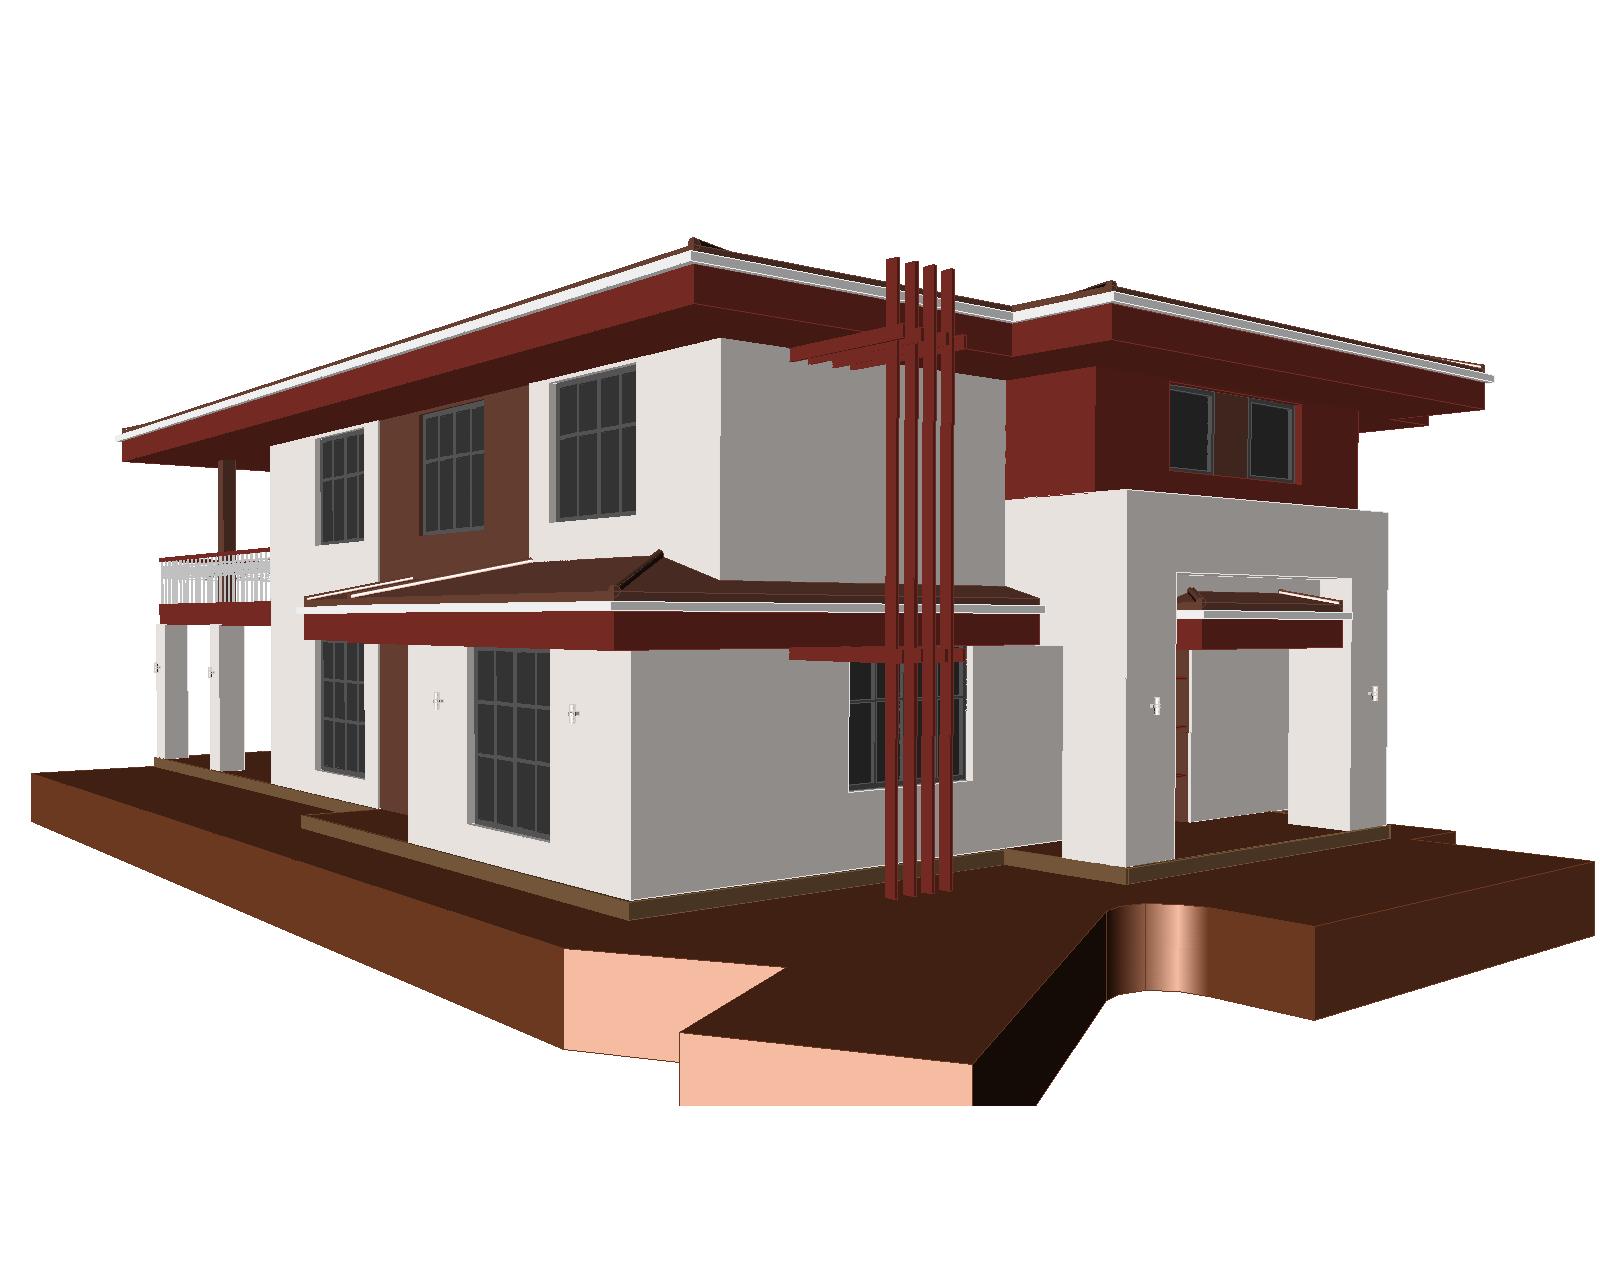
 But now we need to move on and make a gallery connecting the house with the household. block, and the household itself. block (carports for cars, boats and hay, stables).
 The covered gallery should be adjacent to the entrance to the building, and I have not liked any of the options for this connection for a long time...
But it seems that it worked out here.
 Now we place the window openings...
 And let's add a little façade decor around them...
Well, the building is ready. Layouts and exterior are complete.
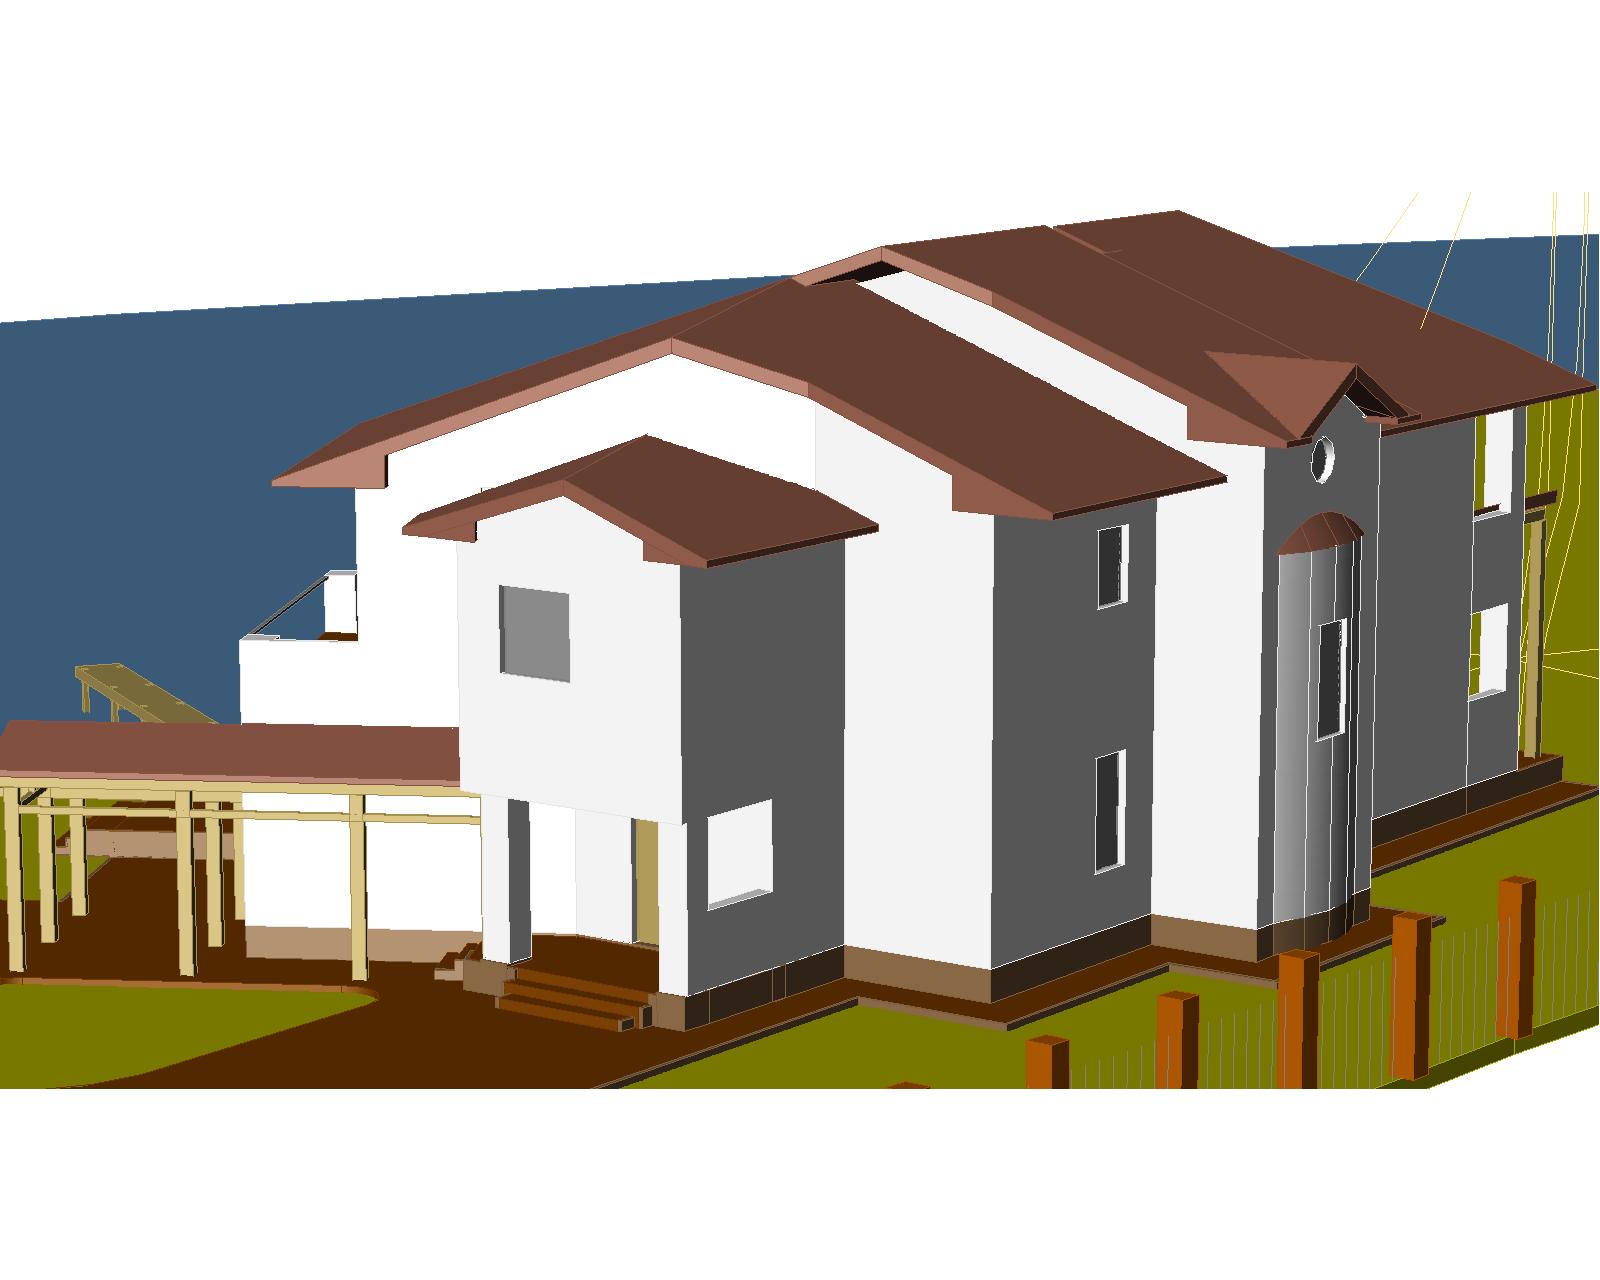
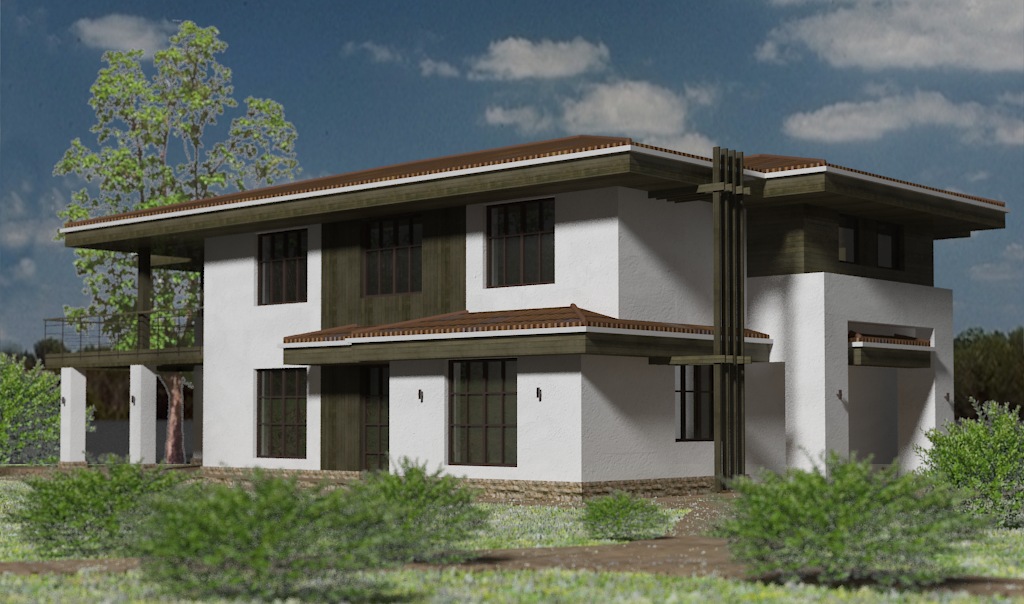
The free and flexible form of the facades on the side of the pond, together with the landscape of the site, should create the image of a modern, but still “country” house, a little in the ethno-style - a kind of Ukrainian Provence. With the appropriate coloring - the material of the walls and roof should not be glamorous, but in an “ethnic” character. Most likely, white non-light plaster walls. Possibly “aged” clay tiles on the roof. The wooden structural elements are made of dark, also “time-beaten” wood….
But... he won't be like that.
Because just at this moment our stylistic concept of the house changed. Customers saw “ Prairie Houses” (F. L. Wright), and the house can no longer be imagined outside of this style.
And we start working on the form from scratch, removing everything that distinguishes the project from the Prairie House style, and adding some of their characteristic features.
 The free form of the facades in the new version has been straightened (and simplified), the roof has become stricter and “more southerly” - its overhangs extend far beyond the walls, covering the second floor windows from the midday sun in summer.
The new, second version of the solution is more recognizable thanks to the organic architecture that is relevant today and the works of F. L. Wright.
The plans, like the form, also became simpler. And they went through an evolutionary path from a protruding staircase to a flat street facade, with many variations of floor plans.


The last change was that the furnace room on the ground floor moved outwards and created a protruding part on the façade. Trellis were added to the facades (wooden slats that serve as a vertical base for climbing plants).


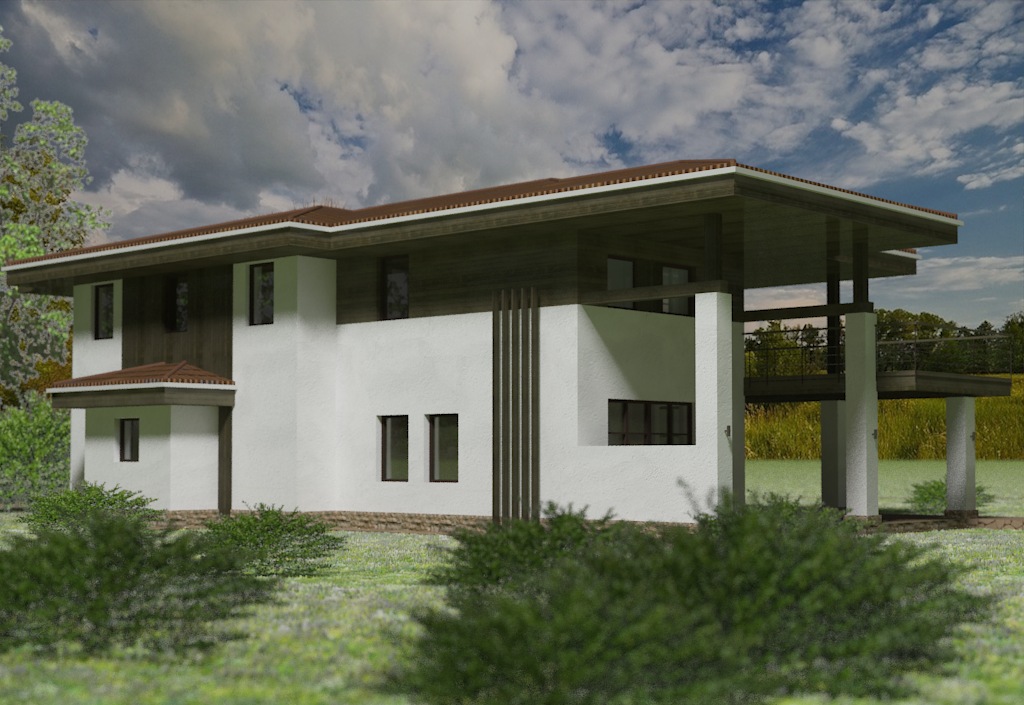
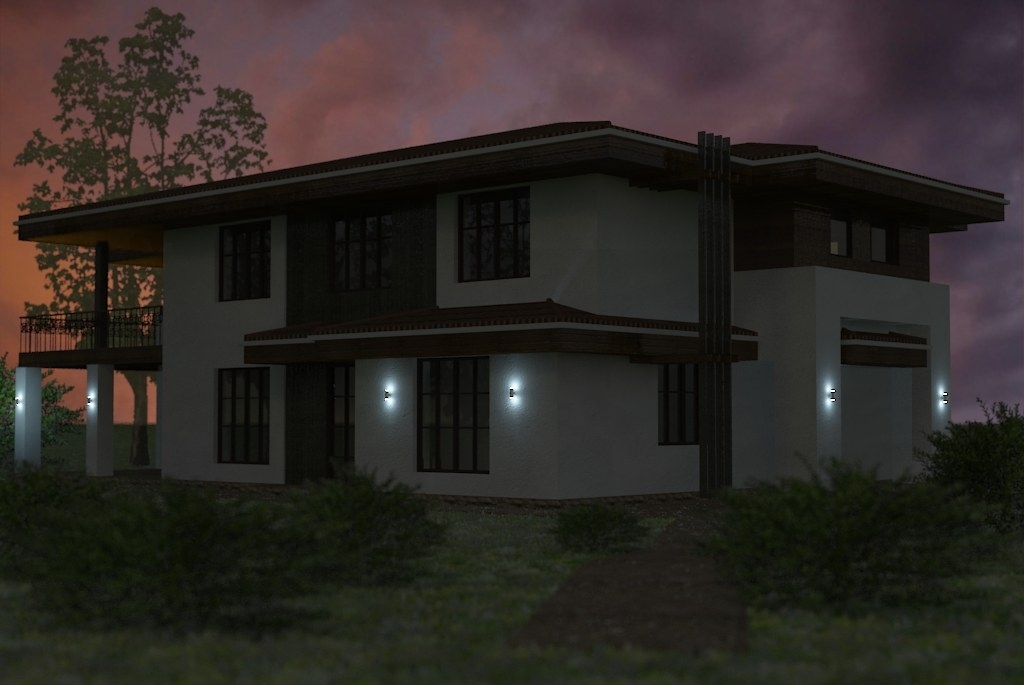
This is what the building will look like in its final form:


The final stage of work on the draft stage of the project is the selection of materials for finishing the facades (on a three-dimensional photorealistic model).


From this moment, the development of the project begins - a long and not so exciting process of painstaking work.
The construction of even the smallest house begins with design. A project prepared on paper will allow you to plan the area of construction, the number of rooms, windows and doors, as well as calculate the cost of work and the amount of materials needed.
When planning to build a house, you can turn to specialized companies for help, order a project, choose a suitable one from among ready-made ones, or independently develop a plan for a new home.

It is more rational to create a house project with your own hands when everything construction works planned to be performed without outside assistance.

The first stage is planning
The first stage of project development involves general planning of the future house, its size, purpose, the presence of a garage or other additional buildings, as well as the geographical features of the site, the presence or absence of a sewerage and water supply system.
Stage two - sketches
At the second step, all conditions and desires are taken into account and assembled into a certain model of a house with a certain number of floors and rooms.

The preliminary design has the character of a sketch and depicts the future of the building from different sides: facade, side, rear and section (transverse and longitudinal).

It also provides a list of materials used, as well as the design features of the house: type of roof, thickness of walls and ceilings.

Before you start your own house project, it is better to carefully study the photo ready-made plans to gain ideas and experience.

Third stage - work plan
The working draft serves as a guide for construction crew and involves a complete description of all the work envisaged for the construction of a house: architectural, structural, engineering and design.
In an architectural project, the location of all premises, their area, the presence of balconies or terraces, the size of windows and doors, the slope of the roof, and the thickness of the walls are outlined and drawn.
Important! Glazing and finishing of balconies can be ordered by low prices on the website viploggias.ru. "Modern Balcony" is a company with many years of experience.

The constructive type of project involves a detailed consideration of each element of the house from the foundation, walls and ceilings to the chimney, stairs and rafters. For example, a complete decoding of the characteristics of the windows is attached, where the profile width, type of lining, number of layers of double-glazed windows, and the presence of a window sill are noted.

Engineering design is aimed at drawing up detailed plan performing work on establishing sewerage, water supply, ventilation, heating, electrical wiring, grounding and security systems.

The design project makes final adjustments to the construction of the house. At this stage, the color scheme of the facade, walls, roof and interior decoration of the room is finally determined.
Project of a house made of timber
Most often, economical, strong and durable wood is chosen as the main material for construction.

However, the project of a private house made of timber requires compliance with certain conditions:

- If timber more than 6 m is required for construction, then additional insulation of the joints of the logs will be required;
- The joints are placed in a checkerboard pattern;
- The number of corners must be even;
- Particular attention must be paid to proper load distribution;
- Log partitions are placed only above load-bearing walls or on additional pillars.
Brick house project
The design of a brick house must necessarily include an assessment financial opportunities, since this type of construction is expensive and requires the creation of a strong and costly foundation.

Note!

When building brick houses, other features of the material should be taken into account: the use of clay bricks on the lower floors, double waterproofing in the bathroom, wall reinforcement for greater strength, strict adherence to horizontal masonry, laying out window and door openings with a quarter.

Project with a terrace
Correct and competent addition of a terrace to a house also requires a separate project. When compiling it, it is necessary to take into account its structure, location, degree of openness, shape and presence of steps.
Most often, a terrace is located near one of the walls of the house or encircles the entire building, less often it is installed separately from a residential building or adjacent to a swimming pool.

As in the house design, the terrace plan must indicate the area, dimensions, materials, weight of the structure and type of foundation.

How to complete a DIY home project?
You need to stock up on paper, a ruler and a pencil and try to depict your future home in detail.

Ready-made ones posted on the Internet will serve as guides and assistants. standard projects, adding and expanding which you can get the ideal plan for a new building.
Note!


DIY house project photo


Note!


People rarely think about how important it is to correctly draw up a preliminary design of the intended object. But any construction should begin precisely from this stage. Moreover, by the time the first brick or log is delivered to the construction site, the sketch must already be agreed upon, developed and approved.
After all, without it, the customer (that is, you) will not be able to get a correct idea of what the completed building will look like. But this should be represented not only by you, but also by the builders who will carry out the entire work process. Therefore, it is worth taking this issue seriously, understanding it down to the smallest detail.
To begin with, a preliminary design of a house is a set of primary documents that is necessary to
And also correctly compile all the documentation used directly in this case. Having a sketch of the house in hand, you can easily formulate your requirements when communicating with the designers who will develop it.
How is it compiled
You are contacting a company that provides . First of all, after concluding the contract, you talk with the architect.
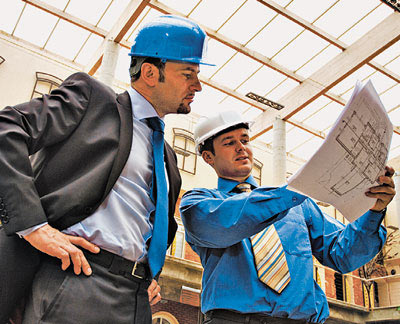
An experienced specialist will ask you in a simple and accessible way about exactly what the house you would like to get should look like. Perhaps you will bring photographs of buildings that would fully suit you. But it is possible that you will have certain wishes: change the shape and location of the windows, use a tiled roof instead of a slate one, and a number of other minor changes.
All these wishes will be taken into account by the architect, who, after talking with you, will begin work.
For an experienced specialist, developing a preliminary design will take no more than a few days.
After this, you will be presented with a set of diagrams and color illustrations, allowing you to fully appreciate the external and internal view future home. Yes, some may wonder why you need to draw up a project practically from scratch if you already know what your house will look like.
 Sample house plan
 After all, this will take a lot of money and time. And yet, drawing up a sketch is not at all a trick of specialists who want to take up your time and extract extra money from you. After all, any changes in appearance buildings, even the smallest ones, can seriously affect its entire structure.
The simplest example: have you decided to enlarge the window? This means that the load on the entire window opening will increase significantly. And he will definitely need to be strengthened so that he can withstand it without harm to himself. Do you want to use ceramic tiles instead of metal tiles? This means that the rafters will have to be strengthened so that they can withstand the significantly increased load.
Of course, it is simply impossible to carry out all these calculations by eye, without drawing up a special sketch or project. In addition, the finished sketch allows you to fairly accurately determine the complexity of the work and the amount of materials required. And, therefore, you will be told the price of the house.
Read also
How to make at home gym
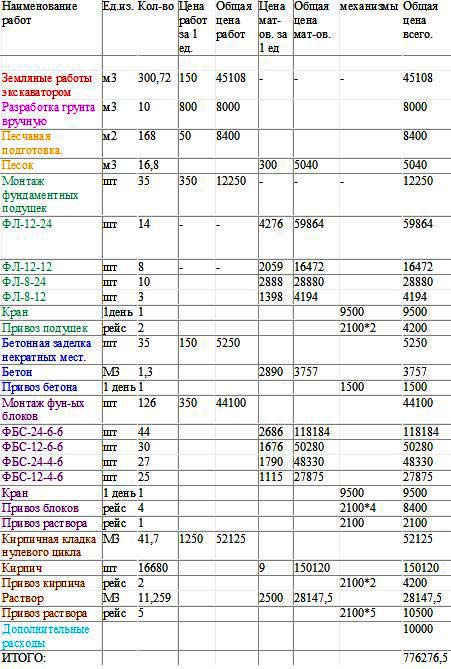 Example of estimate for materials
 Moreover, specialists will be able to calculate for you separately the cost of construction and finishing materials, as well as the cost of the work carried out. And this is very important. Perhaps no reasonable person would agree to start building a country cottage without knowing exactly how much it will cost him.
The sketch necessarily contains a number of illustrations by which you can evaluate your future home from the inside and outside.
Using the latest architectural programs allows you to make the sketch as visual as possible.
You just have to decide whether all your requirements were taken into account during construction, or whether you would like to make additional changes, achieving maximum compliance with the plans that you have in mind.
What is needed to conclude a contract for drawing up a sketch?
Developing a sketch is a very difficult and responsible job. Of course, it is carried out only after concluding an agreement with the company. And for this you will need to collect the following documents:
- Technical specifications for design. Here it is necessary to writing present your requirements that the future object must meet;
- Urban planning plan for a plot of land;
- Geodetic survey of a land plot (scale 1:500);
- Certificate that the existing footage is suitable for use.
When these documents are collected, you can safely go to sign the contract for the provision of services. Immediately after this, you will be directed to the architect-designer to coordinate all the work. Having received everything from you necessary information(in addition to technical specifications), he begins to develop a sketch.
 House sketch example
 It is worth saying that creating a sketch is a very difficult and important stage. From the outside it may seem that everything here is quite easy and simple: every person can live in the way he would like to live. However, drawing up and drawing a sketch with your own hands very often leads to sad consequences. Still, the finished illustrations that are shown to you along with the sketch are just the tip of the iceberg. And the gigantic amount of work done remains in the drawings, which will tell little to a person not related to construction.
Indeed, in order to draw up a sketch, a specialist carries out a series of calculations, which are later used to develop a project according to which construction will be carried out. And a non-professional will hardly be able to do all the work with the same quality, guaranteeing the integrity and durability of the structure, as a specialist who has gotten his hands on this over many years of work.
 house design example
 To more clearly explain how many factors have to be taken into account when developing a preliminary design of a building, it is worth listing the main ones.
Location on the site
Locating housing on plot of land, it is necessary to comply with a number of sanitary and fire safety, as well as building standards. The distance from the house to the border of the neighboring plot must be no less than the established minimum. It is also necessary to correctly orient the house relative to the cardinal directions. Technical rooms are best located on the north side, while residential rooms should be placed on the south.
Of course, the house should fit gracefully into the surrounding landscape, and not stand out from it.
When drawing up a master plan for a site, an experienced architect will successfully place on it not only the house itself, but also all the buildings that the owner of the site considers necessary. This could be a number of other buildings.
It might be useful to read:
- Therapeutic tales When Baba Yaga was a girl;
- Scenario of a festive game program, material on the topic;
- Thesis work is a means of developing psychological readiness for choosing a profession among high school students. Readiness of schoolchildren to choose a profession.;
- Bogomolov “Pronunciation disorders in children”;
- Personal aircraft;
- Thesis on the topic "analysis of personnel planning at the enterprise" Analysis of personnel planning at the enterprise;
- Presentation "Tailed" (6th grade) in biology - project, report Who are axolotls;
- Presentation on the topic "appeal";