Firebird made from maple leaves. Crafts from autumn leaves with preschoolers. Birdie. Pictures and applications from the leaves "Animals"
Bird crafts have always been very popular among lovers of home art. Figures of feathered creatures are especially relevant on Bird Day, which is celebrated in the spring of April 1 in kindergartens and schools. The holiday is dedicated to the return of migratory birds and marks the onset of spring and the renewal of awakened nature. On this day, children of all ages make bird crafts, and older schoolchildren make birdhouses and hang them on trees.
Bird crafts can be made from a wide variety of materials: cotton pads, colored paper, plastic bottles, salt dough, natural and any materials at hand. There are many options for creating birds - from simple ones for young children to complex ones, which schoolchildren can easily master, resorting to the help of adults.
We bring to your attention a few lessons on how to create birds with your own hands. step by step instructions, diagrams and tips. We hope that they will help you learn all the intricacies of this exciting process and be filled with new bright ideas.

We will need: plastic bottles of various colors, polystyrene, a wooden block as a stand, a metal rod, foil and thin colored plastic, a glue gun.

Step one, Cut out the body of the peacock together with the head from the foam, not forgetting to make small indentations in place of the eyes. We attach it to a wooden block with a metal rod, which plays the role of legs.

Step two. We make enough peacock feathers from plastic bottles of different colors. We need three types of feathers: long for the tail, short for the neck and slightly longer for the body. To do this, cut off the bottom and neck of the bottle and cut it lengthwise into 3 parts.
We round off one end of each strip with scissors and cut its edges into thin stripes so that it looks like a bird's feather. We decorate the rounded end of the feathers intended for the tail with two or three multi-colored ovals made of foil and plastic. You can attach them using a stapler.


Step three. Cut out the beak from the red plastic bottle and fasten it in place. Next, step by step, using a glue gun, we glue the feathers on the body of the bird, starting with the tail and ending with the neck. We attach the feathers with a little overlap, as shown in the photo. Do not forget that medium-length feathers are intended for the body, and gentle ones - for the neck.

Step four. We cut out a crest of any shape from colored plastic, which our imagination prompts, and glue it on the head. Using acrylic paints, we draw the eyes of the peacock. You can glue eyelashes cut from a clear plastic bottle to them.

Step five. We start making the tail, using an abrasive mesh for this. We make holes at the base of the feathers and attach them to the mesh using a thin wire.
We start making the tail from the end, gradually laying the feathers on top of each other in rows, until the luxurious is fully formed long tail birds. After that, we attach it to the body and put a peacock, made with our own hands from plastic bottles, on an area among flowers and greenery.
Do-it-yourself salt dough firebird - master class

For Bird Day, together with children, you can make a voluminous firebird from salt dough. The work will take little time, require very few materials and will provide the children with a cheerful and festive mood.
We need: salted dough, gouache or watercolors, colorless varnish.

Step one. Making salted dough. To do this, mix a glass of flour with a glass of salt and knead the dough by pouring 100 ml of brewed starch into it. We prepare it as follows: dilute a tablespoon of starch in 100 ml of cold water and pour a glass of boiling water into this mixture.

Step two. Divide the salted dough into 5 pieces and paint them in different colors. To do this, add gouache or watercolors to each piece and knead it slightly again. Next, we draw a sketch of a firebird and sculpt the details of the bird on it: wings and a body. Dry them in the oven at a low temperature.

Step three. We make the tail fairy bird... We draw stencils of feathers and sculpt them from pink and blue salted dough on them. Dry the feathers in the oven. Next, we paint all the details of the bird with paints, cover it with colorless varnish, and connect. We decorate a colorful festive panel with crafts. The salted dough firebird is ready!
Birds from cotton pads - master class

Another very cute craft that is perfect for decoration kindergarten on a wonderful holiday Bird Day. It's easy, fun, and fast. Young children can be involved in making birds from cotton pads.
For creativity we need: cotton pads, wooden skewers, colored paper, narrow colored ribbons, plastic eyes, glue and scissors.
Operating procedure:
- We take 5 cotton pads to create one bird. We cut one disk into two halves, and leave four whole.
- We fix two pairs of cotton pads on the skewer with glue so that it is inside. One pair of discs plays the role of the bird's head, and the other - the body.
- We glue the halves of the cut cotton pad to the body on both sides - these will be our wings.
- We glue the eyes and beak cut from a piece of colored paper to the head, and decorate the bird with a ribbon. A cute baby bird from cotton pads is ready for Bird Day!
Colored paper owl - master class

You can make cute owls for celebrating Bird Day at school with your own hands from colored paper. We will need directly colored paper itself, scissors, double-sided tape and glue.
Operating procedure:
- We make a cylinder from a sheet of colored paper, glue its edges on one side, as shown in the photo, and press the middle so that ears are obtained.
- Cut out a heart out of paper and glue it to the bottom of the cylinder - these are the legs of an owl.
- We cut circles of the same size and glue them on the central part of the cylinder as plumage. In order for the circles to add volume to the craft, it is better to stick them with double-sided tape.
- Cut out a triangle in the same color as the legs, and glue it in the upper part of the plumage - this is the beak.
- Last of all, we glue the eyes by cutting out circles for them from black and white paper. The do-it-yourself owl is ready!
Do-it-yourself bird of paradise made of polymer clay - master class

Delightful birds of paradise are made from polymer clay that hardens in the air. This modern material we are also familiar with the names "self-hardening plasticine", "mass for modeling" and "velvet plastic". To make charming feathered creatures, we need an aluminum wire with a diameter of 1 mm, polymer clay, foil, scissors, round-nose pliers, a stack, a glass for rolling out clay, a little patience and diligence.


Operating procedure:
- We create three birds at once - while we sculpt one, the rest dry up. Cut a wire twice as long as the planned tail. We wrap half of the wire with foil, crushing it and forming the body of the bird.
- We make paws from wire, as shown in the photo, and insert them into the body. We take a piece of clay, shape it in the shape of a sausage, then roll it out and flatten it. Carefully take out the wire from the bird, place it inside the clay sausage, rolling it up with a glass. Insert the finished colored ponytail back into the body. In the same way, we make the blanks for the other two birds.
- We take a piece of blue, yellow and red clay, roll them out and gradually, smearing them with our fingers, stick them around the birds until all the foil is covered. We will have three blanks of bright birds.
- Starting from the center, we stick around the legs. Then we take a piece of clay of the corresponding color and make the cheeks, crown and beak. We sculpt eyes from balls of black clay, not forgetting to squeeze the upper and lower eyelids around them with a stack.
- Create a ponytail and a tuft. To do this, we cut off several wires of the desired length and roll them into clay. When it is dry, round off the tips with round nose pliers and insert the tail details into the bird's body. We make shorter feathers from thin clay sausages by twisting the ends.
- We make the plumage effect by putting pieces of clay rolled out in the form of droplets on the body and working with a needle in the direction of feather growth. With the help of a needle, we make feathering all over the bird's body. For shine, the peephole can be varnished. The wonderful DIY bird of paradise is ready!
More ideas and schemes for crafts birds from various materials
For needlewomen who are familiar with the isothreading technique, it will not be difficult to create pictures with beautiful white swans with their own hands and decorate a holiday with them, dedicated to the Day birds. Threads for creativity are better to take floss or iris. Draw a swan on the seamy side of the cardboard and draw waves. Divide the drawing into details, drawing shapes of different sizes, and embroider using the isothread technique.


A very charming feathered creature is obtained from woolen threads. You can easily create it with your own hands according to a simple and understandable scheme.
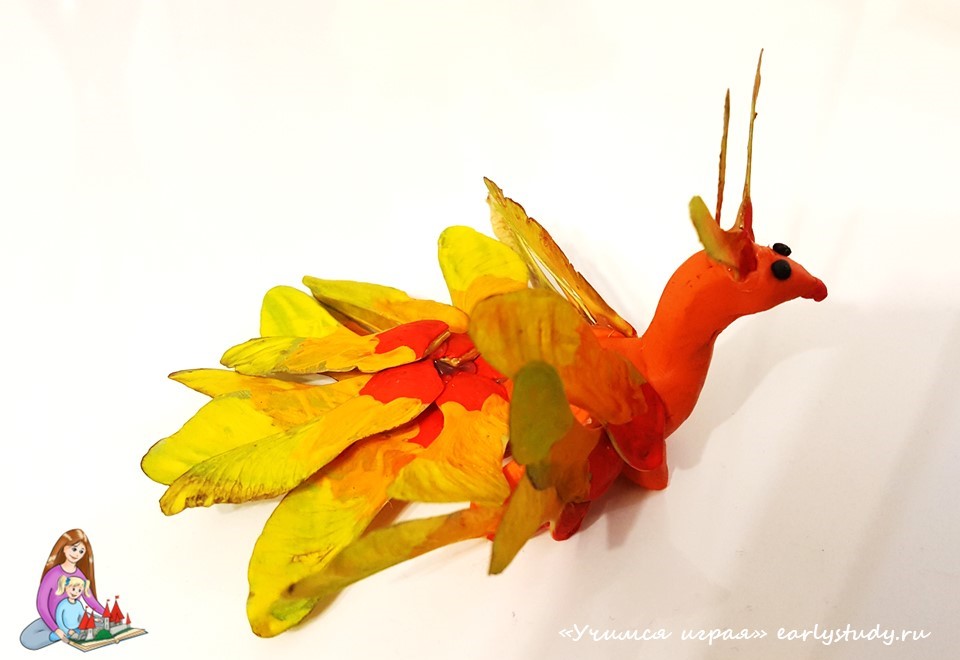
Hello dear readers, guests, friends. One of these days, Dasha's school (she is in the third grade) will host a competition "Cartoon heroes of their natural material". The children had to choose a cartoon character whom they would bring to life from natural material. Dasha's first reaction was to make a hunchbacked horse, but after thinking it over, she decided to revive the Firebird.
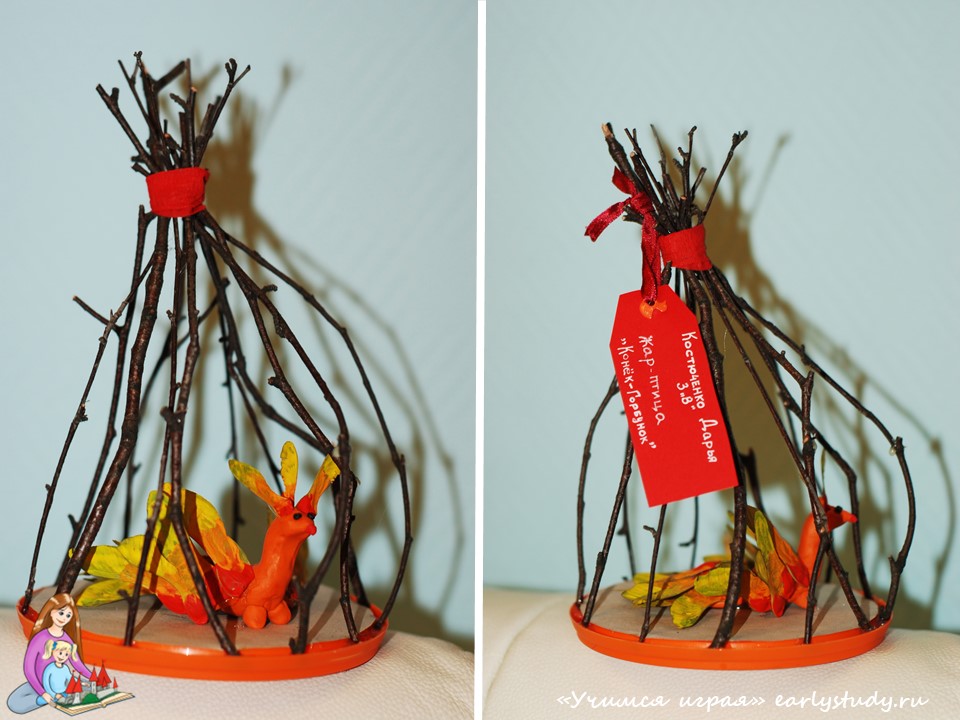
The image and scheme of work were born to her immediately. But she really wanted to make not just a bird, but in connection with some kind of background. I offered to put her in a cage, because it was in it that the bird lived in the royal court after it was caught by Ivan with a horse.
How was the bird born?
Materials:
- Plasticine
- Maple Helicopters
- Paints
- Glue gun
- Ice cream bucket lid
- Twigs
- Colored paper
- Ribbon

Progress:
- Paint helicopters in yellow-orange-yellow tones
- Mold the bird base from orange plasticine
- Make her a beak and eyes
- Using a glue gun, fix on the basis of the helicopter
- Cut a circle out of colored paper corresponding to the size of the lid from the bucket
- Stick the paper to the lid
- Glue the bird in the center of the lid
- Glue the branches around the lid and use a black elastic band (which we use to weave bracelets) to fix the branches at one point at the top
- Braid around the elastic with a ribbon
Do-it-yourself firebird: a step-by-step master class for children on making panels from natural materials.
DIY firebird
DIY materials and tools for making the Firebird craft
We need to make the Firebird:
- Colored cardboard
- Firebird stencil for applique (you can draw yourself or download ready-made)
- Plasticine
- Natural materials.
We used natural materials in the application of the Firebird:
- ash seeds,
- flax seeds,
- buckwheat,
- bird feathers.
You can use whatever you see fit in making the craft. For example, make your firebird only from cereals or only from seeds.
How to make a firebird from natural materials with your own hands: a step-by-step description
The Firebird is made in mixed media with plasticine elements and applique using a ready-made stencil.
How to do it with children:
Step 1. Apply the firebird stencil to the colored cardboard, outline it.

Step 2. Fill the template with plasticine. To do this, we tear off small pieces of plasticine and form small balls. Spread the balls with a stack or fingers on the cardboard, filling the firebird template thin layer plasticine. We try not to go beyond the boundaries of the picture so as not to leave stains.
Step 3. Glue the ash seeds on the silhouette of the firebird, starting from the tail. We form the wings. The bird's body can be decorated with seeds or cereals. Willow leaves can be used together with ash seeds, they are also thin. The panel is ready!


The second option for making a firebird with your own hands
Another option for making a very original volumetric 3d crafts "Firebird" with your own hands together with children from natural materials you will learn from the master class
We wish you pleasant moments of creativity and inspiration! Until we meet again at the "Native Path"!
The author of the master class: This work was sent to our contest "Autumn Workshop" by a reader of "Native Path", a teacher additional education Tsvetkova Natalia Chavdarovna ( Vologodskaya Oblast, Cherepovets). The article contains photographs of handicrafts made by children of 7-9 years old from the studio of Natalia Chavdarovna: the association "The World Around Us" MBOU DOD "Palace of Children and Youth Creativity named after A.A. Alekseeva.
Yet interesting ideas for crafts with children you will find in the headings:
Children can easily be carried away with something new and interesting. If the child is already bored of drawing or modeling, you can invite him to start making crafts from bright autumn leaves... This process is extremely exciting - amazing things are born from simple dried leaves with the help of glue, threads and other improvised devices. Having engaged in applications or making vases and bouquets, the child will not only be able to develop his creative skills and imagination, but also get to know better environment... The joint collection of herbarium for crafts is an excellent reason to teach a child to distinguish different breeds trees. So what can be made from leaves?
Preparing leaves for crafts
To make any craft from leaves, only well-dried material is needed; fresh leaves will not work. It takes a long time to prepare the leaves, so you have to be patient. In addition, you need to dry the material correctly, here are the basic rules:
- If the evenness of the leaves is not important for the craft, they can be placed in a spacious container (for example, a large wicker basket) and left in the fresh air. This will dry the leaves quickly and allow air circulation to prevent mold from developing.
- To get perfectly smooth leaves, you need to lay them between book pages or album sheets under pressure. Spread the material neatly between the sheets of books or scrapbooks. It will take at least 14 days for the material to dry completely and be ready for use.
- If you do not want to wait long, you can use a special herbarium press. To do this, fold a stack of leaves, alternating each layer with newsprint or unwanted sheets. In a few days, the craft material will be ready.

How to make skeleton leaves
Due to their lightness and transparency, leaf skeletons look very impressive as a decor. To achieve this effect, you need to resort to a special technique - skeletonization.
What you need:
- any fresh leaves;
- soda;
- dye for eggs;
- small capacity - ladle or saucepan;
- Toothbrush;
- paper napkins.

How to make skeletonized leaves:
- Mix baking soda with water in proportions 1 to 4 and put the leaves in the prepared solution so that they are completely hidden by the water.
- Bring the mixture to a boil and simmer for 30 minutes.
- Remove the saucepan from the stove and remove the leaves, carefully spread them on the table, glossy side up.
- Remove excess moisture with napkins.
- Brush off the pulp from the leaf (this must be done very carefully, the leaves are quite fragile).
- Rinse the skeleton under water and then paint it the desired color.
- Leave the painted skeletonized leaves to dry.
The resulting material is ready to use.

Bouquet of flowers from leaves
A bouquet is the simplest thing that can be made from leaves, and it is worth starting with it if the child has not previously done such crafts. To make crafts in the form of a home bouquet, it is not necessary to use real flowers, dry them, etc. Buds can be made from colorful leaves collected during a walk. Get the kids involved in every step of the process by creating a true creative workshop.
What you need to make crafts:
- maple leaves (fresh) with stems;
- a spool of sturdy thread.
To make a bud from maple leaves, you need to do several things:
- Take one sheet first and fold it with the glossy side out.
- Roll the sheet into a tube.
- Fold the next sheet in half and wrap it around the straw.
- Continue wrapping the leaves around the bud until the flower is lush enough.
- Wrap the thread around the base of the bud to keep the flower from falling apart.
Using this method, you can make any number of flowers, which are then simply collected in a bouquet.


Topiary can be made from a wide variety of materials. You can often find crafts made from coffee, banknotes, sweets, hearts, etc. This version of topiary involves the use of maple leaves.
So, what is required for topiary:
- pot;
- wooden stick for the trunk;
- a ball of foam rubber or foam as a base;
- gypsum;
- dye;
- hot glue;
- elements for decoration.
The procedure for creating an autumn topiary looks like this:
- The stick must be inserted into the pot and secured tightly with plaster mortar. As a result, the structure will be strong and stable.
- Paint the pot and stick in a color you like, for example, gold to match the leaves.
- We fix a ball of foam rubber on the top of the stick - this is the future crown of the tree.
- Place the required number of leaves into the balloon. For decoration, you can use bunches of berries, ribbons, beads, as well as artificial twigs and flowers.To make the stems of the leaves more durable, they must first be soaked in a hot solution of glycerin (1 to 2) and left in this form for 10 days in a dark cool place ...
- Next, decorate the trunk and soil of the tree with dry moss, bark, beads.


How to make a decorative fall wreath
A beautiful wreath can be weaved from bright autumn leaves to decorate windows, doors, walls, etc. A wreath attached to front door, will delight not only you, but also your guests.
What is needed for the craft:
- flexible branches of any tree;
- dried leaves of different colors (contrasting combinations, for example, yellow and red, look best);
- clusters of red berries (mountain ash, viburnum, etc.);
- physalis;
- glue;
- a spool of durable threads;
- decorative metallized threads;
- small figurines of birds for bouquets.
How to weave a wreath:
- The branches will serve as a frame - make a round or oval wreath out of them.
- For strength, fasten the structure with a thread in several places.
- Wrap the frame tightly with gold thread, leaving small branches free.
- Glue the leaves to the branches.
- Attach the berry bunches with thread.
- Glue or wrap with Physalis threads.
- Finally, attach the birds to the wreath.
A ready-made leaf craft in the form of a wreath can be hung anywhere in the house, it will delight you with its beauty for a long time and remind you of the most colorful time of the year.


Beautiful autumn leaves can be used not only for simple children's crafts, but also for full interior decoration. One of these items is a fruit vase.
To make such a vase, you need:
- glue and brush;
- inflatable ball;
- petrolatum;
- scissors;
- maple leaves.
Step-by-step instructions:
- Inflate the balloon to the size you want.
- Lubricate the surface of the ball with petroleum jelly, this is necessary so that the leaves do not stick to it in the process and easily separate from it.
- Fix the ball in a stationary state, so it will be more convenient for you to tinker with your vase.
- Glue the maple leaves to the ball, after having liberally greased them with glue.
- To keep the vase strong enough, you need several layers of maple leaves.
- As soon as the last layer is completed, once again carefully coat the product with glue and leave for 3 days.
- Burst or deflate the balloon, remove its remnants from the product.
The original interior decoration is ready.


Photo frame in autumn style
Kids love to decorate the walls of their room with their own drawings and favorite photos. This craft from leaves in the form of a frame is perfect to complement the design of the room. Help your child decorate the frame with autumn leaves, where he will then place his favorite photo.
For crafts you need:
- thick cardboard;
- glue;
- leaves that you like;
- pencil;
- scissors.
How to make a frame:
- Cut out a square or rectangular frame of the desired size from cardboard. The center of the frame, where the photo will be placed, needs to be cut out slightly smaller than the photo size.
- To wrap the leaves around the frame, soak them in hot water beforehand, so they become softer and won't rip or break in the process.
- Glue the leaves onto the frame.
- Wait for the product to dry.
When the frame is ready, insert a photo into it, securing it with glue or tape.

Autumn Leaves Appliques
Appliques are one of the simplest types of handicrafts made from dried leaves. Using leaves of different shapes and sizes, you can create real paintings, which will later become a decoration of your home. You can make a whole series of panels, united by a common theme. It can be animals, landscapes, etc. Several small master classes on making appliques in the form of an owl, a Firebird, a fish and a lion will be presented.
Owl
To make an owl applique, you will need:
- small leaves of brown tones (for this you can use oak, willow, birch);
- colored paper;
- a small twig of thuja;
- a sheet of cardboard;
- a bunch of rowan berries;
- any branch of a tree;
- glue.
Before starting work, the leaves and berries must be dried. Once all the materials are ready, it's time to start the most important thing:
- Cut an owl out of cardboard along the outline.
- Birch or oak leaves will represent the ears and legs of an owl, glue them in the right places.
- Use long, narrow willow leaves for the feathers.
- Cut out the eyes and beak from colored paper and glue them.
- Glue your owl to a tree branch for a craft stand.
For additional decor, you can use moss or thuja twigs. You can also use mountain ash as owl paws. The product is ready.


Firebird
For the application with the Firebird you will need:
- paper;
- linden, birch and rosehip leaves;
- pumpkin seeds;
- thuja twigs.
And here's what the process itself looks like:
- A linden leaf is glued to the place where the bird's body will be.
- Birch leaf - head.
- Rosehip leaves are glued individually on the tail.
- Whole rosehip branches will serve as an additional decoration for the tail.
- Glue the birch leaves to the body, these will be the wings.
- Pumpkin seeds are used to make eyes, as well as decorations for the body and tail of the Firebird.
- The final stage- a tuft of a twig of a thuja or any other suitable plant.
The firebird is ready.

a lion
Children love different animals, so it will be especially interesting for them to make one of the familiar animals.
What you need for a lion cub:
- rounded yellow lime leaves;
- black felt-tip pen;
- ash seeds;
- horse chestnut (nuts);
- glue;
- small pine branch;
- scissors;
- a sheet of yellow paper;
- sheet of orange cardboard.
Having collected all the necessary material, it's time to start making crafts:
- Draw a lion's head on yellow paper or print the image on a printer, cut it along the contour.
- For the mane, use linden leaves by gluing them around the head.
- Draw the lion's nose and glue the chestnut in its place.
- The pine needles will go to the mustache.
- The ash seed will represent the tongue.
Once the craft is dry, it will be completely ready.

Small fish
What child doesn't know about a wish-granting goldfish? Making crafts with your own hands will be very entertaining for the kid.
To make a fish craft, you will need:
- dry leaves of quince and linden, brown and yellow, respectively;
- glue;
- marker;
- ash seeds;
- acorns;
- scissors for paper;
- sheet of blue paper.
How to do:
- Draw the outline of the fish on blue paper and cut it out.
- Make scales from linden leaves and glue them to the body of the fish.
- Use brown quince leaves to decorate the tail.
- Draw the outline of the fish's head with acorn caps.
Everything, real gold fish ready.

Colored leaves delight the eye every fall, falling to the ground. This beauty quickly fades under the rains, turning the leaves into a solid brown mass. However, there is a way to preserve the beauty and brightness of autumn leaves - dry them or skeletonize them and use them to make various gizmos from children's crafts to interior decorations. This activity will appeal to both children and adults.
75 photos of craft ideas from leaves


Autumn is not only cloudy days, raindrops that constantly drum on the windows and the roof, but also the time for bright colorful landscapes. During a normal walk. which takes place in a city park or public garden, it is easy to collect a whole collection of materials of various sizes, shapes and colors (yellow, brown, green, red, orange), with the help of which craftswomen, and even children, create crafts from tree leaves with their own hands for a gift or home decoration, interior decoration, school exhibitions, presentations for teacher's day or autumn holiday.
Step-by-step instructions for making tree leaves for kids
The variety of forms, and with them the stunning colors of autumn leaves, give the chance to create many compositions, ekiban, herbariums, appliques and crafts. If we talk about plots, then birds, signs of the Zodiac are considered popular, fabulous creatures, animals, decorative items and ornaments. It is especially interesting to involve a child in such creativity, because the creation of masterpieces develops his imagination and creative potential. Use the following step-by-step instructions to teach your child how to create interesting crafts with your own hands.
Volumetric applique Owl from birch leaves
To create an owl, birch leaves are best suited, they are small in size, have an even outline, due to which they easily fit into the drawing, making it voluminous.
Necessary materials and tools:
- album sheet of white cardboard;
- stationery scissors;
- birch leaves;
- simple pencil;
- black buttons or toy eyes;
- PVA glue;
- 1 sheet of white, black, red paper.
Step by step execution:
- First, draw on cardboard or print the silhouette of a future owl on a printer.
- Next, carefully cut out the cardboard bird.
- Visually divide the owl into horizontal rows, alternately apply glue to each and lay the leaves. It is recommended to start gluing the sheets from the bottom row, gradually rising to the topmost one, until we completely paste over the entire owl. Lay the leaves overlapping each other.
- For the eyes, we take white paper, cut out two circles, glue it on the owl with glue. We use black buttons as pupils, which must be attached to the paper eyes with glue.
- We use red paper for the legs and beak, cut it out, glue them with glue to the owl.
Autumn craft hedgehog from cones and leaves
Not only leaves are used for crafts, other natural materials are also added to them - chestnuts, cones, acorns. Try to make a funny hedgehog with your child. Necessary materials:
- Pine cones;
- plastic bottle(0.5 or 1 liter);
- stationery knife;
- a sheet of thick cardboard;
- brown plasticine
- glue "Moment";
- two bottle caps;
- black acrylic paints.

Progress:
- It is advisable to take a bottle of dark color (brown or black), if there is none, a transparent one will do, but then it must be completely painted with acrylic paints.
- We attach the bumps to the painted bottle with glue, starting from the back of the future hedgehog. Make sure the bumps are firmly attached to the bottle. We glue the whole bottle with cones, except for the "muzzle" and "tummy" of the future animal.
- When the hedgehog's body is ready, we proceed to creating a spout - for this we glue the bottle lid with brown plasticine.
- For the peephole, we take two white bottle caps, in the center of which we draw pupils with acrylic paint.
- Glue the finished eyes to the face with glue.
- The craft is almost ready, all that remains is to decorate it. To do this, spread the moss on a piece of cardboard and put a hedgehog on it.
- Put leaves, rowan berries on the back of the animal.
Arrangement of leaves Firebird
With the help of autumn leaves, children's fairy tales can come to life in original compositions. For example, we suggest trying to create the Firebird. Required materials and tools:
- a piece of white cardboard;
- yellow and black acrylic paints;
- PVA glue;
- red and green maple leaves;
- scissors;
- birch leaves;
- stems with ash leaves;
- stems with leaves of white acacia;
- birch leaves;
- simple pencil;

Step by step execution:
- Draw a silhouette of a Firebird with a bushy tail on the cardboard, cut it out. Paint the body of the bird up to the tail with yellow acrylic, draw the eye in black. Wait for the paint to dry.
- Then we start decorating the Firebird, starting from the bottom of the tail. We put glue on a strip of cardboard tail and firmly fasten the golden ash stalks.
- With the next layer, a little higher, we glue a row of red maple leaves, row 3 - green maple leaves, fourth - birch leaves, fifth - green maple leaves, sixth - white acacia stems, seventh - birch leaves, the final row - red maple leaves.
- When the tail is ready, let's start creating the wing. Again, we begin to fasten the leaves with glue from the bottom row in the following sequence - ash stem, red maple leaf, green maple, birch leaf, maple red.
- The fabulous Firebird is ready!
Tree leaf mask
For children's party In the fall in a kindergarten or school or a masquerade ball, make an original mask with your child. You will need:
- maple leaves of different sizes;
- cardboard;
- sturdy rope, tape or elastic;
- stationery scissors;
- glue;

Step by step execution:
- Draw a blank for the mask on a cardboard sheet, cut it along the contour.
- Make small cuts along the edges of the mask and tie the thread so that in the future the product will hold well on the head.
- Glue the cardboard blank with glue and leaves. Start attaching large leaves at the edges first, and small ones in the middle.
Autumn Leaves Vase
Autumn leaves are used not only for making children's crafts, but also for decorating home interiors. We offer to make an original vase for sweets or fruits. Required tools and materials:
- PVA glue;
- balloon;
- petrolatum;
- glue brush;
- scissors;
- Maple leaves.

Step by step execution:
- We inflate the balloon to the required size, the more capacious the vase is needed, the larger the balloon will be.
- To keep the leaves well behind the ball, grease it with petroleum jelly before work.
- For convenient work, we fix our ball in any container and start making a vase.
- Apply a generous amount of glue to each maple leaf with a brush, and apply it in turn to the inflated balloon.
- Lay out several layers of leaves.
- Almost ready product once again completely coat with glue and wait until it is completely dry (48-72 hours).
- Then deflate the balloon.
Photo frame
All children love to decorate the walls of their room with photographs or hand-drawn pictures. Help place your child's favorite photo in an original handmade frame. Necessary materials:
- cardboard;
- glue;
- leaflets;
- simple pencil;
- scissors.

Step by step execution:
- Prepare a cardboard frame required size... In the middle of the frame (where the picture will be), we take a little less photograph.
- Before decorating the frame, dip the leaves in hot water, they will become soft.
- Next, using PVA glue, glue the frame with leaves.
- We put the finished craft under a stack of heavy magazines or books. We are waiting for the frame to dry.
- We insert our favorite photo into our composition, fixing it from behind with tape.
Application Lion and fish on paper from dry leaves of trees
Colorful and vibrant applications are obtained if whole leaves are used for their preparation. Children love to create different animals and birds - a bunny, a fox, a horse, a cockerel, a cat, a dog, etc. We offer to make a funny lion cub and a fish. Required materials for a lion:
- yellow linden leaves;
- black felt-tip pen or marker;
- ash seeds;
- horse chestnut fruits;
- PVA glue;
- a twig of dry pine;
- scissors;
- yellow colored paper;
- orange cardboard.
Step by step description:
- Print or draw the lion's head on yellow paper and cut it out.
- In a circle, glue the mane with glue in several rows with linden leaves.
- Use a black felt-tip pen to paint over the lion's nose and glue one chestnut to it.
- We use needles from a twig of dry pine as antennae for a lion.
- The tongue replaces the glued ash seed.
- When the product is dry, the craft is ready.

Required materials for fish:
- yellow linden leaves;
- PVA glue;
- brown quince leaves;
- marker;
- ash seeds;
- acorns;
- stationery scissors;
- blue colored paper.
Step by step description:
- Print the fish pattern on blue paper or draw with a marker and cut it out with scissors.
- Cut off a stalk from each linden leaf, use glue to attach them to the frame in the form of fish scales.
- On the tail of the applique, glue a few quince leaves with glue and decorate with ash seeds.
- Attach the acorn caps to the fish with glue along the head line. Do-it-yourself craft from tree leaves is ready!
How to dry leaves for crafts
Dry leaves are an excellent free raw material for various herbariums, applications, crafts. To keep your crafts for a long time, you need to learn how to properly dry the leaves. To do this, study the following rules:
- Collect natural material only in dry weather.
- Choose the color of the leaves yellow or green.
- pay attention to appearance leaflets. The most suitable will be smooth, beautiful and clean, without damage and blackheads.

There are several options for drying leaves. Consider each:
- Long-term and high-quality method (takes 14-30 days). Carefully align each leaf and place between the pages of a notebook, which must be placed in a large thick book. Press down on the top of the book with something heavy.
- Accelerated. If you did not have time to make the workpiece, and tomorrow you already need leaves, this method is the most suitable. Place the leaves between newspapers and iron with a warm iron 3-4 times. Then let the plants cool down and repeat the process a few more times. It is worth saying that when using this method, the plants become fragile and cannot be stored for a long time, green leaves immediately darken, and yellow ones remain bright.
- Alternative. Some craftswomen got used to harvesting leaves with a hair dryer. They argue that with this method the plants do not darken, but there is a possibility that the leaves will curl up into a tube.
It might be helpful to read:
- How scammers sell fake iPhones under the guise of real iPhones Sent a fake what to do;
- Drivers are categorized as workers;
- Syrup to strengthen the immune system (in a jar in the form of a bear);
- You are a person who wants to achieve more than others;
- How to organize an event;
- When discounts start in spring;
- Telesem magazine: getting married is unbearable;
- When is the day of a cadre worker in Russia Day of cadre workers;